Sunday 30 June 2013

Lemon Curd Swirl Cake


I made this cake for a picnic I went on yesterday; it was easy to make and travelled fairly well too. I based it partly on a recipe from Weightwatchers magazine but doubled the quantity and used different frosting.

To serve 8-10, you need:
225g butter or reduced fat margarine
150g caster sugar
4 eggs
225g self-raising flour
finely grated zest of 1 lemon
150g cream cheese
3 tbsp lemon curd

Preheat oven to 175C fan. Grease a loaf tin with cake release - or two tins if you have them. (You can either make two cakes and sandwich them together, or one big cake and slice it in half).
Cream the butter and sugar together.


Add the eggs and beat, then fold in the flour and the lemon zest.


 Spoon half the mixture into a loaf tin and repeat, or if you prefer, put all the mixture into one tin.


I baked my cake for 25 minutes then did the same again with the other half of the cake mixture. If you are making one cake with the whole mixture it will take longer to cook.


The recipe I used instructed me to mix 150g of 0% Greek yogurt with 1 tsp icing sugar to make the filling. It may have been because I was using Tesco Light Greek Yogurt but my mixture was extremely thin and runny and I didn't think I would be able to use it to fill the cake. Instead I made some cream cheese frosting using Philadelphia and icing sugar with a few drops of lemon juice.


I levelled off the top of the cake as it had risen a little too much.


Spread the cream cheese frosting on one half of the cake. I then warmed a couple of tablespoons of lemon curd in the microwave until it was runny, and swirled it through the cream cheese.


I then sandwiched the cakes together and used some of the same frosting and lemon curd on top, though I spread it in quite a thin layer as I was going to wrap the whole cake in tin foil to take to the picnic - I had quite a long way to go by public transport and on foot and had a lot to carry, so I decided this was the easiest way to transport the cake!


I'm sending this to Calendar Cakes, hosted by Rachel of DollyBakes and Laura of Laura Loves Cakes, as their theme this month is "pump up the jam" and they have asked for bakes using jam and curds. As I used lemon curd for the filling I am sending them this cake.


Saturday 29 June 2013

Moomins Summertime Cauliflower Soup


I went to Finland earlier this year, home to the Moomins - characters from a series of children's books by a Swedish-Finn illustrator and writer. The books were quite well known in the UK when I was a child, but they are obviously a much bigger deal in Finland- the small town we were staying near had a souvenir shop full of Moomin paraphernalia and the planes of the Finnish national airline even have pictures of Moomins on the tail wings.

After our trip I happened to need a new thermos flask and found a really cute Moomin flask on Ebay (see photo above). I also came across a Moomins cookery book and hinted to my boyfriend I would like it for my birthday... he duly obliged and bought me a cuddly Moomin toy as well! The other item in the picture below is a packet of Moomin tea I found in the supermarket. I'm pretty sure no Moomins were harmed in the making of it...


The first thing I made from the recipe book - which is beautifully illustrated- was "summertime cauliflower soup".

You need:
1 head cauliflower
1 small onion
1 tbsp oil
1 litre water
2 vegetable stock cubes
120g cheese
100ml cream
3 tbsp cornflour
1 clove garlic
salt, pepper
parsley to garnish

Chop the onion and crush the garlic and fry until softened


Break the cauliflower into florets and bring to the boil in the water flavoured with the stock cubes.


Chop up some cheese - I used cheddar with black pepper as I had some that needed using up, but you could use blue cheese or even soft cheese.


When the cauliflower is tender, add the cheese and stir until melted


Whisk the cornflour into the cream


Add to the saucepan, stir and simmer


You will have a soup with soft pieces of cauliflower; if you prefer you can blitz it in a blender until smooth.


Sprinkle with fresh chopped parsley to serve


This was a delicious soup, though I would say it is more a winter than a summer dish! It tasted a lot like cauliflower cheese which is something I associate more with roast dinners. I think next time I would puree the soup though it was quite nice leaving it thick as well.

This is also a very cheap dish to make and is very filling, so I'm sending it to Credit Crunch Munch, a frugal food challenge hosted by Helen at Fuss Free Flavours and Camilla at Fab Food 4 All. This month it is hosted by Anneli at Delicieux.


Friday 28 June 2013

Food from Fiction: Chronicles of Narnia Cake Pops

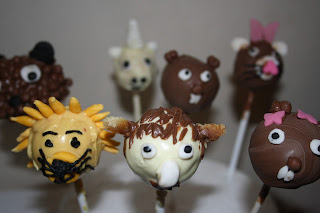
Chronicles of Narnia cake pops
Back row: Hogglestock the hedgehog, Jewel the Unicorn, Mr Beaver, Reepicheep the Mouse
Front row: Aslan, Mr Tumnus, Mrs Beaver


When I saw a competition called "Are you a Narnia cooking star?" on Chez Maximka, I knew I wanted to enter. I love the Chronicles of Narnia, and this was a competition offering the chance to appear in the Official Narnia Cookbook ebook. I've previously made Turkish Delight, inspired by the sweets the evil queen gives to Edmund in The Lion, the Witch and the Wardrobe, and I knew this time I had to go one better. The competition suggested that I could be inspired by the food, events or even characters in the CS Lewis books. I'd recently taken a class to learn how to make cake pops and decided that what I wanted to do was make cake pops representing several of the talking animals in the Chronicles of Narnia.

To make cake pops, you need to start with cake crumbs. You can either bake a plain sponge cake, let it go cold then crumble it up, or do what I did and purchase a ready made cake.


Crumble the cake into a bowl


Mix with vanilla buttercream - either make your own or Betty Crocker's ready made buttercream works really well here. You need about an 80/20 ratio of cake to buttercream.


Really knead it in with your hands until you get a pliable dough.


Roll into evenly sized balls, then put in the freezer for 20 minutes to allow them to firm up.


To dip the cake pops, Candy Melts are best as they come in every colour imaginable (I like the Wilton brand). They are easier to get hold of than they used to be, but I only came across the competition with a few days before the deadline and didn't think I would have time to order any online, and couldn't get to any of the bigger stores that stock them. If you're in the same position, or you don't want to spend the money on candy melts, you can use chocolate. I was lucky because the only colours I needed for my cake pops were white and brown.

You need to dip the cake pops completely so the best way to melt your chocolate or candy melts is in a deep narrow bowl - a mug is ideal. Here is a mug full of white chocolate:


When it melted, it only filled about half the mug, but this was still enough.


Take the cake pops out of the freezer, and dip the end of a cake pop stick (or lolly stick) into the melted chocolate, then insert into the cake pop until it goes about two thirds of the way in. Dunk the cake pop in one smooth action in the melted chocolate, then hold at a 45 degree angle and rotate, tapping gently, to allow the excess to run off.

To let the cake pops dry you need to stand them up - you can buy proper stands or you can also use a block of polystyrene or a cake dummy with holes in it.


I added a little sunflower gel food colouring to the white chocolate after I had dipped two cake pops, as I wanted one that was more orange in colour.


I then melted some chocolate candy melts and added a few drops of oil to make it a pouring consistency.


I dipped the rest of the candy melts in the chocolate. The one on the right was an experiment where I drizzled chocolate over the sunflower coloured base, but I didn't use this one in the end.


I shaped one cake pop so it was slightly more oval as this was going to be a horse's head.


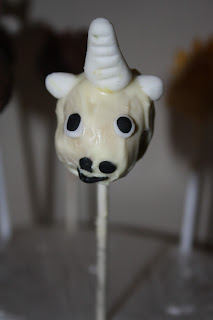
Or rather, a unicorn's head... this is Jewel the Unicorn from The Last Battle. I made a horn from white sugarpaste and also made ears, eyes, nostrils and a mouth from white and black sugarpaste. I stuck them on either while the coating of the cake pop was still wet, or used a little melted chocolate on the end of a cocktail stick.

unicorn cake pop


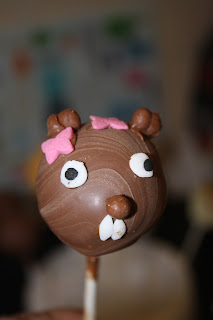
 Next I decided to make Mr and Mrs Beaver, who take the Pevensie children to Aslan in the Lion, the Witch and the Wardrobe. I had a packet of mini chocolate biscuit sprinkles and used two larger ones for the ears and a smaller one for the nose. I made the teeth and eyes from sugarpaste.

Chronicles of Narnia cake pops

I did the same for Mrs Beaver, but gave her a couple of ribbons in her hair.

Chronicles of Narnia cake pops


 Next I made Aslan. I'm not hugely happy with the way this one turned out but at least it does look like a lion. I used the cake pop I had dipped in sunflower coloured white chocolate and made tiny sausage shapes from yellow sugarpaste which I stuck all around his head to make the mane. I piped the whiskers and eyes with a small tube of Dr. Oetker writing icing.

Chronicles of Narnia cake pops

Chronicles of Narnia cake pops


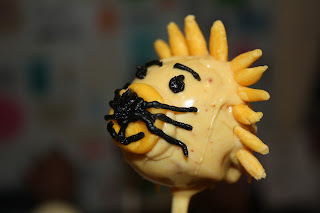
Hogglestock is a talking hedgehog who features in Prince Caspian. I was debating whether to pipe spikes onto the body then decided to use the same chocolate biscuit sprinkles I had used for the beavers' noses. While this cake pop was still wet, I plunged it straight into the bag of sprinkles.


I then gave him ears, eyes and a nose from sugarpaste. I'm not sure how much this one looks like a hedgehog...


This one I am a lot more pleased with. Say hello to Mr Tumnus the faun! I admit to using the character from the Lion, the Witch and the Wardrobe film played by James McAvoy as my inspiration here.

Chronicles of Narnia cake pops

Do you see the resemblance? OK maybe not that much....


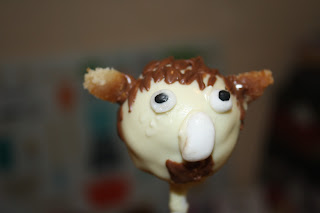
I made the nose and eyes from sugarpaste, and used a cocktail stick dipped in the melted chocolate candy melt to draw on the hair and beard. The ears are leftover crumbs of cake, as the topping of the cake I used was the right sort of brown colour.


 Finally I made Reepicheep the Mouse, from Voyage of the Dawn Treader. I found this one quite hard as the mouse didn't have that many obvious features. I used an upside down mini candy heart for the nose, which I think worked quite well, which I mounted on a circle of sugarpaste. I used the piping tube again for the whiskers. Reepicheep has two pink feathers in his hair; I didn't know how to go about this so I broke a strawberry button (like a chocolate button) in half and stuck these on his head.


Here are my Chronicles of Narnia cake pops all together.


To enter the competition, upload what you have made to this Facebook page before 1st July. Wish me luck!

Cake pops are perfect for a picnic as they are easy to eat and great fun for kids, so I am sending these to Four Seasons Food, the new blogging challenge hosted by Anneli of Delicieux and Louisa of Chez Foti, as their theme this month is picnic food.


Thursday 27 June 2013

Chocolate Mochi: Food from Fiction - Jiro Dreams of Sushi


For this month's Food 'n' Flix blogging challenge, host Camilla of Culinary Adventures with Camilla has chosen the Japanese film Jiro Dreams of Sushi; the idea is to watch the film, cook something inspired by the film and blog about it!

The film, made quite recently in 2011, is a documentary and tells the story of Jiro Ono, the 85-year old head chef at Sukiyabashi Jiro, a sushi restaurant in Tokyo that has three Michelin stars. Jiro's oldest son works with him at the restaurant, while his youngest son runs the sister restaurant. The film covers everything from their relationships, to the day-to-day working of a sushi restaurant (watching the scenes at the fish market is especially interesting), and Jiro's constant striving for perfection in the food he serves his customers.


Jiro works hard, is a perfectionist and says he doesn't like holidays; he also doesn't want to relinquish control of his restaurant to his son. He eats, lives and breaths sushi - and dreams of it. He says in the film: "I would make sushi in my dreams, I would jump out of bed with ideas." His restaurant may only seat 10 and have the toilets outside, but it has won three Michelin stars. Jiro's ethos is that every meal has to be better than the last one, and he takes pride in judging what his customers want. He even memorises seating arrangements and sends out sushi from the kitchen of different sizes - he explains that the women want smaller portions. I actually found that a little sexist, but his customers in that scene seemed to agree!


Chocolate Mochi - a Japanese dessert often served after sushi

I wasn't expecting to like this as I'm not a fan of documentaries and I thought having to read the Japanese subtitles would be a pain (the only Japanese I ever learnt was a song about a goat). But it's so much more than a documentary - the film is almost poetic, combining classical music with slow motion shots at times and I was so drawn in, I barely noticed I was reading susbtitles. I learnt a lot as well - I assumed the rice that forms the basis of many types of sushi was just standard rice, but I had no idea how much effort goes into preparing and cooking it. There is also an 'ebb and flow' to a good sushi menu in terms of the order of flavours, which was interesting. I also didn't know that sushi chefs roll around the fish in their hands to shape it or indeed that there were so many different types of sushi or ways it could be prepared.

So when I started thinking about what I could make for Food 'n' Flix, I knew immediately I didn't want to try making sushi - it's a lot harder than it looks and isn't just a case of slicing up some raw fish! I could have a go - I have seen some Groupon offers for sushi-making lessons recently and am quite keen, but have no time before the deadline of this blogging challenge. But I also felt that having watched this film, any sushi I tried to make would be an affront to Jiro! Luckily there was one other dish that immediately sprang to mind. When I went to Yo Sushi a little while ago I had a dessert called a chocolate mochi, which was a ball made of rice flour and filled with chocolate. It was delicious and so I have tried to recreate this! I found a recipe on the internet and adapted it to add cocoa powder. 
To make about half a dozen, you need:

125g plain chocolate
1 tbsp butter
1/4 cup double cream
3/4 cup glutinous rice flour
1/4 cup cocoa powder
1/4 cup caster sugar
2/3 cup water

Heat the double cream in a small pan and take off the heat before it comes to the boil. Chop the chocolate and butter and stir into the cream; keep stirring until it melts and you have a smooth sauce.


Place in the fridge for up to an hour until it has set. If it sets too hard, just allow it to come up to room temperature before you use it.


Shape into balls by rolling small amounts of the chocolate ganache between your palms. Mine had softened a little too much so I ended up making rather misshaped chunks!


I had to make a special trip to Chinatown to find glutinous rice flour, as none of my local supermarkets stocked it. Luckily I found it in the first Chinese supermarket I went to and it wasn't very expensive.


Mix 3/4 cup rice flour with 1/4 cup cocoa powder in a large glass or pyrex bowl.


Add the caster sugar and water and mix with a rubber spatula until you have a smooth batter.


Cover with cling film and microwave on high for two minutes. Uncover, stir, and recover and microwave on high for another two minutes.


You'll end up with a sticky ball of dough.


The recipe I used said to lightly dust a surface with more rice flour and carefully roll out the dough while it is still hot and cut into equal segments for each mochi piece. But I found the dough was too sticky and too difficult to handle when it was hot so I left it to cool - but this meant it was quite hard to roll out. I ended up cutting it into pieces and stretching them as much as I could.


Place one of your chocolate truffles in the centre of a small piece of rolled-out dough and shape around the truffle so you have a ball (the dough will stick to itself to seal the ball). And that's it - these are eaten cold,  or rather at room temperature.


I found these fairly similar to what I'd had at Yo Sushi in taste though they didn't look quite as good! The sticky rice dough is something of an aquired taste I would say; I found it a bit strange but it was quite nice, and the combination of the chocolate dough and the truffle in the middle is lovely.

I'm sending this to Food n'n Flix and am looking forward to seeing the roundup on Camilla's blog. And if anyone has any ideas how I can use up the rest of the bag of glutinous rice flour, please let me know!