Showing posts with label garden. Show all posts

Sunday, 28 August 2022

Woodcote Green Garden Centre Dobbies - New restaurant review

Many people don’t like change, especially when it’s something they are familiar and comfortable with.

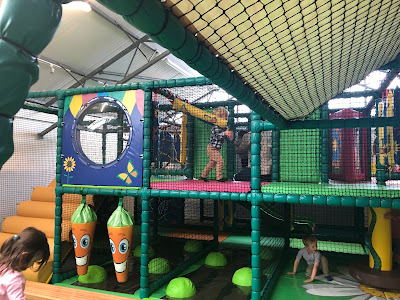
So it’s not surprising that some people were a bit dismayed when the independent Woodcote Garden Centre in Wallington was taken over by the Dobbies chain. At first nothing changed, then I saw people on local Facebook groups complain various things were different and in their opinion not as good, and they had moved the gift section to make way for soft play.

That made me sit up and take notice straight away as a mum of a (then) three year old and living very close to the garden centre. So the first weekend that the soft play was open (last summer - July 2021) I arranged a play date with my daughter’s best friend and we went to check it out. Incidentally, I have reviewed the soft play over on my other blog Mini Moo Life - I thought it was great for younger children.

In terms of the garden centre overall and some of the comments I have seen online, I would have no idea whether the quality or choice of plants was any different as I am the least green fingered person you are ever likely to meet. It did look like something was missing though as there is a huge new area selling hot tubs; I can’t remember what was there before but am sure it wasn’t hot tubs. The outside play area is still there, with a climbing frame, slide and sand pit, and inside everything has moved around but it’s hard to tell what if anything is missing, apart from the Edinburgh Woollen Mill concession which I really liked (which went when EWM went into administration). 

There seems to be a much bigger toy area than previously which is both good and bad - great for gifts (in the past I remember it being mainly wooden toys, puzzles and Schleich animals and now they have everything from Peppa Pig toys to Lego as well) but I can’t see myself taking my daughter past that section without her wanting me to buy something!

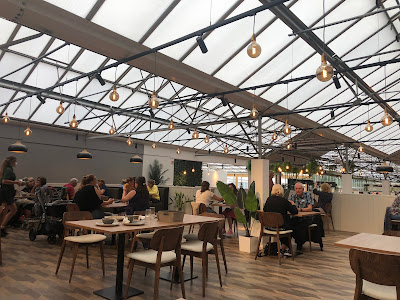
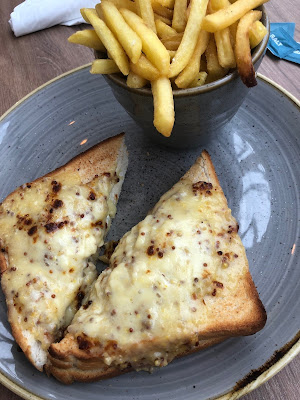
The restaurant has also expanded significantly and has taken over a large section that used to house barbecues and garden furniture as well as it’s previous site. It’s also changed in that you no longer pay at the till when you order food and instead it’s table service. The menu didn’t look a million miles away from what the garden centre served previously but there were some additions. I decided to try a macaroni cheese toastie - I love macaroni cheese and have had it as a burger topping a few times but never in a sandwich! It was very rich and filling (definitely a bit of a carb overload) but quite enjoyable as a lunchtime treat.

Since I've been back, I've noticed there is a smaller menu than there used to be under the previous owners, but there are some interesting additions on offer like an afternoon tea (which I haven't tried yet).

We have been back to the garden centre many times since it changed hands, to buy plants, gifts, visit the soft play or go to the cafe, and to attend different events. For me, the fact that it has become part of the Dobbies chain is no bad thing; it has given us new opportunities and continues to offer everything we expect from a garden centre - but I appreciate that not everyone wants a garden centre to be as much a source of entertainment and general shopping as it is about plants!

Sunday, 18 February 2018

Gardener's Spring Flowers Waterfall Card

Maternity leave so far seems to have been all work and no play - and a lot of naps as I’m so tired all the time. I thought I’d have plenty of time to do things like sort out photo albums, file about two year’s worth of important documents sitting in a drawer, and maybe read a book while enjoying a cup of tea. Instead I’m working my way through a massive list of things we need to do to prepare before the baby is born - everything from setting up the baby monitor to checking we’ve got enough sheets for the Moses basket to writing my birth plan, which I’d intended to have finished about a month ago and still haven’t done!

But at the same time all work and no play isn’t much fun, so one evening when my husband was doing something on the computer I decided to go up to my craft room - which is now the spare room as we’ve had to move the bed out of what is now the nursery - and do a bit of card making.

I was careful to only take out a couple of boxes from my craft cupboard and ones that were right at the front - getting everything back in when you’ve taken it all out is a bit tricky and I knew I wouldn’t have the time or energy to do that at eight months pregnant.

I found something I’d bought in a bulk purchase from a local seller who was getting rid of some of her stash - a waterfall card kit from Quick Cards that promised everything I needed in one small kit to make an unusual kind of card I hadn’t tried before.
 

Unfortunately it proved a lot trickier than it looked! There were no instructions in the pack at all so I’d hoped it would be fairly self explanatory but it wasn’t. I ended up going on you tube and watching this video from Dreaming about Rubber Stamps to understand what I needed to do.
 
Even then I found I needed extra things that weren’t in the pack like a couple of brads, and I had started to use a long strip saying ‘happy birthday’ until I realised it would go behind the ‘waterfall’ and you wouldn’t be able to read the words, so I switched it for a patterned piece of card.

The way a waterfall card works is this: you have three or four overlapping images in a line down the card, and a tab at the bottom. When you pull the tab the picture squares turn over to show the other side in a sort of waterfall effect, and when you push the tab back up, the pictures all turn back the right way up.

What I didn’t like with this kit was that the yellow flower images provided had nothing on the back so when they had flipped you were left with plain white squares. They also didn’t take up much of the card blank provided with a lot of white space around them, so I decided to customise the card.
 
I used the three spring flower images you can see below, and stuck them onto the piece of card on the right - aside from the 'happy birthday' / 'happy mothers' day' strips down the side which are separate, there was a long section of card already scored in the right places for the waterfall card folds.
 
 
But I found it far too plain as I said, so I used a piece of backing paper from the Born to Shop- Go Green range and mounted the waterfall cards on that, along with a 'happy birthday' sentiment from the Quick Cards pack. I used a 'with love' tag as the piece you pull, though the strip that holds the waterfall cards on was made from a scrap piece of card covered with another piece of the Born to Shop paper and secured by two brads as glue wasn't strong enough.


I also didn't like the fact that when the flower cards turned over there was nothing underneath; I think this sort of card would work much better with a 'reveal' of similar images or even a surprise greeting on the other side. For this one I used more of the same backing paper and a picture from the same Born to Shop Go Green set but next time I might plan something that's a bit more of a surprise!
 
Here's a video of the card showing what happens when you pull the tab! Please excuse the wobbliness, I was trying to hold the card and pull the tab and film at the same time!
 

 I'm sharing this with Crafting with Dragonflies where the theme this week is special folds.

Friday, 21 October 2016

Colourful Garden Birthday Card


There's quite a lot going on with this card but I think the colours work well together and I like it. The backing paper is actually all one piece of paper with a mixed pattern showing watering cans, green leaves and clouds and more. One of the very first things I bought for my cardmaking stash was a packet of paper flowers, with green leaves and red flowers. I still had some of them left so used foam pads to layer them on to the card. Finally I cut a small square out of the remaining backing paper that was a box with scalloped edging, and put a 'happy birthday' outline sticker on it. I used another foam pad to stick this on the card and raise it up.

Tuesday, 25 February 2014

Forever Friends Gardener's Birthday Card


I haven't had time to do any card making for ages - getting on for a year I think! Since I had some time off between jobs I decided I would definitely make some time for this hobby. I made quite a few cards; some of them were pretty simple and quick such as this one.

I took a square white card blank and covered it with a piece of paper from a pack aimed at men - it included football print papers for instance but also some more generic patterns like this one. I had a pack of Forever Friends stickers on a gardening theme so I arranged some of these on the card, along with a few flower stickers from another pack as I felt it needed something to contrast. The banner is a die cut card that I bought in a pack of card making supplies from Ebay a long time ago, with a silver happy birthday outline sticker.

Tuesday, 9 April 2013

Birthday card for a keen gardener


I made this birthday card for a keen gardener. I think I got the flowers from Ebay, a long time ago - they are three-dimensional with the pots made of cardboard and a paper flower on top. I used a green backing paper that looked like grass, and a die-cut topper with the words 'a garden is a thing of beauty and a job forever'. I also made a smaller topper from a piece of green card on an adhesive pad to give it some height, and a silver outline sticker saying 'happy birthday'.

Tuesday, 3 April 2012

Garden planter

And now for something different from my usual baking and crafts... I made a wooden garden planter!

Last summer B&Q started offering "You can do it" classes, where you could go to your local store and learn how to do a specific job - including plastering, laying laminate flooring, using power tools and putting up shelves and mirrors. I'd already taken an eight-week evening class in basic DIY the year before (a necessity when moving into my own house given I could barely change a lightbulb), but I was about to start doing up my garden and thought their class on building raised beds in your garden would be very beneficial.

The class only cost £10 for three hours of tuition and - as it turned out - construction, in a small group of about six people. The course description led me to believe we would be learning how to create raised flower beds, so I was quite surprised when I arrived and was told "We're going to be making one of these" - a square free-standing wooden planter. I queried what that had to do with raised beds in your garden, only to be told "We don't have the facilities to do that here, so we're making one of these instead". The planter in question was about half a metre wide by half a metre tall, and made of really solid wood.... and I was supposed to be getting the bus home! Luckily I rang my boyfriend and he said his mum would be able to pick me up after the class and take me home.

So we were given some long pieces of wood and had to mark the right length and use a power saw to cut the sections. Unfortunately one of the first people to use the saw broke the blade, and it took the guy taking the class about half an hour to find and set up a new one, so in the meantime we had to use hand saws. Sawing wood by hand is quite hard work and it's also very hard to saw in a straight line (well, I find it hard) so my planter ended up a little wonky.

When we had the correct-sized pieces of wood, we had to fix them together to create a basic frame, using a power screwdriver.

Then we cut pieces of decking to make the side panels and fit them on. It sounds quite straightforward and wasn't too difficult (other than my wonky edges) but it took almost the entire three hours to get to the point you can see below.

There was supposed to be a decorative top section that I didn't have time to finish, though I guess I couldn't complain - the £10 cost of the class covered the materials, as well as tuition, and obviously I got to take home the planter that I had made.


A week later, my boyfriend and his dad kindly added the decorative top section that I hadn't had time to make. You can see the finished planter below, taking pride of place on my patio!