Showing posts with label cookies. Show all posts

Wednesday, 25 October 2023

Halloween Spooky Sugar Cookies


I recently did a class with Biscuiteers which I shall write about separately - and since then I've been enjoying baking and decorating biscuits at home, now I know the 'proper' techniques for decorating! The trick is to use royal icing to pipe an outline, then when it has set, use thinner royal icing to 'flood' the inner part of the biscuit.

I have a large collection of cookie cutters and among them, a pumpkin, ghost and bat. I used a Biscuiteers recipe which you can find online here - the addition of golden syrup makes the dough less likely to spread during baking.

I tried a few different designs, including writing 'Boo' on a ghost, and a pumpkin with a face - but I prefer the look of the plain pumpkin cookies. I think the bats came out fairly well too. I made a few of each type and plan to serve these when my daughter has a couple of friends around for a mini Halloween party - if they aren't eaten already before then!

Saturday, 6 May 2023

Coronation Cookies

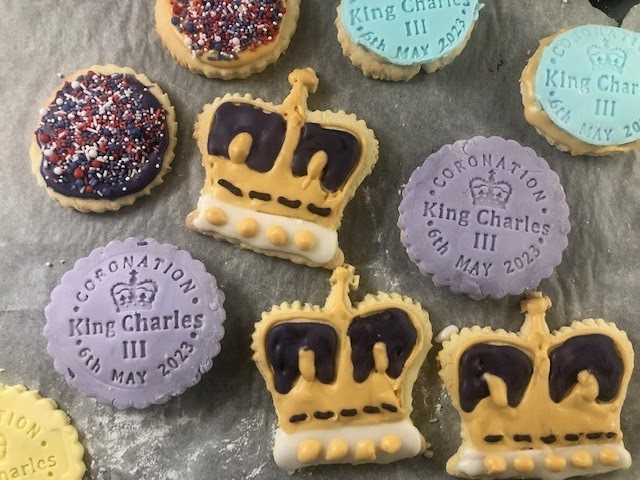
I couldn't miss the opportunity/excuse to do some baking for the coronation of King Charles III - it's certainly a momentous occasion no matter what you think of the royal family, and we are merrily joining in with the celebrations, with a street party and parties at school and Rainbows for my daughter.

My husband 3D printed me a crown-shaped cookie cutter, and I bought a cookie stamp from Etsy - not having realised this is something he could have 3D printed me as well so I will remember that for next time! I also had some red, white and blue sprinkles left over from last year's Jubilee which came in handy.

My icing technique is far from perfect but I'm quite pleased with these compared to my usual fairly messy icing. It is a bit fiddly to keep switching colour and icing bags but I think worth it!

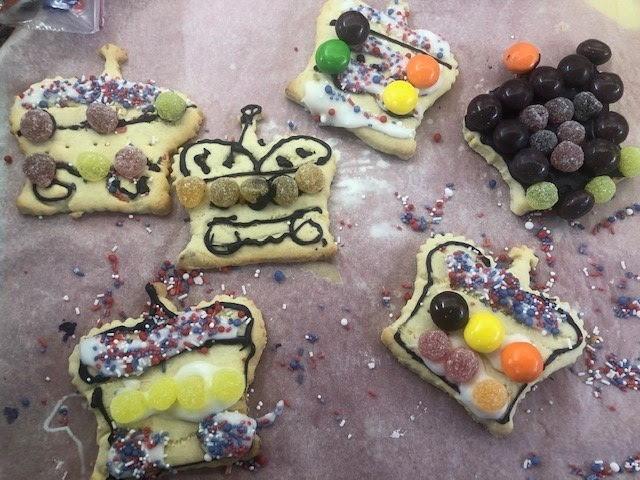
I used a standard sugar cookie recipe, from BBC Good Food. My cookie cutter was quite large so I didn't get that many cookies out of it - about 9 crowns and 5 circles. My daughter had most of them to decorate as you can see below!


For the ones I did, I copied the shape and colours of the actual coronation crown and added what is supposed to be some gems along the bottom. I definitely need more practice with icing though but it's all just for fun - and my daughter had a great time making hers!


Friday, 15 April 2022

Easter Imprint Plunger Cookies

I’m ever hopeful that one day I will develop the knack of decorating cookies so they don’t look like a child has done it, and have resigned myself to thinking I need to book a place on a Biscuiteers course.

But in the meantime I decided to have another go at making and decorating some Easter biscuits. I used a standard sugar cookie recipe like this one:

2800g plain flour

1/2 tsp baking powder

pinch of salt

170g butter, softened

150g caster sugar

1 egg

a few drops of vanilla flavouring

Cream together the butter and sugar and then beat in the egg and vanilla flavouring. Next fold in the flour, baking powder and salt.

Knead until you have a ball of dough and wrap in clingfilm. Ideally place in the fridge for at least an hour (though I often skip this part!).

When you are ready to use the dough, roll it out on a lightly floured surface and cut out using cutters.

Bake in a preheated oven at 180C - the baking time will depend on the size and thickness of your cookies, but you don't want them to be overbaked, so I would recommend 10-12 minutes then checking if they look like they need longer.

For Christmas I got a set of Easter cookie cutters (which seemed odd to my sister who got them for me, but as I pointed out, my birthday is right after Easter so I would have had to wait a year before I could use them!).

I like these cutters because they have a design that imprints into the dough, and you use the little plunger to push the cookie out. When they are baked, the design did lose a little definition but could still be seen quite clearly.

I used the design as a guide for icing, piping royal icing in different colours and snipping the tiniest piece off the end of a piping bag rather than using a nozzle. Even then I found it really hard to decorate them neatly!


Thursday, 29 March 2018

Easy Easter Decorated Biscuits


I’m determined not to let having a new baby mean I have to give up my hobbies of baking and card baking but at the moment I definitely have very little time for either! There are lots of things you can make that are quick and easy and take minimal fuss though, like these decorated sugar cookies for Easter.
We had some friends visit for a couple of hours last Sunday afternoon; they had said they would  bring some cake but I also wanted to be able to offer something as well, but didn't know if I would have time to make even a simple cake, and wasn't sure what they were going to bring and didn't want to make the same thing, so cookies seemed the answer.

I already had some biscuit dough in the freezer from a previous recipe pre-baby (which I don’t seem to have blogged about); here's a basic sugar cookie recipe you can use, though you can add other flavourings like a bit of lemon zest or butterscotch flavouring, vanilla essence and so on.

225g butter, softened
200g caster sugar
1 egg
340g self-raising flour

Cream the butter and the sugar and beat in the egg. Then fold in the flour until you have a pliable dough. Keep in the fridge until you need to use and roll out to use with cookie cutters.

The size and thickness of the cookies will dictate how long they would need to bake in the oven but I would usually give them 8-10 minutes at 180C as they will continue to harden as they cool out of the oven.

I defrosted my dough and used a set of Easter cookie cutters I bought last year (or maybe even the year before) from one of the pound shop chains and had never used. The set included two different bunnies, a chick, and an egg.


They took no time at all to cut out and bake in the oven and I decided they needed decorating even if I didn't have a lot of time until our friends arrived - or until the baby woke up and wanted feeding again! So I mixed some icing sugar with water and added some different food colourings and did my best to ice the biscuits with a teaspoon (I didn't have time to faff around with piping and flooding properly!) and added a few sprinkles on top.


They aren't particularly neat, but tasted good which was the main thing, and the presentation was helped by this cute little felt Easter basket I bought for a couple of pounds in Lidl last year.


Sunday, 17 December 2017

3D Christmas Cookie Tree


I feel like Christmas has almost passed me by this year. Normally I do all my shopping in November if not before, and do plenty of Christmas baking. This year being pregnant has meant I'm tired a lot of the time, spending half my weekends having naps, and when I am awake I have far more important things to do like register for nurseries which have a one-year waiting list!

My beloved cat was also unwell over the past week but is much better now, and I feel a bit more awake at the moment (I hope that lasts!) so decided it was about time I did something festive. Yesterday I listened to Christmas music while wrapping gifts and actually did some baking.


I bought the Lakeland 3D Christmas cookie cutter set in their January sale last year and hadn't used it yet so this was the perfect time. You get a set of star shaped plastic cookie cutters in varying sizes and two piping bags and nozzles.


There's a recipe on the back of the box which I followed though I also added some cinnamon for a more Christmassy taste. You need to make two cookies from each cutter, though I found the recipe recommended baking the cookies for 12 minutes, which I think works for the larger ones but once you get to the very small cookies, 12 minutes is too long. I baked them in batches and reduced the oven time as the cookies got smaller.


I left them all to cool, then mixed up some icing sugar with water to make a thick paste that I could pipe. I found the nozzle provided in the kit a bit thin so just snipped off the end of the piping bag and piped an outline around the edge of each cookie star. I then added some Dr Oetker gold pearls to the tip of each star while the icing was still soft.


Next I made up some thinner icing and used it to flood the inside of the cookies, and left them all to set.

The final step is to layer the cookies starting with the largest on the bottom; as you have two of each size, rotate one so that the points on the star are sticking out between the points of the cookie underneath.

I placed the final small star standing up on the top of the 'tree' though you could also add another decoration on top if you like.


The effect is really pretty and it is a little time consuming to bake this many cookies when you can't get them all in the oven at once but otherwise it's a very easy kit to use and something you could do with children. The cookies tasted really nice too - we tucked into them after helping my mother-in-law decorate her tree.

I'm sharing this with Cook Blog Share, hosted this week by Hijacked by Twins.

Wednesday, 23 August 2017

Scrabble Letter Cookie Cutters and Biscuits

 
These scrabble cookie cutters are a fun way to send a message to a loved one or decorate a cake. I got a set for my birthday this year – they come in a sturdy metal tin and are the same size as actual scrabble letters. Made of plastic, they let you cut out a square of dough with one side, then turn the cutter over and use the letter to imprint in the dough.
 

Since you use these to stamp the letters and don’t actually use the letters in the oven to shape the cookies, it means you can make as many of the same letter as you like, and bake them all at once.
 
You could also use these to stamp letters into fondant but personally I’d prefer to do that with standard letters rather than ones with scrabble numbers on them, unless the cake was specifically for someone who liked scrabble.
 
 
As cookies though, these are really fun – I baked some for a friend’s birthday (actually the same friend who had given me the kit) and jumbled up the letters into a box and got her to work out what the message spelled. It didn’t take her long to figure out it said Happy Birthday and her name!
 
A standard sugar cookie recipe is probably best for this, which you could also flavour with something like lemon, but to mimic scrabble letters you want the cookies to be quite pale. I actually used a vegan recipe I found online as I knew a vegan friend would be there as well and I wanted her to be able to eat them too but as we’d actually been out for afternoon tea, these cookies didn’t get eaten until another time!
 
These are available for sale on loads of websites including Amazon.


Tuesday, 4 October 2016

Chocolate Chunk Cookie Dough Tray Bake

This recipe, from Xante Milton (aka Cookie Girl)'s Eat Me, is called Chocolate Chunk Tray Bake - but to me it was more like a cookie dough so I have added that in to the title of the blog post. I made this during the summer when we were going out for the day and wanted to take a picnic lunch; I wanted to quickly make something sweet that would travel well and thought of a tray bake or cookies, and when I came across this recipe, realised it covered both. What I didn't realise, as the recipe in the book is fairly sparsely written with no pictures or photos, is just how good this is! It was like eating thick squares of cookie that were still slightly gooey in the middle - absolutely delicious!

I also discovered they make a really good cookie ice cream sandwich, if you sandwich ice cream into the middle!


To make 16, you need:
320g plain flour
1 tsp bicarb of soda
1 tsp salt
110g unsalted butter, at room temperature
170g granulated sugar
125g soft brown sugar
1 tsp vanilla extract
340g chocolate, chopped into 1cm squares
110g chopped hazelnuts

Preheat oven to 190C. Grease a large baking tin that is around 15 inches long by 10 inches wide, and around an inch or two deep.
 

Cream together the butter, both sugars and vanilla and add the eggs one at a time until well mixed.

 
Fold in the flour, bicarb of soda and salt, then stir in the chocolate and the nuts.


Spoon into the tin and spread out until the mixture is level and bake for 20 minutes.


Turn onto a wire rack to cool when it is still a bit squidgy in the middle - it will harden as it cools. When cool, cut into 16 pieces.


I'm sharing this with We Should Cocoa, hosted by Choclette and Tin and Thyme.

Friday, 16 September 2016

Ultimate Chocolate Chip Cookies


One weekend in the summer we were going out for the day and I made us a picnic lunch. I wanted something sweet that would travel well and not be messy and decided to make cookies. My cookies are usually good but not brilliant - I have a tendency to over bake them, forgetting that cookies harden as they cool.

I had a look in a big recipe book I've got called the Good Housekeeping Baking Book and found a recipe for "the ultimate chocolate chip cookie". I was pretty dubious as I've heard that claim often, but these were absolutely amazing! Soft and just the right amount of chewy and they tasted delicious.

You need:
225g unsalted butter, softened
125g caster sugar
150g light brown sugar
1 and 1/2 tbsp. golden syrup
1 tsp vanilla extract
2 eggs, beaten
375g plain flour
1 tsp bicarb of soda
1/4 tsp salt
350g milk chocolate, cut into chunks

Preheat oven to 200C. Mix the butter, sugars, golden syrup and vanilla, then beat in the eggs


Fold in the flour and bicarb of soda then the chocolate - I used mini Hershey's Kisses from America, which worked really well.


Drop spoonfuls of the mixture onto a lined baking sheet, spaced well apart, and press down slightly


Bake in the oven for 10 minutes until golden brown and still soft


Allow to cool on a wire rack. Delicious!


I'm sharing these with Treat Petite, hosted by Kat at the Baking Explorer and Stuart at Cakeyboi.


Saturday, 10 September 2016

Mary Berry Lavender Shortbread Biscuits


The area around where I live in Surrey is known for its lavender – in fact, it was once known as the lavender capital of the world. In the summer there are beautiful purple fields stretching into the distance. Apparently Yardley, a British toiletries brand that is known for lavender talcum powder, ties back to the area but eventually cheaper French lavender flooded the market and a lot of the lavender fields in Surrey were given over to housing estates.
 

Now, there are two main operators of the lavender fields, at least that I'm aware of. Mayfield Lavender is a commercial enterprise, but still a family-run farm; they are open every day through June, July and August where you can buy lavender plants and products. I've never been and it's not clear to me from their website whether you can actually pick your own lavender or not - I would assume so, but can't be sure!


The place that I've preferred to go to over the last couple of years is the non-profit allotment run by Carshalton Lavender. It's a volunteer-led project and they have an annual harvest one weekend a year (this year it was at the end of July) where you can go and pick your own lavender. They charge a reasonable £5 for a large bunch and £10 for a bucket-ful, and there are stands selling food and drinks, cakes and lavender products. That's me in the photo above picking lavender.

My husband and I went with some friends who live locally and I picked a large bunch of lavender, as I was planning to do various things with it from baking to making lavender bags (if I ever get around to using my sewing machine!).

It was my father-in-law's birthday not long after and he really likes shortbread, so I decided to make him some lavender shortbread with local lavender, and parcel a few pieces (as he isn't meant to be eating much sugar) up as a gift.

I used this Mary Berry recipe - lavender shortbread seems a very Mary Berry thing to make. It was very easy to make though you do need to factor in chilling time for the dough - I actually did mine overnight.

Here's the lavender that I picked:


I made up the dough and added the lavender


Make into a cylinder, roll in brown sugar, wrap in foil or parchment and chill in the fridge until firm.


Slice into rounds and bake in the oven


The finished product

 
 I'm sharing these with Treat Petite, hosted by Kat at the Baking Explorer and Stuart at Cakeyboi.