Showing posts with label pink. Show all posts

Friday, 4 July 2025

It's Love I Think - Pop-Up Cafe London review


On a lunchtime errand near London's Liverpool Street station, something unusual caught my eye across the road - a shop front filled with purple teddy bears. I crossed the street to have a closer look and realised it was a cafe - very pink, with cuddly toys and neon signs adorning the walls. Of course I had to go in and have a closer look.

It's Love I Think is both a pop-up cafe and an immersive art takeover by the artist Eve De Haan that claims to be a space for retreat, positivity, wellbeing and nostalgia. Inside you will find inspirational slogans on neon signs, comfy and slightly furry chairs and clear perspex coffee tables stuffed with pink teddy bears. Look up the stairs and you'll spot a cluster of large purple bears; look around and you'll also notice the vintage record player, a bookcase full of wellbeing books, a cutsey milk carton sign and the mystery surprise vending machine. It was only £1 so I popped in a coin and twisted the handle to get a surprise for my seven year old daughter - which turned out to be a fluffy creature of some kind on a key ring and a hairclip in the shape of a bean.


There was a wide selection of hot and cold drinks and some delicious looking bakes; being a hot day - and being in a thoroughly pink cafe - for me it had to be an iced pink chai latte. 

Open until December 2025, It's Love I Think is located at 57 Old Broad Street, and is open Tuesdays to Fridays from 8am to 4pm. Also, 10% of the profits go to Choose Love, a charity supporting women and children in need. So as if you even needed an excuse to grab a coffee and a selfie in this pink paradise, you'll know you are helping do some good at the same time.


Tuesday, 13 July 2021

In The Pink Birthday Card

This birthday card was made for a very dear friend I haven’t seen for over a year due to coronavirus. She actually sent me most of the things I used on this card for my birthday so I thought it fitting to make a card for her!

The starting point was a sheet of clear stamps with some popular cute animals - alpaca, flamingo, meerkat and giraffe - and matching sentiments. The animal stamps were all from  the neck up at an angle where it would work best with the animals coming out from the side of the card, so I used a tall thin card blank. I put the flamingo near the top and stamped him in black ink then coloured in with a pink Promarker pen. The matching sentiment said ‘hope this finds you in the pink!’

I then added an alpaca, since I like alpacas and that’s a good enough reason, popping his head out from the other side of the card. One of the other sentiments was perfect to add next to him: ‘miss you!’. I added a couple of highlights with the same pink pen.

I toyed with the idea of adding a happy birthday sticker but decided it wouldn’t look right and I needed to stamp the message. I added a few strokes of pink pen around it to add a bit of colour.

A final touch was two sections of washi tape from a pack the same friend gave me for my birthday; one says ‘happy birthday’ on it and the other ‘lots of love’. Hopefully I will get to see my friend soon!

Saturday, 27 February 2021

Strawberry and white chocolate crispy cakes with pink Coco Pops

Kellogg’s new strawberry and white chocolate flavour coco pops are pink and a fun option for breakfast - but there is a lot more you can do with them than just add a splash of milk!

So what can you make with pink coco pops?

Since I got them a couple of days before my daughter’s third birthday I had the perfect idea - unicorn poo! Or rather, the equivalent of chocolate Rice Krispie cakes, but using the pink coco pops and white chocolate (and a little golden syrup). They are so easy to make and something that children can make with you or even by themselves.

Melt 100g white chocolate and mix with 200g strawberry and white chocolate coco pops - you can always add a little more cereal if the mixture looks too ‘wet’. I added two tablespoons of golden syrup as well.

Spoon into paper cupcake cases and then decorate however you like - I used mini white chocolate stars as I figure unicorns must poop stars, right? Or maybe edible glitter would have been good!

Leave in the fridge to set for a couple of hours then enjoy!


Have a look at my other blog Mini Moo Life for more ideas of things to do with children!

Monday, 21 May 2018

Pink Flamingo and Balloons birthday card

handmade flamingo birthday card
 
Flamingos are a really popular motif at the moment and one night while feeding the baby I decided they would look really good on a birthday card, and bought a flamingo stamp from Dovecraft on Ebay.

I also bought some die cut balloon shapes - it would be cheaper to buy the die in the long run and cut my own shapes but time is something I don't have a lot of at the moment (I'm writing this while the baby takes a nap but can already hear signs she is waking up!) so I just bought the shapes pre-cut.

I was playing around with shapes and thought the card would look nice with several layered embellishments in different shades of pink - there's quite a lot going on on this card but I really like how it turned out.

To start I covered most of a white square card blank with a piece of pink patterned paper, leaving a small white border clear around the edge. I stamped the flamingo onto a piece of cream card and coloured it pink with a Promarker pen.

I cut a scalloped shape around the edge of a slightly larger rectangle of purple paper (which was actually a recycled birthday card envelope I'd received) and mounted the flamingo card on that. I found a wide glittery pink ribbon in my stash that I'd bought and never used - it is quite wide and very pink and glittery so a bit OTT for most cards but I decided it worked for this one! I stuck that across the middle of the card using double sided sticky tape and mounted the flamingo topper on that.

The final touches were two die cut balloons, one in pink and one in purple, and a stamped 'happy birthday' sentiment from the 'Say it with stamps' set from All Night Media on a piece of the same purple paper as the topper which I cut out with a wavy line. The perfect card for someone who likes a bit of glitz and glamour!

Here are some of the products I used:


I'm sharing this with Stamplorations where the theme is 'things with wings'; Crafty Ribbons challenge, As You Like It where the theme is pink or blue, and Creatalicious Challenges where anything goes with the option of 'all that glitters'. As I re-used an old envelope I'm also sharing it with Use Your Stuff where the theme is upcycle/recycle, plus Addicted to Stamps challenge where the theme is 'ribbons galore'.

Friday, 11 March 2016

Tattered Lace Especially for You Pink Sparkle Card

Among the Tattered Lace dies that I received for Christmas (and then bought a few more of in the January sale) was this beautiful ‘especially for you’ die. It’s very pretty but what I didn’t realise is that it’s quite large; if you use it on a small card (this one is 6x6) there isn’t room for much else. But I didn’t just want to use the die cut on its own.
My Sizzix die cutter
I made the ‘especially for you’ die cut in pink, and realised it wouldn’t stand out on a pink card so used a cream coloured one instead. I had an off cut from a border which I stuck on the right hand side of the card, and used another die in my machine to cut out the shape of a butterfly, which I overlapped over the bottom of the ‘especially for you’ die.
It still looked quite one-dimensional so I decided to add some sparkle with tiny pink gems, which I dotted about the die cut and on the butterfly. Finally I added a little pink bow in the bottom right corner.
This is quite a girly card and I think one that my friend’s 7-year old daughter might appreciate more than the adults!


Wednesday, 19 November 2014

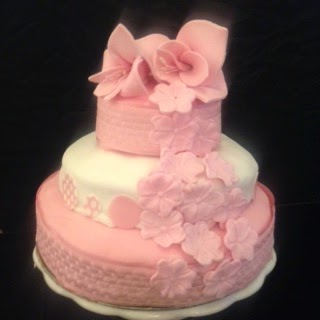
Pink Ombre Wedding Cake and How To Make Pink Sugar Flowers

pink three tier wedding cake
Pink three-tier wedding cake
- How to make a pink wedding cake
- How to make a pink ombre cake with each layer a different shade of pink
- How to make realistic sugar flowers
- How to decorate a pink cake
- Can you freeze cake
..... all these questions will be answered in this post!
 
This cake was a real labour of love so I think deserves a big blog post. It isn't actually a wedding cake but I think would work very well as one, perhaps with another one or two layers. I made it for a bake sale at work that was raising money for Breast Cancer - the charity with the pink ribbon campaign, so the theme was pink. The bake sale was meant to be a 'bake off', judged by a senior member of staff with a prize provided by a local business, but for various reasons the competitive element was cancelled. I wish I'd known that in advance as I might not have spent so much time and money on making this cake! Even so I'm very proud of it, it helped raise a good amount of money for charity and it's great to be able to share this cake and how I went about making it with you all.
 
To begin with I made the sugar flowers; as I was making them from flower paste they were intended to harden and I knew I could make them at the weekend (the bake sale was on Thursday and I knew I wouldn't have time during the week).
 
I bought various things after watching a sugar flower demonstration at Cake International two years ago that I still hadn't used so it was about time! Here you can see an Iris petal cutter which I used to cut out some large petals from Renshaw's pink flower paste.


Here are stamens and florist tape - the only non-edible part of the flowers.


I also had two smaller Iris petal cutters which I used for the inner petals. Take a few stamen and bind them together with the florist tape then take your first petal and wrap it around the stamens, quite tightly at the bottom but more open at the top. Start with a smaller petal and place a few of these around the stamen, overlapping each one.


Then add a couple of the bigger petals and curve them outwards at the edges. I placed them on this drying rest; they dry hard quite quickly. Keep whatever flower paste you are not using covered up.


I made three of these, but in the end could only fit two on the cake.


I also used this blossom flower cutter to make some smaller flowers to cascade down the side of the cake. I've explained in more detail how to use the cutter and embosser on this post on wedding cupcakes.


I made a whole pile of these and left them to dry.


As for the cake: I wanted to make each layer of cake a different shade of pink so I thought it was important to use a simple sponge recipe. I went for a 6/6/6 cake - that is, 6oz of flour, 6oz caster sugar and 6 oz butter, and 3 eggs. The sponge turned out really well, very light and tasty.

I made several quantities of this cake mixture and used more for the first few layers as I was using a bigger cake tin; so in total I made three batches of this cake mixture but it wasn't evenly used across the three tiers of the cake. I didn't make a note of exactly what quantities I used for each cake unfortunately!

I used Sugarflair pink colourpaste for three of the layers and fuchsia for the fourth. I added a tiny amount of the pink to the cake mixture and spread a very thin layer on the bottom of a greased 10-inch cake tin, and baked that in the oven for about 12-15 minutes.


I then added a little more of the same pink food colouring to the cake mixture left in the bowl and repeated the procedure. I did that one more time with the pink (I think at this point I had to make more cake mixture) and then finally I used fuchsia for the last layer.


You can really see the difference in shades when they came out of the oven! My three-tier cooling rack came in very handy.


 For the final tier I made a very small cake in a 5-inch cake tin and did a marble effect, combining a spoonful of pink cake mixture with a spoonful of plain until the tin was filled.
 

As I knew I was going to be too busy in the days leading up to the bake sale, there was only one thing for it: I was going to have to freeze the cake. I looked up how to do this on the internet and discovered that you can't really freeze frosting but the actual sponge cake should be fine. Wrap each layer in clingfilm and carefully place in the freezer.

I would never been able to do this with the freezer in my last house as it was quite small, and had drawers which wouldn't have been wide enough for the biggest layer of cake. But when we bought the new house we treated ourselves to an American-style freezer (partly as my boyfriend wanted the ice dispenser but two months later it still hasn't been connected to the plumbing!). One real advantage is that the shelves are very deep so I had no problem sliding my layers of cake into the freezer. And rest assured the cake tasted absolutely fine when it came out of the freezer!

 
So the night before the bake sale I assembled the cake. I made a simple buttercream which I coloured pink and spread it very thinly between each layer of the cake.


I had to level off one layer of cake as it wasn't quite flat but otherwise the layers were all relatively uniform, and definitely came out in different shades of pink!

I was limited by having to carry this in my cake carry case to work so I made the bottom tier four layers thick and then covered it in pink fondant from Renshaw.

The next tier was two layers but the layers were thicker. The final cake on top didn't come out of the tin very well and left a chunk of itself behind which is why the top looks quite uneven.

I thought that covering the whole cake in pink was a bit much, plus I had some specific decorations in mind, so I covered the middle layer in white fondant.
 

I bought these printed sugar paper decorations from Culpitt after seeing their stand at the Cake and Bake Show. They are really easy to use - pre-cut circles you just pop out of the page. They are edible and the circles were a variety of sizes and patterns which I thought would look nice around the side of the cake, on the white layer. I also bought some pink ribbon from the same website to put around the pink layers.


So finishing the cake was quite easy. I didn't bother using dowels between the tiers - I never have done, though some people say it's essential. I'm doing a wedding cake course next year so hopefully I will find out more!

After covering each tier of the cake separately, I placed one on top of the other, securing with some buttercream in between. I wrapped the ribbon around the top and bottom layers and secured with some edible glue, and stuck the sugar paper circles around the white layer, again with edible glue. I placed two of the large sugar flowers on top and secured them with royal icing, and used royal icing to stick on the smaller flowers so they would look like they were cascading down the side of the cake. I was really pleased with the final result!


There aren't many blog challenges this month that I can share this cake with, which is a shame, as it doesn't fit any of the themes. But I can send it to Cook Blog Share, hosted by Lucy at Supergoldenbakes. 


Wednesday, 2 May 2012

Pink and black polka dot shoe birthday cake


So you might have seen the shoes I made from Mexican paste at a recent cake decorating class - I made them in black and pink as I had already decided those would be the colours of my birthday cake. I also decided I wanted a two-tier cake so there would be plenty to go around, though I needn't have worried as we had plenty of cake in the end!

I thought the cake I made for my boyfriend's birthday was such a success that I would do a similar thing again. So I decided to make the Green & Black's Ultimate Chocolate Fudge cake as the bottom layer - you can find the recipe here or in the Green & Black's Ultimate Chocolate Recipes book. As I made it and blogged about it in the previous post, I won't repeat it again here, other than to say that it's really yummy!

For the top layer I decided to do something different and chose Dan Lepard's Easy Chocolate Birthday Cake which I found on the BBC Food website.

It was very simple to make but I liked the sound of the ingredients including double cream, sunflower oil which I thought would make it very moist, and four eggs. However I tend to prefer chocolate cakes that contain melted chocolate and this one used cocoa powder.

You melt the butter in a pan and mix with most of the wet and dry ingredients, then add the milk and cream


Then add the flour and baking powder. I found it made quite a runny mixture which is always nice.


Bake in the oven.... you cover the top with foil initially then remove it later in the cooking process.


So when it came to assembling the cake, I took the bottom layer - the Green & Black's chocolate cake - that I had left to cool, and used my cake wire to split it neatly in half.

Unfortunately it wasn't quite as cool as I thought. When I split the cake, the inside was still quite warm and soft but in my impatience - as I still had a whole birthday party to prepare with just a few hours left to go - I decided to lift the bottom layer anyway to put it onto the cake board. At which point it promptly broke into four pieces!


I wasn't put off by this minor crisis and decided to sit the pieces back together and use this as the bottom layer; I carefully spread frosting (my own recipe of melted 75% dark chocolate, butter and icing sugar) over the top and carefully placed the other half of the cake on top. I don't think you can tell from this picture that it's broken!


When I made my boyfriend's cake I tried to cover the two layers at once with white fondant, and realised it would have been a lot easier if I had covered one layer at a time. So I decided that's what I would do this time, and got out my pink fondant to cover the bottom cake.

However I don't think it was really turning out to be my day! I had bought the bright pink fondant a few months earlier for a cake that I didn't end up making. While the fondant was well within its best before date, when I took it out of the packet I found it was already a little dry. I discarded some of the dryer icing around the edges and kneaded the remaining lump for as long as I could bear.


When I covered the cake, a few cracks immediately appeared, and as the fondant dried out, even more cracks appeared.


It looked fine from a distance but close up you can see there were some really bad patches. In future I'll try to use fondant almost as soon as I buy it!


I also covered the second, smaller chocolate cake and placed it on the top. It looked like it really needed something....

Luckily I had already planned to make the cake a polka dot pattern, so while I couldn't quite hide any mistakes as well as with my boyfriend's cow print cake, I did still have the opportunity to cover a few of the biggest cracks.

I had recently bought a cupcake plunger, to be used when filling cupcakes - you place the plunger over the cupcake, push it down, and pull the handle up, leaving you with a nicely shaped hole in the middle of your cupcake to fill with whatever you want. I hadn't got around to trying it out on a cupcake yet, but decided it was the perfect size and shape to cut circles out of black fondant to make the polka dots.


I used a little edible glue to stick the circles onto the cake - I think it gives a really nice effect. I also found some spotty ribbon that I had left over from something else and decided it would be perfect to hide the joins in the fondant!


I placed the shoes and a sort of pink feather thing that I bought a while ago on a whim on top of the cake. The shoes are slightly the wrong colour pink and look a bit small in comparison to the cake but I was quite pleased with the finished effort!


Here's a close up of the top... I love these shoes! They were made using the Jem shoe cutter set, as described in my earlier post.


Instead of candles on the cake I had mini sparklers! Happy birthday to me :-)