Showing posts with label birthday card. Show all posts

Friday, 5 August 2022

A Day Like No Otter Birthday Card


Until the last couple of years where my daughter has taken up pretty much all of my free time (in a good way!) I couldn't resist buying card making magazines when they have a set of rubber stamps on the cover that is something I haven’t got! This particular stamp was from a brilliant A4 sheet of clear stamps featuring different animals and puns relating to birthdays. This one is a picture of an otter that I stamped in black and a patch of grass that I also stamped in black and went over with a green Promarker pen.

The sentiment is two separate stamps, one saying ‘on your birthday’ and the other ‘have a day like no otter’, which I thought was cute!

Monday, 27 June 2022

Purple Peacock Card

Here’s a card I made for a friend’s birthday using a set of toppers from Hunkydory. They have a membership club that is free to sign up for, and every so often you get an offer for a ‘free club gift’, a set that normally retails at £9.99 where you only have to pay postage of £2.99. You get several A4 pieces of printed card and four sheets of die cuts to press out, all on a particular theme. This theme was peacocks and I decided to buy the set.


I do find using these a little difficult however as I’m never quite sure what to do with them. The toppers are usually a picture with several frames and I never know whether to use just one frame or all of them, and the printed cards aren’t that practical for cutting out the picture from as it feels like you are then wasting the design on the card. So what I did this time was fold the A4 card in half to make the birthday card itself but again that feels a bit of a waste as I don’t need a design on the back of the card!

The Hunkydory website does have design ideas for using the set if you are stuck, but no instructions for how to make them. Most are quite straightforward though!

For this card I used one of the large peacock toppers and all three of the accompanying frames which I raised up at different levels with adhesive pads (though you can’t really see that from the photo). It’s for a friend who likes deep purple colours so I hope she liked it!


Sunday, 3 April 2022

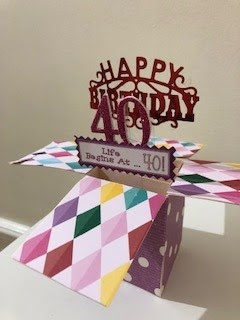
40th Birthday Card Exploding Box Card

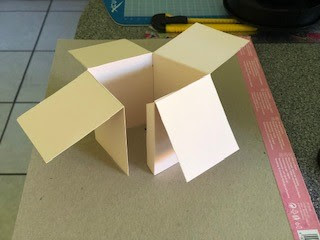
As my school friends (and I) were turning 40 all in the same year, I wanted to make them each a special birthday card for the occasion, using a different type of card design for each one. I had made an exploding boxcard before and used the same template for this one.


You can use a different design on each of the four sides but I decided the card  would look more professional with the same design on each so I used a diamond-patterned paper in what I thought was a nice range of colours – primarily reds, purples and pinks with some other shades too. The base of the card was a purple and white polka dot design, again from a patterned paper, which worked well with the diamond design.

My pop-up elements of this card were a ‘Happy birthday’ die cut, a glittery ‘40’ sticker and a small die cut sentiment saying ‘Life begins at 40!’ mounted onto a small piece of card cut with pinking scissors. I actually bought that in a small pack from Ebay but it’s quite easy to make your own – if you have the time!


Tuesday, 13 July 2021

In The Pink Birthday Card

This birthday card was made for a very dear friend I haven’t seen for over a year due to coronavirus. She actually sent me most of the things I used on this card for my birthday so I thought it fitting to make a card for her!

The starting point was a sheet of clear stamps with some popular cute animals - alpaca, flamingo, meerkat and giraffe - and matching sentiments. The animal stamps were all from  the neck up at an angle where it would work best with the animals coming out from the side of the card, so I used a tall thin card blank. I put the flamingo near the top and stamped him in black ink then coloured in with a pink Promarker pen. The matching sentiment said ‘hope this finds you in the pink!’

I then added an alpaca, since I like alpacas and that’s a good enough reason, popping his head out from the other side of the card. One of the other sentiments was perfect to add next to him: ‘miss you!’. I added a couple of highlights with the same pink pen.

I toyed with the idea of adding a happy birthday sticker but decided it wouldn’t look right and I needed to stamp the message. I added a few strokes of pink pen around it to add a bit of colour.

A final touch was two sections of washi tape from a pack the same friend gave me for my birthday; one says ‘happy birthday’ on it and the other ‘lots of love’. Hopefully I will get to see my friend soon!

Sunday, 14 July 2019

Let's go on an Adventure - Alpaca my bags! Handmade card


I'm a big fan of alpacas - and even had them at my wedding - so when I saw a card making magazine on sale where the cover gift was a set of animal stamps including alpacas, I had to have them! It also came with some fun sentiments to go with the different animals including this one: Let's go on an
adventure - alpaca my bags! Probably my favourite alpaca pun :-)

To make this card I started with a background paper of pink and blue hearts. I then stamped the alpaca onto a piece of pink card and mounted it onto a piece of blue card with scalloped edging (a die-cut) and stuck it at a jaunty angle on the card. I followed the pink and blue theme with two die-cut balloons and stamped the sentiment onto a piece of pink card. I used some little pink gems in the four corners of the sentiment box to make it look like it had been fixed onto the card.

I'm sharing this with the Library Challenge where the theme is 'Five weeks in a balloon' and
Penny Black - 'summer colours'.

Monday, 22 April 2019

Design Your Own Invitations with Paperless Post - Review


You may have noticed that I love to make birthday cards, and have even made other greeting cards and invitations by hand. You may also have noticed that I haven't had a lot of time lately! My daughter is 13 months old now and takes up most of my time and attention, and when she's with my husband or having a nap, I'm doing housework or preparing her meals or one of a myriad of other chores.

So the opportunity to review Paperless Post couldn't have come at a better time. This is a site that allows you to create online cards and invitations, either by using one of the thousands of designs they offer, or uploading your own.

I had a go at making a few cards - I started with an invitation to my birthday celebrations and a photo upload Easter card.

The site is very easy to use and the end result looks really professional. The cards are received as an email where you can watch an envelope opening and the card coming out, and there are options to reply or leave a comment on the site. My friends and family thought the cards were lovely and I was impressed with the site.


The card are fully customisable. To make my birthday invitation, I searched for 40th birthday invitations and chose one of the designs. I was then not only able to enter the text I wanted but change the font, colour and size of the text, choose a background pattern to go behind the card, and pick the design of the envelope. You can also add a particular stamp and postmark to the card if you like.


For my birthday invitation I included a RSVP card; if you are making wedding invitations and want extra options like a card for guests to fill in their menu choices you can add that as well. You can also use the site to send messages to guests if there is information or a change of plans (or just send them an event reminder) that they need to know.

I was pleasantly surprised at how many different cards are on the site with themes like invitations to a barbecue or picnic, a hen party, a moving house announcement and so on. There are even designer collections like Oscar de la Renta and Kate Spade cards. I can definitely see myself using this on a regular basis!

There are also lots of cards were you can upload a photo so I also created Easter cards for friends and family featuring a photo of me, my husband and our daughter and a giant Easter bunny from a farm we visited recently. This is what the card looked like:


The site uses its own currency called 'coins' which you buy in packages, starting at 25 coins for £8 but the price per unit decreases eg 100 coins for £18 and 200 coins for £28. You get 25 coins free when you sign up for an account and can get extra coins for doing things like liking Paperless Post on Facebook.

 
My fairly simple birthday invite plus envelope and reply card cost 6 coins per invite. There are e-flyers which are free of charge to make and obviously the more you add to a card (eg extra sections for a wedding invite) the more they cost, but these are still pretty reasonably priced and much cheaper than buying and posting a physical greetings card - plus they are better for the environment. But if you do want a physical printed invitation or card there is an option on the site for that as well. I was very happy with the online cards and another benefit is that they are very quick - I didn't do the Easter cards until Good Friday and they only took a few minutes to create and send, whereas if I had bought cards and put them in the post, they wouldn't have arrived until after Easter!
 
 Thanks to Paperless Post for some coins to use on their site. All opinions are my own.

Monday, 17 September 2018

You're a Treasure Pirate Card for Kids

I have a confession to make about this card - I made it for a friend’s little boy who was turning three, and forgot to send it!

My husband and I were ill for nearly a whole week, luckily the days when we were most sick didn’t overlap so we were able to take it in turns to look after our baby with a bit of help from my mother-in-law as well (who then got sick after she had been to see us!). Luckily baby S didn’t get ill at all which was a huge relief!
That whole week passed in a blur and it was only some time later I realised I had missed the birthday and not sent the card. Sorry Alex!

I’ve decided to share it now as I think this is a really cute theme for children that works for both girls and boys. I bought a set of clear stamps from eBay (which didn’t have a brand - look up ‘pirate clear stamps’ on eBay and you will find them).

I had some sea themed backing paper that I hadn’t really used before as it was a tricky design - not a patterned paper as such but most of it was plain blue or similar with a detailed design in one corner. I found it hard to know what I could add to the card to complement it without covering up the design but also without the backing paper stealing the show - but these pirate stamps were perfect.

I stamped the boy pirate onto white card and coloured him in with Promarkers and did the same with the treasure chest and boat, and stamped the words ‘you’re a treasure’ directly onto the card, which I then went over with a black Promarker.

I'm sharing this with:
Outlawz Challenge Songs and Rhymes - Row, row, row your boat
Sheepski Designs - For the kidz
Cardz 4 Guyz - All at sea

Sunday, 26 August 2018

Music and Drumkit Birthday Card


I made this card for a relative who is a musician; it can be hard to make cards for men that aren't just fairly generic so if a guy I know has a particular hobby (or in this case, it's his profession) I try to theme cards accordingly.

The main elements of this card come from a set of die cuts I bought that you press out from a sheet, I'm afraid I can't remember the brand! The musical notes and stave across the top come from a sheet of outline stickers (I think they are Anita's) and the backing paper is actually from a 6x6 paper pack with an Oriental theme - I thought this one would work with the reds in the drum kit and happy birthday square.

I'm sharing this with:
Allsorts challenge - music
Dream Factory (Die Traumfabrik) - Save the last dance
Jo's Scrap Shack - anything goes
Crazy 4 Challenges - masculine

Tuesday, 7 August 2018

Unicorn and Balloons Birthday Card


I went a bit unicorn-crazy recently after buying a new rubber stamp and some patterned papers. This card uses one of the papers as backing for the card - it's a busy pattern so I left a bit of white edging around the card.

I then added some die-cut pink balloons and some die-cut blue bunting, which matched the background of the card - I bought both sets of die cuts on Ebay. The 'happy birthday' is from an old set of stamps called Say it with Stamps from All Night Media, stamped onto a piece of pink card which I cut out freehand.

This would be a lovely birthday card for a young girl!

I'm sharing this with:
Penny Black - something beginning with B (balloon)
Outlawz Challenges - Up, up and away
Creative Knockouts - For the kids

Wednesday, 1 August 2018

You're a Koala-ty Friend Koala Card

 
Here's another animal card made with the same set of stamps from Creative Stamping magazine that I used for this elephant card. The main stamped image is of a koala, with a separate stamp of a branch that I coloured brown with Promarkers, and finally a third stamp of the leaves which I used with green ink.

The sentiment, 'you're a koala-ty friend' is a cute pun and one that makes the card suitable for pretty much any occasion - a birthday or thank you or just a note. As a final touch I added a glitter heart sticker next to the sentiment.

I'm sharing these with the following challenges:

Simon Says where the theme is 'wild things'
Sweet Stampin' - CAS (clean and simple)
Moving along with the times - wild animals

Friday, 20 July 2018

Age is Irr-elephant Birthday Card

 
I couldn't resist buying a card making magazine recently when I saw the free cover gift was a sheet of zoo animal clear stamps, including an alpaca, as I love alpacas! The set included some great sentiments and phrases to go with the animals as well; here is a card I made using the elephant stamp, the 'tree in the savannah' stamp and a sentiment saying 'age is irr-elephant'.

I inked the background using a cotton wool ball and an ink pad which also came with the craft magazine, pressing more firmly on the bottom half of the card and lighter on the top half.

I'm sharing this with CCEE stampers where the theme is zoo animals for national zookeepers week and Moving along with the times where the theme is wild animal.

Sunday, 8 July 2018

Pink Unicorn card - Be a Unicorn in a Field of Horses


Unicorns are a really big thing at the moment - I can't really remember when it started but suddenly they are everywhere, from toys to children's clothing to cakes to stationery. Late one night in between feeding the baby I was browsing the internet and decided to look for a rubber unicorn stamp for card making. I thought there would be loads but couldn't find any I liked until I came across this unmounted one from China. It's quite large so just right for the main element of a card.

The backing paper is from a set called Glitter Girl which was from Hobbycraft only a couple of months ago but they don't seem to stock it any more unfortunately. The frames and banner are die cuts I bought pre cut from Ebay (getting out my die cutting machine seems like hard work at the moment!). I stamped the unicorn and coloured it in with Promarker and stamped the sentmiment from a separate set of unicorn-related sentiment stamps.

I'm sharing this with Penny Black where the theme is 'things with wings' as unicorns are usually depicted with wings; Crafting with Dragonflies where the theme is animals; Crafty Friends which is fairy/fantasy; Send a Smile 4 Kids which is anything goes for kids; and the Fairy and Unicorn challenge where the theme is mythical.

Sunday, 17 June 2018

Focus on the Journey, not the Destination handmade card


This card has an inspirational sentiment that would be suitable for a birthday or someone who is going travelling - though I actually gave it to my dad for Father's Day.

It's made from free gifts that came with a recent issue of Creative Stamping magazine. I stamped a white card blank with some of the clear stamps that came with this issue - one was a train ticket, one was a passport stamp, one was a postmark that you might get on a postcard and so on. I stamped them in different coloured inks randomly over the card, then cut a circle from a piece of paper that came with the magazine with a map design. I cut a border from the same paper and stuck it around the edge of the card.

I stamped the plane stamp onto brown paper and cut around it, and stamped the sentiment onto white card which I mounted onto brown card and added those to the card as well.

I'm sending this to My Time to Craft where the challenge is a stamped background, Simply Create Too where the theme is 'for a male' and Ellibelle's Craft Wednesday where the theme is 'make it masculine'; Always Fun Challenges - for a male/dad and Stamps and Fun where the theme is travel and holidays.                 

Friday, 15 June 2018

Don't Worry Bee Happy card


This card was made using a few stickers I was given by a friend; I don’t know where she got them from. The stickers were quite large, taking up most of the space on a blank card, so for a while I didn’t know what to do with them.

I decided to use one of the stickers as the background; it is a brown sticker with a few yellow and brown honeycomb shapes in the middle. I cut around the sentiment from another one of the stickers, and found some tiny bee stickers from another set and dotted them around the card.

With the colours I think this card is quite masculine so it would be suitable for a man or a woman.

I’m sharing it with Little Red Wagon where the theme is ‘to bee or not to bee’

 and Tuesday Taggers where the theme is ‘for the boys’

 
plus Unicorn Challenge where the theme is masculine.


Monday, 21 May 2018

Pink Flamingo and Balloons birthday card

handmade flamingo birthday card
 
Flamingos are a really popular motif at the moment and one night while feeding the baby I decided they would look really good on a birthday card, and bought a flamingo stamp from Dovecraft on Ebay.

I also bought some die cut balloon shapes - it would be cheaper to buy the die in the long run and cut my own shapes but time is something I don't have a lot of at the moment (I'm writing this while the baby takes a nap but can already hear signs she is waking up!) so I just bought the shapes pre-cut.

I was playing around with shapes and thought the card would look nice with several layered embellishments in different shades of pink - there's quite a lot going on on this card but I really like how it turned out.

To start I covered most of a white square card blank with a piece of pink patterned paper, leaving a small white border clear around the edge. I stamped the flamingo onto a piece of cream card and coloured it pink with a Promarker pen.

I cut a scalloped shape around the edge of a slightly larger rectangle of purple paper (which was actually a recycled birthday card envelope I'd received) and mounted the flamingo card on that. I found a wide glittery pink ribbon in my stash that I'd bought and never used - it is quite wide and very pink and glittery so a bit OTT for most cards but I decided it worked for this one! I stuck that across the middle of the card using double sided sticky tape and mounted the flamingo topper on that.

The final touches were two die cut balloons, one in pink and one in purple, and a stamped 'happy birthday' sentiment from the 'Say it with stamps' set from All Night Media on a piece of the same purple paper as the topper which I cut out with a wavy line. The perfect card for someone who likes a bit of glitz and glamour!

Here are some of the products I used:


I'm sharing this with Stamplorations where the theme is 'things with wings'; Crafty Ribbons challenge, As You Like It where the theme is pink or blue, and Creatalicious Challenges where anything goes with the option of 'all that glitters'. As I re-used an old envelope I'm also sharing it with Use Your Stuff where the theme is upcycle/recycle, plus Addicted to Stamps challenge where the theme is 'ribbons galore'.

Friday, 13 April 2018

Oriental Dress Birthday Card

 
I loved Arthur Golden's book Memoirs of a Geisha which I read many years ago, so it was a nice throwback when I saw it had been chosen as the theme for the Library Challenge, which is for crafters who love books.

I had a pack of both outline stickers and die cuts I bought years ago that I never really knew what to do with, in the shape of Oriental dresses and fans. They are quite detailed and large so take up most of a typical card and I was never really sure how to make the most of them.

They seemed just right for this particular card challenge so I decided to make a very quick and simple card using one of the colourful cardboard die cuts. I used a pre-printed card blank which creates quite a busy pattern with the die cut, but the colours and flower shapes are complementary at the same time.

I finished the card with a pink 'special day' sticker.

Wednesday, 11 April 2018

Car, Map and Signpost Birthday Card


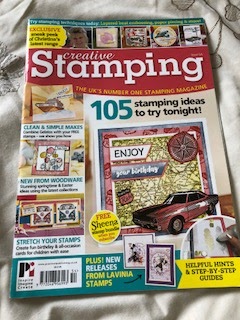
I treated myself to the latest issue of Creative Stamping and indulged myself in making a few cards one day while the baby was asleep. There was a large A4 sheet of clear stamps as the free cover gift that had a travel and transport theme - handy to make cards for men.
 
#
I decided to make a version of the card featured on the front cover of the magazine with a few differences. First I stamped the road map rubber stamp multiple times over a white square card blank - you can only tell the pattern repeats if you look closely!
 
Then I cut a border to go around three sides from an old envelope I'd received in the post and kept. Next I used the car stamp and the signpost stamp on red card and cut around them and stuck them onto the card. I stamped the top part of the signpost again so I could cut out two of the arms and use a small adhesive pad to raise them from the card.
 

I used the 'enjoy your birthday' sentiment stamps as on the card on the magazine cover, and mounted them on red card so the colours brought the whole card together. I like this card but unfortunately after making it I can't find the car stamp anywhere - that's the problem with clear stamps!

I'm sharing this with Cardz 4 Guyz where the theme is travel or transport and Craft Stamper where anything goes as long as you use a stamp, Moo Mania where the theme is masculine and Challenge Up Your Life where the theme is vehicles.

Sunday, 25 March 2018

Spring Butterflies Birthday Card

I had a sudden urge to do some more card making not long before my baby was due, but as I wasn't going to have the time/ energy/ ability to lift heavy boxes and keep bending down, I decided to indulge myself but only use things that were easily accessible from my craft stash, either at the front of the cupboard or not needing any special equipment or effort! It was a good opportunity to use up some of my stash, for example these die-cut butterflies I bought from ebay absolutely ages ago.

I received a large packet of different coloured die-cut butterfly shapes and had used them before but there were a lot left. The colours made me think of spring so I decided to make a clean and simple (CAS) card for a friend with a birthday in March, letting the butterflies take centre stage.

The way I've arranged them makes me think of a whole swarm of butterflies taking flight en masse - and the card didn't really need anything else other than a 'happy birthday' sentiment.

I'm sharing this with Cuttlebug Mania, a challenge to use die cuts where the theme this time is spring, and the Sparkles Forum Challenge where 'spring is in the air'.


Sunday, 18 February 2018

Gardener's Spring Flowers Waterfall Card

Maternity leave so far seems to have been all work and no play - and a lot of naps as I’m so tired all the time. I thought I’d have plenty of time to do things like sort out photo albums, file about two year’s worth of important documents sitting in a drawer, and maybe read a book while enjoying a cup of tea. Instead I’m working my way through a massive list of things we need to do to prepare before the baby is born - everything from setting up the baby monitor to checking we’ve got enough sheets for the Moses basket to writing my birth plan, which I’d intended to have finished about a month ago and still haven’t done!

But at the same time all work and no play isn’t much fun, so one evening when my husband was doing something on the computer I decided to go up to my craft room - which is now the spare room as we’ve had to move the bed out of what is now the nursery - and do a bit of card making.

I was careful to only take out a couple of boxes from my craft cupboard and ones that were right at the front - getting everything back in when you’ve taken it all out is a bit tricky and I knew I wouldn’t have the time or energy to do that at eight months pregnant.

I found something I’d bought in a bulk purchase from a local seller who was getting rid of some of her stash - a waterfall card kit from Quick Cards that promised everything I needed in one small kit to make an unusual kind of card I hadn’t tried before.
 

Unfortunately it proved a lot trickier than it looked! There were no instructions in the pack at all so I’d hoped it would be fairly self explanatory but it wasn’t. I ended up going on you tube and watching this video from Dreaming about Rubber Stamps to understand what I needed to do.
 
Even then I found I needed extra things that weren’t in the pack like a couple of brads, and I had started to use a long strip saying ‘happy birthday’ until I realised it would go behind the ‘waterfall’ and you wouldn’t be able to read the words, so I switched it for a patterned piece of card.

The way a waterfall card works is this: you have three or four overlapping images in a line down the card, and a tab at the bottom. When you pull the tab the picture squares turn over to show the other side in a sort of waterfall effect, and when you push the tab back up, the pictures all turn back the right way up.

What I didn’t like with this kit was that the yellow flower images provided had nothing on the back so when they had flipped you were left with plain white squares. They also didn’t take up much of the card blank provided with a lot of white space around them, so I decided to customise the card.
 
I used the three spring flower images you can see below, and stuck them onto the piece of card on the right - aside from the 'happy birthday' / 'happy mothers' day' strips down the side which are separate, there was a long section of card already scored in the right places for the waterfall card folds.
 
 
But I found it far too plain as I said, so I used a piece of backing paper from the Born to Shop- Go Green range and mounted the waterfall cards on that, along with a 'happy birthday' sentiment from the Quick Cards pack. I used a 'with love' tag as the piece you pull, though the strip that holds the waterfall cards on was made from a scrap piece of card covered with another piece of the Born to Shop paper and secured by two brads as glue wasn't strong enough.


I also didn't like the fact that when the flower cards turned over there was nothing underneath; I think this sort of card would work much better with a 'reveal' of similar images or even a surprise greeting on the other side. For this one I used more of the same backing paper and a picture from the same Born to Shop Go Green set but next time I might plan something that's a bit more of a surprise!
 
Here's a video of the card showing what happens when you pull the tab! Please excuse the wobbliness, I was trying to hold the card and pull the tab and film at the same time!
 

 I'm sharing this with Crafting with Dragonflies where the theme this week is special folds.

Tuesday, 23 January 2018

Pop-Up 3D Box Birthday Card for My Husband's 40th Birthday

Have you come across box cards before? They fold flat to go into an envelope, but when they are opened, pop out into a three-dimensional box that stands up, and often has other elements 'exploding' out. They take a little while to make but are really worth it as they are impressive and really unusual. I made this one for my husband's 40th birthday last year and he was really pleased with itI'd heard of these cards but didn't know how to make them so looked for a video on You Tube.
It's a bit too difficult to describe each step and easier to direct you towards a video like this one or this one - I can't actually remember which tutorial I used now!
 
You need a fairly large piece of card to start with, roughly A4, and score lines at certain widths apart so you can later fold along them.


Make cuts part way up where you have scored


You'll find the card then folds into a box shape.


To decorate, I cut squares of patterned paper the same size as the sides of the box and used a different paper on each side (but in the same colour scheme).


Stick two strips of acetate inside, folding them at the ends so you can glue to the sides of the box; these create cross strips that you will then stick things to.


To make an element stand up out of the card, stick it onto another strip of acetate as shown, then stick this acetate strip vertically to the horizontal ones running across the box. Glue dots are good to use for this.


This is the effect you are going for! You can add as many of these as you like.

 
 You can see that here I've got three elements sticking up inside the box; two are glued onto acetate strips running horizontally through the box and one is stuck to the front and the back of the box itself. Make sure the elements aren't aligned with each other either in position or height, otherwise you won't be able to see them all when you look at the card from the front.
 

Here's a better view of the box so you can see the elements sticking out - a 'happy birthday' die cut, a 40 I cut from silver card, and a 'with love' heart. I also used a 40th birthday message topper on the front of the card.


And here the card is from the front; it's better in real life as you can take in all the elements at once. I think my husband liked it and seemed pleased with the amount of effort I'd put in to make him something special!

 
I'm sharing this with Cardz 4 Guyz as the theme is 'January blues'  and the Make My Monday challenge where the theme is 'fancy folds'.