Showing posts with label Christmas tree. Show all posts

Wednesday, 22 December 2021

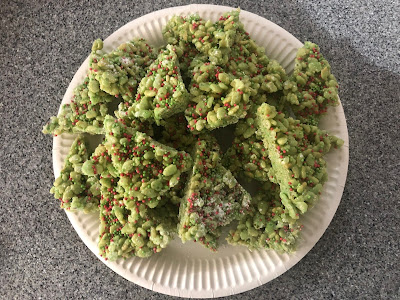
Christmas Tree Rice Krispie Treats


These little treats are easy and fun to make and are great for a children’s Christmas party or to make at home with your kids. They don’t involve any baking, and just one pan which children can do under supervision. The idea came from FoodFanatic.com but I adapted it a little.

Melt 100g butter in a large pan over a low heat along with 200g marshmallows, stirring until smooth.

Add a few drops of green food colouring and stir. Remove from the heat and allow to cool.

Mix in a large bowlful of Rice Krispies and stir gently until all the cereal is coated. 

Line a large flat baking tray with greaseproof paper and spoon on the Rice Krispie mixture. Press down and spread so you have a thin layer about 2cm thick.

Sprinkle over some Christmas sprinkles then place in the fridge to set for an hour.

When set using a knife carefully divide into triangles to make Christmas tree shapes.

I found that while the top of the Rice Krispie treats had set, the bottom was still very sticky once I had peeled them off the greaseproof paper, so I sprinkled that side with icing sugar which made them much easier to handle.

The original recipe suggested inserting a pretzel as the tree trunk but I found the treats were still too soft and started to break up as I did so, so I decided to just leave them as they were. 

My daughter was a little dubious at first as they were green but soon decided they tasted good!

Sunday, 17 December 2017

3D Christmas Cookie Tree


I feel like Christmas has almost passed me by this year. Normally I do all my shopping in November if not before, and do plenty of Christmas baking. This year being pregnant has meant I'm tired a lot of the time, spending half my weekends having naps, and when I am awake I have far more important things to do like register for nurseries which have a one-year waiting list!

My beloved cat was also unwell over the past week but is much better now, and I feel a bit more awake at the moment (I hope that lasts!) so decided it was about time I did something festive. Yesterday I listened to Christmas music while wrapping gifts and actually did some baking.


I bought the Lakeland 3D Christmas cookie cutter set in their January sale last year and hadn't used it yet so this was the perfect time. You get a set of star shaped plastic cookie cutters in varying sizes and two piping bags and nozzles.


There's a recipe on the back of the box which I followed though I also added some cinnamon for a more Christmassy taste. You need to make two cookies from each cutter, though I found the recipe recommended baking the cookies for 12 minutes, which I think works for the larger ones but once you get to the very small cookies, 12 minutes is too long. I baked them in batches and reduced the oven time as the cookies got smaller.


I left them all to cool, then mixed up some icing sugar with water to make a thick paste that I could pipe. I found the nozzle provided in the kit a bit thin so just snipped off the end of the piping bag and piped an outline around the edge of each cookie star. I then added some Dr Oetker gold pearls to the tip of each star while the icing was still soft.


Next I made up some thinner icing and used it to flood the inside of the cookies, and left them all to set.

The final step is to layer the cookies starting with the largest on the bottom; as you have two of each size, rotate one so that the points on the star are sticking out between the points of the cookie underneath.

I placed the final small star standing up on the top of the 'tree' though you could also add another decoration on top if you like.


The effect is really pretty and it is a little time consuming to bake this many cookies when you can't get them all in the oven at once but otherwise it's a very easy kit to use and something you could do with children. The cookies tasted really nice too - we tucked into them after helping my mother-in-law decorate her tree.

I'm sharing this with Cook Blog Share, hosted this week by Hijacked by Twins.

Thursday, 9 November 2017

Tree and Santa Pattern Christmas Cards


These two cards are mainly made from a mini set that contained a few pieces of patterned paper and one sheet of die cuts. I think they are quite fun but there is also something a bit masculine about them, I think because of the colours and also the geometrical shapes.

On the first card, I covered a square card blank with the patterned paper and mounted a die cut tree with adhesive pads. It's also a little hard to see but there are a few tiny die cuts in the shape of presents and snowflakes also on adhesive pads so they stand out. To finish off, I used a 'noel' shiny red sticker from a different pack.

For the second card I covered the bottom half of the card with patterned paper and used a piece of washi tape across the edge as a border. The two child (elf?) stickers at the top were actually left over from a pack of Christmas address labels that I think came from Ikea a couple of years ago. Finally a 'tis the season' sticker in the top right corner completes the card.

I am sharing this with Crafty Hazelnuts Christmas Challenge and Cardz 4 Guyz where the theme is Christmas trees.