Showing posts with label beef. Show all posts

Saturday, 1 October 2016

Beer-Braised Beef Brisket with Branston

 I made a version of this recipe when I had a lesson at the London Barbecue School courtesy of Branston; we used thin steaks rather than beef brisket as they were quicker to cook, and they had been pre-marinaded.
 
I liked it so much I decided to make the full version of this recipe at home, which you can find on the Branston website here.
 
To serve 4, you need:
 
500g beef brisket
Bottle of dark beer – I actually used Liefmans Fruit Beer for a lovely fruity taste
1 tbsp honey
1 head of garlic, cut in half
100g Danish blue cheese, crumbled
150ml buttermilk
1 tbsp cider vinegar (I used white wine vinegar)
1 tsp garlic powder (available in the spice section of supermarkets)
Pinch of pepper
½ head of Savoy cabbage, core removed, and thinly sliced – I don’t like cabbage generally so used mooli instead
½ red onion, thinly sliced
1 carrot, peeled and grated
4 large flour tortillas (I actually served mine on the little gem leaves as I was avoiding carbs)
Branston Smoky Tomato & Chipotle Relish
2 sliced medium Jalapenos or green chillis (I left these out)
 
Marinade the beef overnight in the beer, honey and garlic.
 
 
When you are ready to cook, pre-heat oven to 120C – a pretty cool temperature. You are going to braise the beef, in the marinade, for 3-4 hours until cooked through and tender.
 
 
When it’s ready, carefully transfer the beef to a plate or chopping board and cover with foil. Strain the cooking liquid into a pan and reduce to a glaze.
 
Use two forks to shred the beef, and add to the pan with the glaze and fold in.
 
Meanwhile mix the cheese, buttermilk, vinegar, garlic powder and pepper in a large bowl until smooth. Add the cabbage, carrot and onion and stir until all combined.


To serve, place a tortilla (warmed in a skillet if you like) onto a plate, top with little gem, the slaw and pulled beef brisket. Add a dash of the Smoky Tomato and Chipotle Relish and sprinkle with chillis if desired.
 
 
I often make chicken fajitas but this was the first time I had served my husband pulled beef in a tortilla wrap and he really liked it. I don’t normally buy beer or have 4 hours to cook something in the oven so this isn’t something I’d probably make again, but I did really enjoy it – and it showed me once again how versatile Branston is.
 

Tuesday, 31 May 2016

Slow Cooker Thai Green Beef Curry

I've been trying to use up the contents of my freezer so I can fit my ice cream maker inside! It's been quite interesting as I've made a list of everything in there and intend to cross it off and add to it - no more rummaging wondering whether we have any more chicken breasts, or telling my fiancé there is no garlic bread left and then finding some the next day (sorry!). It's also meant I don't have to buy as much as there is more food in there than I thought!

One thing I came across was a packet of cubed beef. My fiancé loves steak but isn't as keen on beef when it's casseroled but this sort of cubed beef really is best in the slow cooker. Rather than do a traditional casserole though I wondered if I could make it into a curry, and found this recipe from BBC Good Food for Thai Beef curry.

I used red chilli rather than green as that's what I had in the fridge, and I already had some galangal from when I made a Thai curry from scratch after doing a cookery class last year. I bought it from Sainsbury's so there's no need to find a specialist shop - though if you live in an area with Thai food stores then definitely go and have a look! Star anise is also something I've had in the cupboard for a while and I know spices do lose their potency so it was good to be able to use them. I didn't have any kaffir lime leaves either so I know this wasn't quite as authentic, but it still tasted really good. And my fiancé enjoyed it which was great as I really wasn't sure he would like it!

See link above for recipe.


Friday, 18 December 2015

Winter Slow Cooker Balsamic Beef

I bought some reduced-price stewing steak in the supermarket and thought it would work well in the slow cooker. I was going to chop the beef into cubes but it looked like a good quality piece of meat (or two pieces in fact) that I didn't think I needed to. I had been looking at a Slimming World recipe for beef in red onion gravy but as my other half doesn't like red onions I decided to change it and ended up pretty much making up my own recipe!
 
 
Slow Cooker Balsamic Beef - an original recipe by Caroline Makes


Serves 2
1 large shallot, sliced into two or three
400-500g braising steak
1 beef stock cube made up to 3/4 pint with hot water
1/4 tsp garlic puree or 1 garlic clove, crushed
1 tbsp tomato puree
1 tbsp balsamic vinegar
 
Mix the stock, garlic, tomato puree and vinegar and pour into your slow cooker. Place the onion pieces in the bottom and place the meat on top. Add more water if necessary so the beef is just covered.


Place the lid on your slow cooker and cook on high for about 2 hours or medium for 4 hours (mine has an auto setting that cooks on medium for 4 hours then keeps warm until I get home from work which is very handy).
 
 
Serve with veg and boiled or mashed potatoes.


This is a great second day dish as well if you cook enough for two but there is only one person eating it, as there was in my case.
 
For that reason I'm sending this to Cook Once Eat Twice hosted by Corinna at Searching for Spice.
 

Cook Once Eat Twice

Friday, 10 April 2015

Packed Lunch Ideas and Lunchbox Reviews


Whether you take a sandwich to work or make a packed lunch for your children I think there are few British people who haven’t made a meal at home and taken it with them to eat later. In the US a packed lunch is traditionally known as a bagged lunch and from what I’ve seen on television, Americans usually put their sandwiches in a brown paper bag. I’m not sure if this is completely accurate; to my mind, a packed lunch in a paper bag would get squashed! Surely American children must use lunchboxes as well – or is this a very British thing?

When I was at primary school, your lunchbox was a huge status symbol. They were square plastic boxes with handles, which fit a plastic flask inside (which came with the box), and were often decorated with the latest cartoon characters. I actually had a metal (tin) one at one point with a garden scene on the front, which I loved – until I was too cool for it any more and wanted a Care Bears one!
As an adult I used a plain Tupperware box with a white lid, and I’m not adverse to keeping plastic takeaway containers and reusing those for sandwiches or taking leftovers to work. But as I take a packed lunch to work almost every day it’s nice to have some better quality, attractive and even fun lunchboxes! I need a few in case one is in the dishwasher or I have something larger than usual, or sometimes I take different elements of a meal which need to be in separate containers.

So it was great when Flamingo Gifts offered to send me a few products from their website to review and as I wanted to test out food, drink and kitchen-related products I chose a couple of lunchboxes.
Flamingo Gifts has a wide range of gifts though – as well as kitchenware and gifts for the baker and cook in your life, there is jewellery, stationery, accessories like bags and purses, baby gifts, homewares like cushions and clocks…. The site is also divided into sections allowing you to browse for ideas for your boyfriend, grandmother, teenage girls and so on. The prices are very reasonable, and at the time of writing, a special deal offering 10% off and 1p first class delivery on all orders. I had great fun browsing the site and making a wish list!

I love Happy Jackson products with their fun and sometimes irreverent slogans. This lunchbox really makes me smile, from the sunny yellow colour with the jazzy band holding it together, to the message “Yay, lunch” – which is pretty much how I feel when it gets to midday!

The elastic band holds the two parts of the lunchbox together securely – though I wouldn’t put a liquid (such as leftovers in a runny sauce) into this in case it seeps out in your bag (if like me you have a long commute in the morning, or you have a child who will be carrying this around all day). There is plenty of space for a sandwich and piece of fruit and a KitKat for instance - or whatever you are having for your lunch.

One word of advice, I wouldn’t put this in the dishwasher; I also have their lunchbox which says “my very healthy snacks” on the front – and when you take the elastic band off you see the words “yeah right”! – and the words partly came off after one wash in the dishwasher.

It is really good value at only £5.94.

The second lunchbox I was sent to review is more of a bento box. I often take lunches into work that require assembly when I get there - for instance things that would go soggy if put together in the morning. I also like to take different salad ingredients and there's something nice about having them all separate rather than tossed together in one box, and this little lunchbox lets you do that.

It's from Ted Baker - also available on Flamingo Gifts - and is bright pink with a little metal bow on the elastic. The RRP is £12.99. It's very clever as the two sections can be carried separately with different contents and when they are empty, one fits inside the other to take up less space in your bag - ingenious!


The boxes are fairly small - it is 8 x 15 x 7cm when expanded - and only 5cm when shut. So this might not be enough for your entire lunch - I prefer to use it as a snack box and put for instance some crudites in one section and these Slimming World beef wraps in the other:

They are very easy to make. Take a slice of cooked beef - the kind you get in packets like ham -and spread with a thin layer of Quark and sprinkle over a dash of lemon juice and some salt. Fill with rocket and other lettuce if desired, roll up, and eat as a wrap.


Finally I selected this farmyard compartment tray - it's aimed at kids but I think it's really cute! The RRP is £9.31 which is a little more expensive but I think families with young children would get a lot of use out of it. The reason I like it is because as I said I sometimes like to have different things for my lunch which are all bite-sized, e.g. a portion of potato salad, some roast chicken slices, some carrot sticks and so on. The compartments are deep enough that you could put a dip in one section and perhaps the carrot sticks in the rectangle next to it. When I have lunch at my desk I eat out of a lunchbox -so it would be nice to  put this out in front of you! It also comes in a floral 'secret garden' design.


What do you take your packed lunch to work in?

Thanks to Flamingo Gifts for sending me the three items to review. All opinions are my own.


Tuesday, 19 August 2014

Beef Ragu


Sometimes when it's hot you still want a robust, cooked dinner but you don't want to be sweating over the oven or hob when you get home from work.

I adapted this recipe from Jamie Oliver's website;  he says it will feed a family for three days served over pasta, with mashed potato or crusty bread. I had mine with pasta and put the leftovers in the freezer for another day.

I didn't use all the ingredients from Jamie's recipe - for instance I don't like celery - so for his full recipe check out the link above. Or for my version, which is a bit quicker and I think just as  tasty, read on...

Serves 4
1 tbsp oil
6 rashers bacon, chopped
1 red onion, finely chopped
1 clove garlic, crushed
2 carrots, grated
750g minced beef
1 glass red wine
400g tin tomatoes
1 bay leaf
1 tsp oregano
salt and pepper to taste

Heat the oil in a pan and fry the bacon, onion and garlic.


Then add the grated carrot and minced beef and cook, stirring occasionally, until the mince has browned.

Add the bay leaf, oregano, seasoning, wine and tomatoes and simmer for about 30 mins until most of the liquid has been absorbed. Remove the bay leaf before serving.


This is a great way to sneak in some hidden veg like the grated carrot; you could experiment and see what other veg you can add as well. As well as Jamie's suggestions of pasta, mash or crusty bread I think this would be nice with rice (a bit like a chilli) or in a baked potato. It's really versatile and you can make a huge pot at the weekend and have it for dinner when you get home from work.


Saturday, 28 June 2014

Beef and Black Bean Stew


Having a slow cooker is very useful, as it means I can put something on in the morning and come home to a meal that would have taken ages to cook otherwise. In the spirit of the World Cup, I found a Brazilian recipe for a beef and black bean stew.

I had a packet of cubed stewing beef that I put in the slow cooker along with half a can of black beans, a large squeeze of tomato puree, a small squeeze of garlic puree, a quarter of a teaspoon of chilli powder, half an onion (chopped) and two cups of water.


I put the slow cooker onto 'auto' setting, which means it cooks for about 4 hours then keeps the food warm until you are ready to eat.


I served it with some Jersey royal potatoes and vegetables, though I guess rice might have been more traditional.


I'm sending this to Chris at Cooking Around The World for his World Cup challenge.


Saturday, 17 May 2014

Slow Cooker Beef in Orange

This started out as a boeuf bourgignon but I didn't have any red wine so I made it up as I went along, using white wine from a bottle that was already open and throwing in half an orange I had in the fridge from a previous recipe. It tasted delicious!


Here's what I did:
To serve two: take a packet of cubed casserole steak and brown in a frying pan. Chop a few rashers of bacon and fry as well. Then place the beef and bacon in the slow cooker along with some chopped onion, red pepper if desired,  a squeeze of tomato puree, 100ml white wine, 250ml beef stock (made from a stock cube), a dash of orange juice or the squeezed juice from half an orange, and an entire orange half. Cook on high for about 3 hours - depending on the settings of your slow cooker, you could also put this on the lower setting for a longer time.

When the dish is cooked, strain the cooking liquid into a small pan and mix with 1 tsp cornflour. Bring to the boil, stirring, until the sauce has thickened. Pour over the beef and serve - this goes well with mashed potatoes and green veg.


I'm sending this to the Slow Cooker Challenge, hosted by Janice at Farmersgirl Kitchen.


Saturday, 22 February 2014

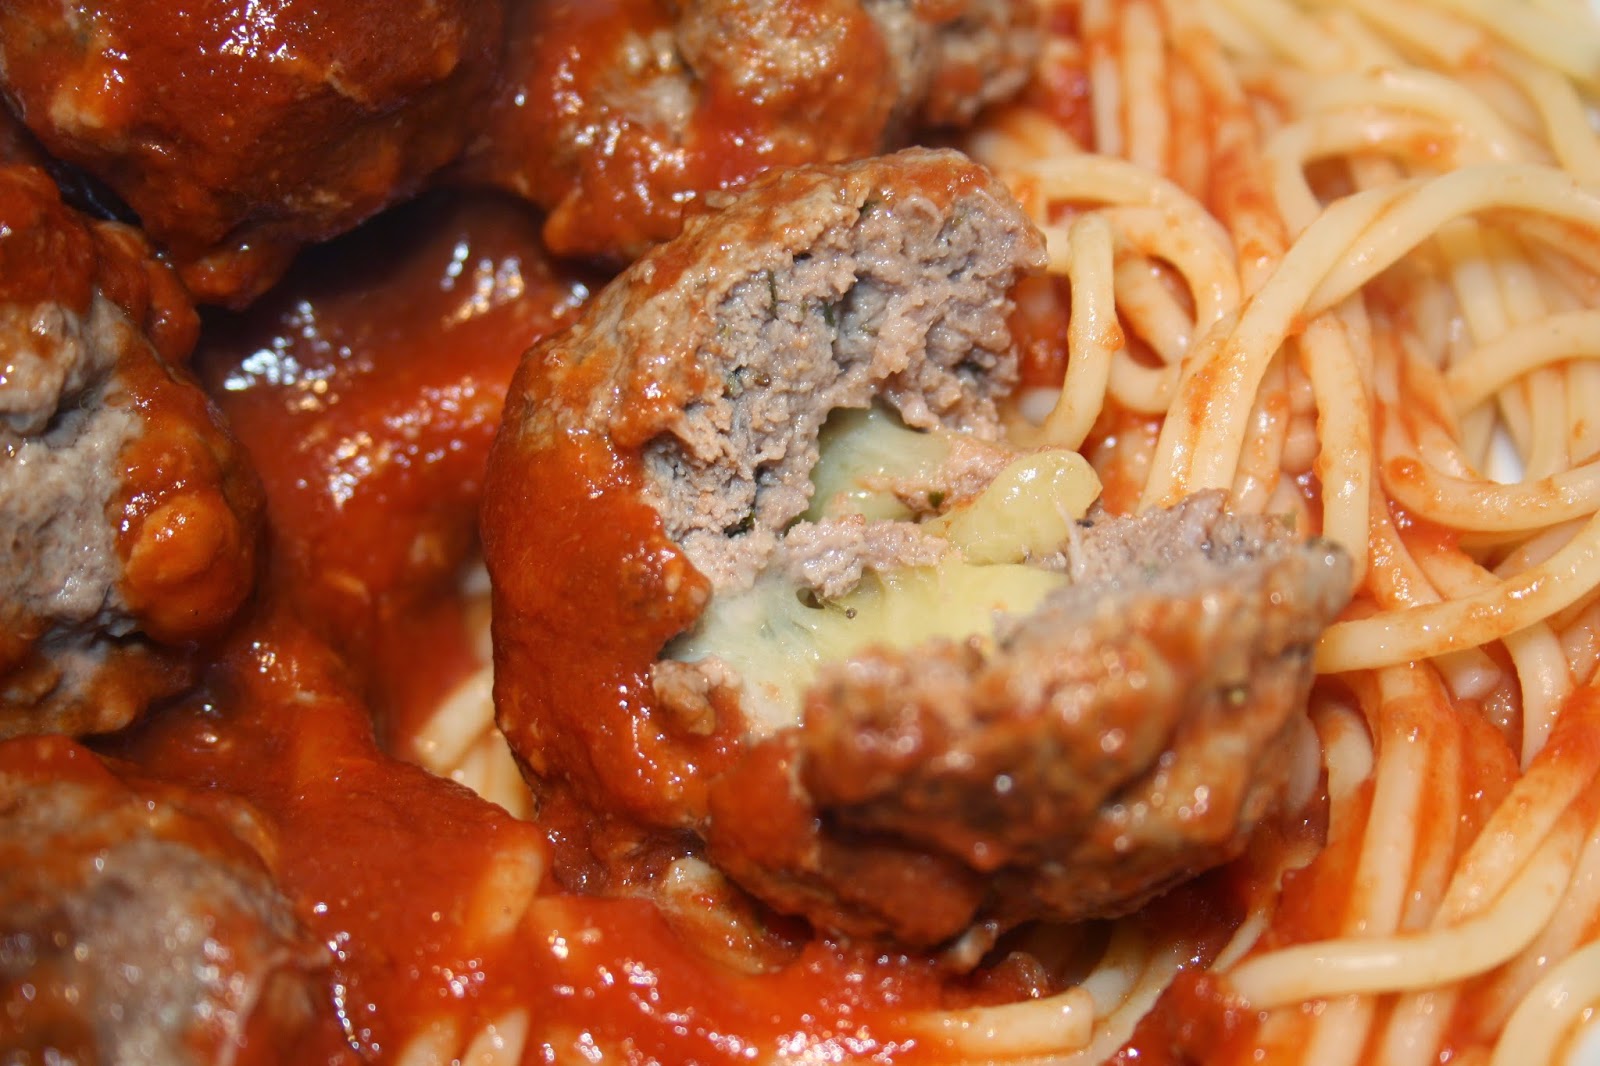
Cheese-stuffed meatballs


cheese stuffed meatballs

These cheese-stuffed meatballs are really simple and tasty and are a good way of jazzing up spaghetti bolognese if it's a dish you make a lot or you have someone who isn't that keen on pasta (strangely enough there are people like that out there!). Somehow the idea of a cheese-stuffed meatball is so much better than spaghetti bolognese even though there's not all that much difference!

I made these to use up some freshly minced beef I made after buying chuck steak from the local butcher and trying out my Kitchenaid mincer attachment. You can mix the mince with whatever you like such as finely diced onion, garlic, oregano and other herbs and a little salt. Then cut cubes of hard cheese - I've used cheddar here, but you could also try halloumi. Form the mince into a ball around the cheese.


Roll into balls and place in the fridge for about half an hour to firm up.


When ready to cook, heat a frying pan and spray with Fry Light or a little oil and fry the meatballs on all sides until browned.


In the meantime cook some spaghetti according to the packet instructions. You can also make a tomato sauce from scratch if you have time, but here I just used passata as I didn't want to compete too much with the flavour of the meatballs.


As you can see, when you cut into the meatballs, the cheese is softened but still intact; it hasn't oozed out or melted into the meat. These went down very well with my boyfriend!


In fact because I made these for my boyfriend as I knew he would love it (more than spag bol) and because I love him (awww)  I'm sending this to Cheese Please, hosted by Fromage Homage, which has a theme this month of cheesy romance.


I'm also sending this to Pasta Please, as the challenge this month focuses on spaghetti and these meatballs go perfectly with spaghetti. The challenge is hosted this month by a blogger I haven't come across before, called Feeding Boys and a Firefighter, on behalf of Jacqueline at Tinned Tomatoes.

Sunday, 2 February 2014

Baked Beef Cannelloni and the KitchenAid mincer


There's no denying that KitchenAid mixers are expensive, and take up a lot of space in the kitchen, but I absolutely adore mine. It's baby pink and was a present from my boyfriend :-) One reason I love it is how versatile it is - you can get all sorts of attachments for it. I've already got the pasta attachment and for Christmas my boyfriend's dad gave me the mincer attachment. It's very easy to use - you just screw it on to the end of the KitchenAid and it's ready to go.

I usually shop in supermarkets for the convenience but I get to our local butcher when I can - a great place called Scott's. They have a catering service which my boyfriend's family uses for parties, particularly on Boxing Day, and they also have a deli and meat counter. I asked for some steak that was suitable to mince, and was given some chuck steak. I'm not sure how much it was by weight; I asked for enough to make a couple of burgers for two people and ended up making three burgers and a portion of beef cannelloni out of it.


Here's the mincer attachment on my KitchenAid. You simply turn it on, feed the steak (sliced into strips) into the top, and watch it come out the other end as mince. Don't forget to put a bowl underneath to catch the mince!


It took literally no more than a minute or two before I had a lovely bowlful of minced beef. I decided to keep it simple and seasoned the meat with salt and pepper and oregano.


When I've made cannelloni before, I've cooked the mince first, but then found it tricky to stuff the meat into the dried pasta tubes. I decided to try stuffing the cannelloni with raw mince - I checked on the internet that this would work and I wouldn't end up with raw meat, and it seems to be a perfectly acceptable method. It was much easier to get the raw mince inside the pasta though when it cooked it had turned into pretty much a sausage!


Place the filled cannelloni tubes in a foil-lined baking tin and pour over passata which you can mix with garlic or herbs and season to taste.


Bake in a preheated oven at 180C for about 20-25 minutes.


To serve, sprinkle with parmesan cheese. This is a pretty simple but tasty recipe and was a great way to test out my new KitchenAid attachment!