Showing posts with label showstopper. Show all posts

Tuesday, 1 February 2022

Unicorn Birthday Cake - Cakes for Children


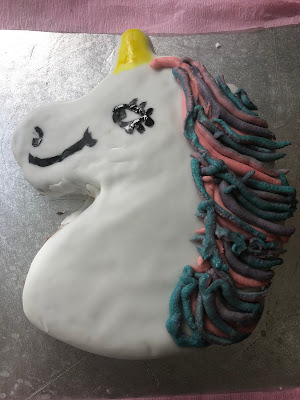
Last year my daughter had a ‘lockdown birthday’; COVID-19 restrictions meant that we couldn’t have a party, couldn’t have family to visit and couldn’t do anything much at all really. We still had a nice day, as we got Sophie a balance bike for her birthday, and were able to go to a local park to try it out. Of course I was still going to make her a birthday cake, and this year she asked (repeatedly) for a unicorn cake.

I’ve made a unicorn cake before, but thought this style was a bit grown-up for a three year old and possibly not even as instantly recognisable, so instead I invested in a unicorn cake mould to make it easier for myself. I bought a silicon mould from Ebay for around £7 which I thought wasn’t too bad; I’m sure I will end up using the mould again and if not I can pass it on to someone else. 

I wasn’t entirely sure of the quantity of cake mixture I would need to fill the mould, but luckily the scale of this BBC GoodFood recipe for an easy chocolate cake was just right. My daughter had requested a chocolate cake and I thought this recipe didn’t look too rich, compared to some others I have made in the past.

The cake was really easy to make and un-mould (I use PMW Cake Release spray to grease all my cake tins), and decorating was fairly straightforward too. I’m sure a more artistic person – or more professional cake decorator – could make a more beautiful unicorn, but my daughter loved this! 

The cake was covered in a chocolate buttercream and then rolled out white fondant. I coloured some buttercream in various colours and used a piping bag to pipe each section of the mane – after all, everyone knows that unicorns have rainbow hair! 

This photo has come out a little darker than the real thing – you can’t quite see the purple in with the blue and pink, but my daughter thought it was great. She also had a unicorn helium balloon and a few unicorn-related gifts, so referred to this birthday – and continues to do so several months later – as “my unicorn birthday”. 

The year before was “my dinosaur birthday” – when she had a dinosaur cake and several dinosaur-related gifts – and she has already told me that her next birthday, even though it is nearly six months away, is going to be “my Sofia birthday”. So I’m already squirreling away Sofia the First gifts and thinking about how to make a Princess Sofia cake!

Tuesday, 7 November 2017

Baby Cow Gender Reveal Cake - For My Own Baby!


There’s a big trend at the moment for gender reveal parties, in the US at least. I’m seeing more and more posts and pictures on the internet where couples expecting a baby reveal whether it’s a boy or a girl in front of their family and friends – often in quite creative ways. For instance, when the gender is discovered at the antenatal scan, rather than tell the parent(s), the sonographer places the result into a sealed envelope. The parents give the envelope to a bakery, which makes a cake that has either neutral or both pink and blue decorations on the outside, but the cake inside is dyed either pink or blue, and often has sweets in the centre that tumble out. It’s only when the couple actually cut into the cake and see what colour is inside that they find out whether they are having a boy or a girl.


Another reveal method is for the couple or mum to stand surrounded by family and friends (usually outside) holding a large helium balloon that is opaque – often black or patterned. They burst the balloon and are showered with either pink or blue confetti – again having had no idea themselves what the gender would be.

Those seem really fun if you want to make a thing of revealing the gender in front of your loved ones, but the idea of not knowing ourselves was a bit strange to me – and gender reveal parties aren’t really a thing in the UK. Nonetheless, I decided I wanted to make a gender reveal cake – but rather than give a sealed envelope to a bakery, my husband and I would find out at our 21-week scan and I’d bake a cake that evening.

I wanted to fill the cake with sweets that would tumble out when it was cut, and I found getting hold of pink sweets was easy but blue surprisingly hard! As I was making the cake in the evening I wanted to have both colour sweets already to hand, so a few weeks before the scan started having a look on the internet and online in supermarkets. There are loads of pink sweets available, from strawberry bonbons to a giant tube of purely pink Smarties, but there didn’t seem to be a blue equivalent – at one point the closest I thought I was going to get was mint tic-tacs! Of course, I could have gone to M&M World in Leicester Square – where you can buy M&Ms by weight in any colour you like – and I do work in London but getting to Leicester Square is a bit of a pain and the shop is busy, full of tourists and generally not somewhere I want to go if I can help it.

Luckily I spotted an old fashioned-style sweet shop called Hardy’s near my office – there are a few of these around. They had giant jars of all kinds of sweets against one wall, including pink strawberry bonbons and blue raspberry bonbons, so I bought a bag of each.

I also wanted to plan the cake and buy the ingredients in advance – it might have been nice to have the option of baking both a pink strawberry cake and a blue raspberry-flavour cake but I decided to take the easy option and make a lemon cake.

I used this recipe from Good to Know, though I didn’t do the lemon syrup due to lack of time, and realised the lemon curd in my fridge was out of date and I didn’t have time to make more, so I made a simple lemon buttercream for the filling.

 
I made up the batter, adding lemon zest and a bit of lemon juice, and then added some gel food colouring before the mixture went into two cake pans.

 
When it was baked and cooled, I used a glass to cut a circle out from both layers of cake, going right through the top layer and part way through the bottom layer. I spread lemon buttercream icing on the bottom layer and sandwiched the other cake on top, then filled the hole I’d cut with the sweets, replacing a thin slice of the disc I had removed so the cake would be flat on top.
 

The rest of the buttercream went on the top and around the sides of the cake so I could cover it with a large piece of rolled white fondant. As my surname is Cowe – pronounced cow – this had to be a cow-print cake, like my wedding cake last year! But instead of black and white I made the patches a mixture of pink and blue. I used the same cutters from the Lakeland ‘make your own cookie cutter’ set that my sister and I used on the wedding cake last year – lovely to think that the cutters were coming out again for such a special reason!

 
It was already 9pm and I was watching the Apprentice when I decided the cake did need a baby cow topper as well, so I moulded the animal – complete with baby bottle – while sitting in front of the TV. It’s not my best creation but given it wasn’t even going to be seen very long (I was taking the cake into work, not having a gender reveal party) I didn’t think it mattered much. I also made four alphabet blocks spelling ‘baby’- I thought the cake looked quite pretty and it didn’t actually take that long.

So here’s what you’ve no doubt been waiting for…. when the cake was cut the first slice revealed the colour inside was…. Pink!  We are having a little girl.


The cake tasted really nice and it was fun to see people’s reactions and to be able to share our news!

I'm sharing this with CookBlogShare hosted by EasyPeasyFoodie.

Saturday, 28 October 2017

Lime and Coconut Halloween Slime Ghost Cake


Halloween baking is such fun - you can really push the boundaries of how you would normally decorate a cake, and make it as over the top as you like! Obviously subtle black and purple looks very stylish and striking but this Halloween I decided to go for..... green slime!

The theme for Food 'n' Flix this month is Ghostbusters - the 2016 remake which was chosen by host Coffee and Casseroles. I did enjoy the film and didn't think there was anything odd about an all-female cast - the film was funny, it carried on the ethos of the original Ghostbusters film and there were even several nods to the original - which I won't spoil if you haven't seen it, but you will have fun spotting the cameo roles to the extent that I'd worked out who Patty's uncle was (who she refers to a few times) long before he appears on screen!

My heart is loyal to the original Ghostbusters though (the first one anyway, not the sequel - which I don't remember being that bad but is largely panned). It came out when I was five years old so I don't imagine I would have seen it right away, but by the time it was shown on TV (in the days of only four channels, you had to wait a couple of years for new movies to appear on screen!) I would have been about seven or eight and was transfixed. I even used to run around the playground at primary school with a group of friends acting out Ghostbusters stories - though as one of the only girls I was always forced to be Janine. Though it could have been worse, the other girl played Slimer!

In terms of choosing a recipe for Food 'n' Flix, my mind turned straight away to the Stay Puffed Marshmallow man from the first movie... from the remake, one of the over-riding foodie references is to Chinese takeout - there's a standing joke about takeaway food that Abby (Melissa McCarthy) gets from a Chinese restaurant, and their HQ is above a Chinese restaurant.

But as it's Halloween I wanted to make something 'spooky' and not Chinese food. Slimer, the friendly green ghost, features in both the original movie and the remake, so I took him as my inspiration and decided to make a cake oozing with green 'slime' buttercream!


For the cake itself I used this recipe from RTE for Irish chef Rory O'Connell's toasted coconut and lime cake though I did change it a little. I didn't cover it with the toasted coconut and I didn't make the cream cheese filling and instead did a lime flavoured buttercream which I then added green food colouring to.
 
Despite being green the cake looks quite elegant like this... but I wasn't going to stop there!
 

On top of the cake there is more green buttercream, plus some green candy floss I bought in a tub from a shop called Tiger and some marshmallow ghosts and chocolate eyeballs, also from Tiger.

Does it look like Slimer has been at this cake?!


I'm sharing this with Food 'n' Flix and Cook Blog Share.


Thursday, 19 October 2017

Banoffee Tool Box Birthday Cake


We had a family barbecue for my father-in-law’s birthday in August and I wanted to make a cake that would stand out. I tried to think of things I associated with him – my father-in-law is really handy, at everything from fixing fences to building a child’s ride on car from scratch so I had the idea of a tool box cake.
 
Looking at Google Images I realised there were some incredibly detailed, realistic tool box cakes and figured I wouldn’t have the time or skill to do anything like that. Rather than make something else altogether, I decided to make a simple rectangular red toolbox, with a separate lid, and make some tools separately to pull the whole thing together.


My father-in-law really likes banoffee pie so I decided that would be a good flavour for the cake and found a recipe in Fiona Cairns’ Birthday Cake book. The recipe in her book is designed to make cakes in the shape of a pair of dice – for someone who likes a game of chance perhaps – but it was easily adapted to a loaf tin shape. You can find the recipe online at Cooked.

 
I decided to make the lid separately and as I didn’t want it to be too heavy, I thought rice krispie cakes would be perfect. I’ve seen cakes where all sorts of parts were sculpted from rice krispies – like an animal or person where the limbs were made from rice krispies. I wasn’t sure what consistency to make my rice krispie cake so took the easy way out and (kind of) cheated by using Kelloggs Rice Krispie squares. I sandwiched 6 – a mixture of chocolate flavour and plain – together with melted chocolate, in a block the length of my loaf tin, and put them in the fridge to set.

 
For the cake, I followed the recipe, mixing butter, sugar, mashed banana, eggs, vanilla, milk, flour, baking powder, salt, nutmeg and cinnamon. The mixture baked nicely in my loaf tin – it did create a bit of a dome which had to be sliced off to level the cake. I also cut some corners – because I had a lot of other food to prepare for the barbecue as well – with the frosting. Fiona Cairns gives a recipe for toffee buttercream which sounds really nice, but as I had a tin of Carnation Caramel I decided to make some regular buttercream and add that.


After filling the cake I covered the whole thing plus the rice krispie cake block in red fondant, and made a handle out of fondant for the lid and some black panels for the front of the box. I wasn’t that confident at making tools even if I drew a template and followed it, so I bought some cookie cutters from Amazon and cut out a saw, pair of pliers, hammer and spanner, then did the same again in coloured fondant to make the handles. I think they worked really well, what do you think? These are the ones I used:


Finally I placed the tools on or around the tool box, secured the lid with a couple of cocktail sticks in an open position and the cake was ready to be presented. The cake itself was moist and delicious – I do recommend checking out Fiona Cairns’ recipe!


Saturday, 13 May 2017

40th Birthday Showstopper Chocolate Drip Cake With All the Chocolate

This was my husband's second birthday cake - well, it was his 40th!

We spent his birthday with some of his family then saw other family the following weekend, so I wanted to make a cake for both occasions. For his birthday itself I made this chocolate R2D2 cake (a throwback to his childhood) and the following weekend I wanted to make more of a serious classic cake - but at the same time I wanted it to be a showstopper.

My husband loves chocolate so I decided to celebrate his love of chocolate by making something I'd seen a few (or more than a few) times on the internet. It's a 'drip cake' which means a chocolate cake with a chocolate glaze or ganache that is dripping down the sides of the cake; it's also something of an 'explosion' cake with various chocolate bars and types of chocolate sticking out of the top. They are intended to look as if they have been placed in a fairly haphazard fashion but are actually carefully arranged with pieces of different heights to create interest and balance and the appearance of a lot of chocolate bursting out of the cake!

For the cake itself, I actually had enough mixture leftover from the R2D2 cake (as the cake mould just said it took an 8-egg batter, but the recipe I used gave me far too much) to make a normal round sponge cake which I froze, and defrosted in time to make this.

For the other layer, I made the chocolate cake from this Konditor and Cook Curly Whirly cake as I remembered it being really good before (and it was).

To make the chocolate ganache on top, I used:
200ml double cream
200g plain chocolate, chopped

Heat the cream in a small pan and when it is just simmering, remove from the heat and stir in the chocolate until it has melted. Allow to cool until it is still a thick pouring consistency.

Here's a nice pic of some cake batter... I do like the before and after photos!

The cake, sliced through the middle - with the one I had in the freezer I ended up with four layers. For a drip cake you do want it to be quite tall.


 Like this - four layers of chocolate cake


I coated the top and sides of the cake in chocolate buttercream then poured the chocolate ganache over the top, encouraging it to drip down the sides. I stuck various chocolate bars and pieces of chocolate in the top, sprinkled over some giant chocolate buttons, and added some red stars (made of icing, which I bought from a cake decorating website) and a diamante '40' pick I bought from the same website.

 
 My husband's family seemed quite impressed and my husband loved it - though he had better not get used to having two birthday cakes!


Sunday, 23 April 2017

Chocolate Star Wars R2D2 40th Birthday Cake

My husband was very lucky for his 40th birthday. As well as some great presents including a 'carvolution' framed picture of all 9 cars he'd ever owned  - interestingly, they seem to have put their prices up quite a bit since I bought it a few weeks ago - and a meal at Hawksmoor, he had two birthday cakes.

We were spending his birthday with some of his family - more on this in another post as I will do a restaurant review.  In the evening after a day out in London we had a takeaway at his brother's house so he could put the children to bed and keep an eye on them. There were six adults but I knew that the following weekend we were seeing more of my husband's family with up to ten people - so I wanted to make him a birthday cake for his birthday but also another cake a week later.

He requested a chocolate cake and I planned a chocolate extravaganza for the bigger occasion, and had an idea for the other one quite some time ago. My husband has mentioned a few times a birthday cake he had as a child in the shape of R2D2 which he thought was brilliant - I thought it would be fun for him to have the same sort of cake when he turned 40!

I bought an R2D2 silicon cake mould for only £5 or so in the Lakeland sale back in January which I hoped would make the cake a doddle, though I wasn't sure how easy decorating it would be. In the end it was actually relatively easy.

The cake mould is quite large and it says on the box to use an 8-egg recipe; but other than that there wasn't any guidance. I spent a while googling 'what recipe to use for Lakeland R2D2 cake mould' and didn't really come up with much, so decided to use my trusty chocolate wedding cake recipe. This is the recipe from BBC Good Food that I used for the middle layer of my wedding cake and when I made the wedding cake of Ros from The More Than Occasional Baker. It works brilliantly every time and is a 10-egg recipe; I scaled it down to use eight eggs but had enough mixture left over after filling the R2D2 pan to make another 9-inch cake which I put in the freezer!

So I recommend that for the R2D2 cake pan you use a six or even five egg recipe; you can basically divide the quantities of the BBC chocolate cake recipe in half. You'd then need to adjust the cooking time and I'd advise keeping an eye on it and testing with a skewer - I think I baked mine for an hour and a half but didn't make a note as I was playing it by ear.

A lot of chocolate

The cake turned out perfectly and as always with this recipe was moist and super-chocolatey.


I had sprayed the pan liberally with PME Release-a-Cake spray, making sure I got into all the nooks and crannies. The cake came out of the silicon mould perfectly and you can see all the details of R2D2.

I wanted these details to show through when I decorated the cake so instead of covering the cake with buttercream, I brushed it with some warm runny apricot jam. I carefully sliced the cake through the middle and filled the centre with chocolate buttercream and then covered it with white fondant, rolled fairly thin, which I smoothed down so the details of the cake still showed through.


I then cut some pieces of blue fondant for the details and before I stuck them onto the cake, sprayed the white parts silver with PME edible silver lustre spray.


Lakeland R2D2 cake


I'm sharing this with We Should Cocoa, hosted by Choclette at Tin and Thyme.
Saturday, 25 March 2017

Strawberry and White Chocolate Unicorn Cake with a Surprise Inside


unicorn cake for Comic Relief

Scrolling through the messages on my Blackberry on a day off, I spotted a message about a bake sale at work for Comic Relief the following week. I always bake cakes when there is a charity bake sale and occasionally there has been a competitive element. I won the work bake-off two years ago with this floating malteser cake:


The following year I made this 'surprise inside' Mini Egg ombre piñata cake, but was out done by one of the other entrants (my sponge was a bit dry)

Easter showstopper mini egg ombre pinata cake

This year I wanted to make something special again and spent a while browsing the internet to get ideas and find out what current cake trends were, and decided to make a unicorn cake. I chose a strawberry cake recipe, bought some of the ingredients, spent time planning exactly what I was going to do... and when I got back to work and read the email properly, I realised that while all cakes were welcome for the bake sale, there were three competitive categories: tray bake, savoury cake, and chocolate cake. And I wasn't going to make any of those.

I considered scrapping my plans and making a different cake entirely but still wanted to do this one, and hit upon an idea: I could make a strawberry cake with white chocolate. I had a feeling that the other chocolate cake entries would all be milk chocolate or plain chocolate so having something with white chocolate might be a nice change.

In the end there weren't that many entries in the chocolate category after all so I won the bake off hands down! The cake tasted delicious, was really light and moist and I hid some white chocolate covered strawberries in the centre, which tumbled out when the cake was cut. It wasn't actually that difficult to decorate either and if the comments I received are anything to go by, it was definitely worth doing!

I didn't want the strawberries to overpower the white chocolate but also didn't want them just in the filling, so I decided to puree the strawberries in a blender and swirl it through the cake mixture in the tin before it was baked. To make sure the white chocolate flavour came through, I made a white chocolate buttercream for the filling and a white chocolate ganache to coat the outside of the cake before covering it with fondant.


Strawberry and white chocolate cake - an original recipe by Caroline Makes

I used a 6-inch cake tin (which is pretty small) as I wanted the cake to be tall but not too large and heavy as I had to carry it into work. This quantity makes four layers of a 6 inch cake.

450g butter, softened or margarine like Stork
450g caster sugar
8 eggs
450g self-raising flour
200g white chocolate, grated
50ml milk
227g punnet strawberries (or roughly that amount), hulled, chopped and blended in a food processor until pureed

for the strawberry centre:
75g strawberries
50g white chocolate

for the buttercream:
175g butter, softened or margarine like Stork
350g icing sugar, sifted
100g white chocolate, melted
pink food colouring
PME Cake Release or butter/marg for greasing the cake tins

for the ganache:
60ml double cream
120g white chocolate

to decorate:
about 1kg fondant - I find it easier to have extra for rolling out
PME gold edible lustre spray
black food colouring or a black edible ink pen
a wooden dowel or similar, about 8 inches long
star-shaped piping nozzle and piping bag

First if you want to fill the cake with chocolate-dipped strawberries you need to start by making these. The other thing I'd recommend using for the centre of the cake is Rainbow Drops - I had been planning to use these as I thought I had some in the cupboard but then couldn't find them!
 
Image result for rainbow drops

If you are using strawberries: Melt the 50g white chocolate in a small bowl in the microwave or a bain marie and dip in some chopped strawberries and leave on a wire rack to set. I actually did these the night before I needed them, though they don't take that long to set.


Preheat the oven to 180C and grease two loose-bottomed 6-inch cake tins. or spray with Cake Release.
 
In a large bowl, cream together the butter and the sugar then beat in the eggs. Fold in the flour then grate in the white chocolate, then carefully stir in the milk.


Spoon a quarter of the cake mixture into each of the two tins (so you will fill four in total).

Take a few spoonfuls of the strawberry puree and swirl through the cake mixture in the tins. Bake in the oven for 20-25 minutes, until the cakes are cooked through but still fairly soft.

 
Remove from the oven and allow to cool in the tin, then turn out onto a wire rack.


Wipe out the two tins, grease or spray again and spoon the rest of the cake mixture into the two tins. Bake for 20-25 minutes and leave to cool as before.

Make the buttercream by creaming the butter and the icing sugar and stirring in the melted white chocolate.

Make the chocolate ganache by heating the cream in a small pan until simmering. Remove from the heat and add the white chocolate and stir until melted. Set aside until it has cooled and thickened to a spreadable consistency.

When you are ready to assemble the cake, carefully level the cakes - if they have risen unevenly, slice a thin amount off the top of the cakes so they are flat.


Place the bottom cake on a cake board. Then take the next two layers and using a round cookie cutter, cut out a circle from the middle of both cakes. Spread some buttercream on the bottom layer, place the second layer on top and spread buttercream on top, leaving the hole free; place the third layer on top and repeat. Reserve a little of the buttercream to make the unicorn's hair.


You will now have a three-layer cake with a hole in the middle and a solid bottom layer. Pop your chocolate-dipped strawberries or sweets or whatever you are using into the hole, and place the solid top layer of cake on the top.


Spread the white chocolate ganache around the outside and on top of the cake.


Roll out the fondant on a mat dusted with icing sugar until it is large enough to cover the cake. Lift by draping it over a rolling pin and place on top of the cake. Smooth down the sides and trim the bottom.

Using the offcuts, roll two thin sausage shapes and twist one over the other, tapering as you get to the end - this will be the unicorn's horn. If you want you can use flower paste and the horn should stand up on its own; I used fondant which is too soft, so I poked a wooden dowel into the horn, leaving about an inch and a half at the end, which I later used to insert into the cake.


Place the horn onto newspaper or kitchen paper and spray with PME gold lustre spray. Leave to dry.


Using more of the fondant offcuts, shape two ears - I made these quite thick so they would stand up. Colour a small piece of fondant with pink food colouring and cut two flat pieces to stick inside the ears. I then used a cocktail stick inside each ear to attach them to the top of the cake.

I bought an edible ink pen by Rainbow Dust which has a thin end and a thick end; it took me about ten minutes to get the lid off one end and the other one wouldn't budge at all! So I could only use the thin end. It would have worked better if I'd waited for the fondant covering the cake to fully dry but it was already 11pm so I drew on the eyes, with the nib of the pen cutting into the fondant more than I would have wanted, and I would have preferred a thicker line, but it looked ok.


Add a little of the pink food colouring to the rest of the buttercream and using a piping bag and star nozzle, pipe some hair on top of the unicorn's head. Finally take the horn when the gold spray has dried and fix onto the top of the cake.

When you cut into the cake, the strawberries inside will tumble out, which is a nice surprise - you can just about see the strawberry swirl through the cake as well.


This cake would be lovely for a little girl's birthday I think - and of course it won the Comic Relief bake off!

I'm linking this up with Cook Blog Share, hosted by Eb at Easy Peasy Foodie.

Hijacked By Twins
 
I'm also sending it to We Should Cocoa, hosted by Choclette at Tin and Thyme.