Showing posts with label heart. Show all posts

Monday, 14 February 2022

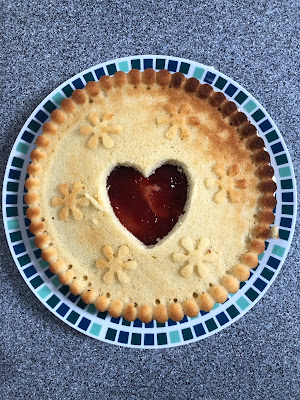
Jammie Dodger Heart Cake

This cake is inspired by Jammie Dodger biscuits, which have two layers sandwiched together with jam, and a heart shape cut out from the top biscuit layer to show the jam underneath. It’s very easy to make and fun for Valentine’s Day or someone who loves a Jammie Dodger biscuit!

I used a giant cookie silicon cake pan, which has two parts and lets you bake a cake where the sponges have fluted edging and flowers and also the word ‘cookie’ on the top so they look like giant biscuits.

I used a heart shaped cookie cutter to cut out a piece from the top layer to show the jam underneath.

The recipe itself is a pretty simple one:

175g butter, softened

175g caster sugar

3 eggs

175g self-raising flour

1 tsp vanilla flavouring

50ml milk

For the filling

150g butter, softened

300g icing sugar

Strawberry jam


Preheat oven to 180C.

Cream together the butter and the sugar then mix in the eggs one at a time with a spoonful of the flour each time. Fold in the remainder of the flour. Finally mix in the vanilla flavouring and the milk.

Spoon into two greased cake pans and bake for 20 minutes.

When cool, use a heart shaped cookie cutter or cut around a heart template to make a heart shaped hole in the top layer of your cake.

Cream together the butter and icing sugar to make buttercream and spread over the bottom part of the cake. Spread a layer of jam on top, making sure the jam is thick enough in the centre of the cake (where your heart shaped hole will go) that the buttercream can’t be seen. Place the top layer on top of your cake and enjoy.

Sunday, 18 December 2016

Red Heart Anniversary Card

 
I made this anniversary card for my parents using some very quick shortcuts - it looks like it would have taken a lot longer than it did!
 
I think I got this pack of three rolls of tape from The Works - the intricate patterns are really nice and the tape just needs peeling and cutting off to the right length, it's so easy! 


I used the tape to make a border along the top and bottom of the card, and used a heart topper I bought in a pack ages ago. The topper uses quilling to make a heart shape - a technique I've been meaning to try for a while and not got around to. The 'happy anniversary' sentiment is a simple silver outline sticker to finish the card off.

Sunday, 14 February 2016

Chocolate Brownie Valentine's Cake with Stencilled Hearts


It feels like it's been ages since I've made a proper cake so I decided to make one for my fiancé for Valentine's Day - I also wanted the chance to try out one of my cake stencils with a heart pattern that I'd never used before.

We'd just covered stencilling in my wedding cake decorating class and I'd written the blog post but forgotten to publish it so you'll have to hang on to read more about the technique - for this blog post I will concentrate more on the cake itself.

I used a recipe from the Great British Bake Off Big Book of Baking, for a "classic chocolate fudge sandwich cake". I filled it differently and decorated it differently, and both layers of the cake did sink when I took them out of the oven, which was odd as my cakes don't usually do that and I followed the recipe exactly. I thought the cake reminded me of a chocolate brownie in texture which is why I've given it this name; it was kind of chewy (in a good way) and tasted very good - I had a small slice just to try it, and think I will pack the rest of it off to my fiancé for his work colleagues (some of whom are coming to the wedding so there's no harm in trying to win them over!).

You can find the full recipe online here, so I won't repeat it. I didn't split my cake into four layers and instead just used chocolate buttercream to fill it and to spread over the top and around the sides, as I only wanted a thin layer of coating as I was covering the cake with fondant. I found that half the amount of the quantity in the recipe was plenty, and I actually used milk chocolate rather than plain as I generally prefer it, but I decided afterwards that plain would have been better in this recipe.

So I followed the recipe for the cake exactly and then for the buttercream used:
150g icing sugar
75g milk chocolate, melted
75g butter, softened
which I beat all together to make a buttercream consistency.

Melting chocolate and butter
 
Beating the mixture


Two pans about to go in the oven


And after baking - both sank in the middle


I covered the bottom layer with buttercream


The two layers stacked very neatly on top of each other - this is a good-sized cake


Crumb coating of buttercream around the sides and on the top


Covering with white sugarpaste


Mixing some royal icing with gel colour and getting ready to spread


Here's the stencil I used - it fits neatly onto the top of the cake. You have to stick it down with tape or it will move.

Spreading the icing over the stencil


And here it is! The icing was a bit thick in places because the top of the cake wasn't completely flat, which means there were some small gaps around the edge of the stencil shapes but I don't think it's too bad for a first attempt.


I added a pink ribbon and tied it in a bow around the front of the cake


And finally placed the cake on a heart-shaped cake board I already had. My fiancé thought it was cute and thought the chocolate cake was particularly good.


Do you fancy a slice?


I'm sharing this with We Should Cocoa, hosted by Choclette at Tin and Thyme, as her theme this month is butter.


I'm also sending this to Love Cake, hosted by Ness at JibberJabberUK, where the theme is "the month of cake".


And also to Simply Eggcellent, hosted by Dom at Belleau Kitchen, as this month "anything goes".

And finally I'm sending this to the Food Year Linkup, hosted by Charlotte's Lively Kitchen, as it's Valentine's day of course.

Tuesday, 10 February 2015

Valentine's Chocolate Hearts


These candy cane chocolate hearts I made at Christmas were so cute and easy to make that I decided to develop them for Valentine's day. I actually made them a bit early as we are going away for Valentine's weekend, and last week my boyfriend was away at a conference for a few days so these were waiting for him when he came back. In fact I only made them about an hour before he got home, they were so quick!

I wanted to put something around the edges that would give the hearts enough of a structure and decided to use Hershey's Kisses, and mini kisses for the smaller hearts. The latter are similar to chocolate chips and if you can't get the full size Kisses you could use Smarties -perhaps pink ones that you can buy in large tubes of all one colour.


Place a piece of greaseproof paper on a baking tray - as you will need to be able to lift this into the fridge. Lay out the Kisses or Smarties or whatever else you are using in a heart shape.

Melt some chocolate - I prefer to use milk chocolate - and carefully pour or spoon into the heart shape, using a teaspoon to gently nudge it up to the edges.


Sprinkle with whatever decorations you like - I did mini marshmallows, heart-shaped sprinkles and pink glitter.


Then place in the fridge for about an hour to set. Carefully peel off the baking paper and give to your loved one.


 I'm sending these to Alphabakes, the blog challenge I co-host with Ros of The More Than Occasional Baker, as the letter I have chosen this month is V - for Valentine's hearts.


 I am also sending this to the Food Year Linkup, a challenge I’ve just come across which celebrates various calendar events so this is perfect for Valentine’s day. The challenge is hosted by Charlotte at My Recipe Book.
Food Year Linkup Feb14


Over at Treat Petite, love is in the air- that is their theme this month – so I am also sending them my chocolate hearts. The challenge is hosted this month by Kat at the Baking Explorer and in alternate months, Stuart at Cakeyboi.


Tuesday, 16 December 2014

Candy Cane Chocolate Hearts


I saw these on the internet when I was looking for edible gift ideas and thought they were just brilliant. I already had candy canes from making my peppermint bark and had quite a few left over. All you need in addition is chocolate and a few sprinkles; these are so easy to make and really pretty.

Place a piece of greaseproof paper on a flat baking sheet or chopping board and arrange the candy canes so they make a heart shape. Make sure both ends are touching and you have no gaps - though my candy cane moved slightly as the chocolate set, leaving a gap, and it was still fine!

Melt some chocolate in a bain marie or microwave - you need about 50-60g of chocolate per heart I would say but I wasn't measuring (and I expect candy canes come in different sizes).

Pour the melted chocolate into the space inside the candy canes and add any sprinkles that you like - I had some snowflake sprinkles which I thought worked really well.

Place in the fridge for about an hour to set.

I packaged them up in festive bags to make edible gifts. You could also thread some ribbon through the top and hang these on your Christmas tree, providing your tree isn't near a radiator or the chocolate will melt!


I'm hosting Alphabakes this month (it's Ros from the More Than Occasional Baker's turn again next month) and the letter is X. We are allowing Christmas recipes so I'm including this.
 
 
I'm also sharing these candy cane hearts with Treat Petite, hosted by Kat at the Baking Explorer and Stuart at Cakeyboi, as they also have a Christmas theme this month.
 
 
Finally I'm sending these to Tea Time Treats; hosted by Karen at Lavender and Lovage and Jane at the Hedgecombers, it has a lovely theme this month of glitter, sprinkles and shiny stuff. The snowflake sprinkles should mean this counts.
 

Friday, 30 May 2014

Heart-Shaped Cake Balls


I described in a previous post how I made my own Rolo chocolates from a mould provided by the Dot Com Gift Shop. They also sent me a heart-shaped mould and some heart-shaped petit four cases to review.

I decided not to make chocolates this time however and instead make cake pops. Usually these are on sticks but they taste so delicious I don't see why you couldn't just make them as bite-sized nibbles and enjoy them that way. I had made a chocolate cake that was part of the same project, which you will be able to read about shortly, and had to trim the cake a bit. So I had some leftover cake trimmings which I crumbled up into a bowl.


I mixed it with some chocolate buttercream to make a dough.


Simply press the mixture into the moulds and place in the fridge for a little while to firm up.


As the mould is silicon it is completely flexible, making it very easy to turn the shapes out. You could also dip them in melted chocolate to coat them.


The Dot Com Gift Shop also sent me these mini heart-shaped petit four cases, which are just the right size to use with the mould.


Simply place the cake shapes or your chocolates into the cases to serve.


Disclaimer: I was sent these products free of charge by the Dot Com Gift Shop. I was not asked to write a positive review and all opinions are my own.

Wednesday, 21 May 2014

Wilton Tasty-Fill Heart Pan: Engagement Cake with Hidden Heart

Have you ever bought something and put it to the back of the cupboard, and kept telling youself that you will use it, at some point.....? I've had the tasty-fill pan (who comes up with these names?) from Wilton for a couple of years but never gotten around to using it, partly because the instruction leaflet didn't make a huge amount of sense to me.


The recipe leaflet leaves a lot to be desired, suggesting that you use a boxed cake mix, and frozen Cool Whip or similar for the filling - which is something we don't have in the UK. I also wasn't sure I fully understood the instructions for how to assemble the cake. Luckily there are now plenty of bloggers who have used this tin and explain the process, so I finally decided to take the plunge, and am very glad I did. It's not difficult at all, and the result is very impressive. I made this for a work colleague's engagement and birthday and I had people coming up to me all day asking how I had made the cake and saying how good it was.

Inside the box you get two cake tins which look like this. It's important to get them the right way around; the easiest way to tell is that each tin has the Wilton logo imprinted on it; you want to make sure the logo is on the bottom (that is, facing down and not the right way up to read the name) on each tin.  You also want to make sure that the centre circle is a deep indent rather than sticking up as you will see in the second picture. This is the right way up:


And this is the wrong way. Got it?


I used the recipe for Nigella's Old Fashioned Chocolate Cake which you will find if you follow the link. I ended up having to make a double quantity of the recipe as the cake tins are very deep - in fact this is the tallest cake I've ever made.

It's also worth mentioning that I think chocolate cake works best here. You really don't want to see where the two layers of cake join, and if you make a vanilla sponge, the edges of the cake will most likely be more browned so there will be a line going through the middle of the cake. Chocolate cake means that you won't see the join.

You need to grease both tins really well and get right into the grooves or the heart shape won't work. I used PME cake release spray. Fill both tins evenly with the mixture and then bake in the oven.


Allow the cakes to cool in the tin then turn out onto a baking rack. Hopefully they will come out clean; any bits of cake that break off or are stuck in the tin mean there is a high chance of the heart shape not working. Mine turned out fine as you can see. Make sure you remember which half of the cake is the top and which is the bottom.


To fill the cakes, first place the bottom half on a cake board and secure with a little buttercream. I didn't want to take any chances as this was the first time I had made this cake, so I made a simple pink buttercream.


Spread the buttercream in the circular gaps around the cake, pressing in and levelling off the top. Do that on both halves of the cake.


Carefully invert the top cake and place on the bottom layer. You can see what I meant earlier about the join - if you had a vanilla sponge which browned more at the edges, as they often do, you would have a distinctive line. I also levelled off the top of this cake so it was flat.


I covered the cake in a cream cheese frosting which I added a little pink food colouring to, and sprinkled some heart-shaped sprinkles, also from Wilton, over the top.


But surely what you want to know is what does the cake look like inside? I didn't cut into the cake and took it into work so when I presented it to my colleague and explained there was a surprise inside, or at least there was supposed to be if it had turned out OK, we all waited with bated breath...

 Ta da! I don't know how this works exactly - the rings on the cake tins don't look in the slightest as if they would match up to make a heart shape, but they do. When you cut the cake, every single slice has a heart shape - which is why I used pink buttercream - in the middle. It's so much easier than it looks and would be the perfect cake for an engagement, wedding, Valentine's day or simply the one you love.

Wilton tasty fill heart cakeWilton tasty fill heart cake


It may be slightly tenuous but I am sending my engagement cake (well, my colleague's engagement cake) to Alphabakes, the blog challenge I co-host with Ros of The More Than Occasional Baker, as the letter this month is E.


I'm also sending this to Food 'n' Flix, the blog challenge that picks a movie each month and asks bloggers to make a dish inspired by the film. This time Evelyne at Cheap Ethnic Eatz has chosen Bridesmaids.
 
I saw the film about a year ago and wasn't sure I would particularly enjoy it as I'd heard it described as "the female equivalent of The Hangover" - and I don't really like the Hangover trilogy. I did find Bridesmaids quite funny but it was a bit slapstick in places for my taste - but it was a very successful film. It centres around Annie, a single woman in her 30s with a failed baking business, who is asked to be chief bridesmaid for her friend Lillian. The other bridesmaids are like chalk and cheese and get into quite a few scrapes before the wedding - including getting food poisoning from a Brazilian restaurant. I did think about making a Brazilian dish to tie in with the film but the connection with a food poisoning scene just somehow didn't do it for me. Instead, I decided to focus on the love story in the film - of course it all ends happily for Annie, who falls in love and even starts baking again.
When I realised that a colleague at work had recently become engaged - and so would be having a wedding, complete with bridesmaids - I decided that this cake would work for this month's challenge!
 
 
I'm also sharing this with Calendar Cakes, hosted by Rachel at Dollybakes, as her theme this month is bank holiday bakes and cakes to share with friends.