Showing posts with label blowtorch. Show all posts

Tuesday, 9 February 2016

Fruity Yogurt Brulee Two Ways


The letter for this month's Alphabakes is Y, never an easy one - I've already managed to enter my Yule Log I made after Christmas that I hadn't blogged about until now. I also wanted to make something else, but with wedding planning (four months to go and counting!) I've been far too busy to bake.

So instead I decided to go for an easy dessert involving yogurt. I found a recipe in The Fairtrade Everyday Cookbook for a yogurt fruit brûlée - passion fruit on the bottom topped with Greek yogurt, which you mix with a little pomegranate juice, then top with brown sugar which you caramelise with a cook's blowtorch or under the grill.

I had some pomegranate to use up so didn't want to buy passion fruit as well - I'm terrible at buying fruit and not using it before it goes off. I did have the pomegranate juice as I had just been sent vouchers to buy some POM Wonderful pomegranate juice to review. It's made from 100% pomegranate (made from concentrate) - did you know that pomegranates are a good source of all of these?:

  • Vitamin C
  • Vitamin K
  • Fiber
  • Potassium
  • Folate
  • Copper

  • I mixed a dash of pomegranate juice with fat free Greek style yogurt and spooned it into a ramekin on top of some pomegranate seeds.


    I sprinkled a generous coating of brown sugar on the top but using my blowtorch didn't make the sugar caramelise, just burn in places- as you can see it was literally on fire at one point!


    Once I'd stopped and scraped off the burnt bits, and added some more pomegranate seeds on top, it did taste quite good, but I decided I needed to make this again using caster sugar, which I know does caramelise properly with a blowtorch.


    This time I cut up a ripe pear and placed pieces of it in the bottom of a ramekin and topped it with some flavoured yogurt - Onken's mango, papaya and passion fruit flavour.


    I sprinkled caster sugar on top and caramelised it - properly this time - with my cook's blowtorch. It tasted delicious and would be great as a dessert or even breakfast!


    I'm sharing my yogurt brûlée with Alphabakes, the challenge I co-host with Ros of The More Than Occasional Baker, as the letter this month is Y.


    Tuesday, 14 July 2015

    Mini Lemon Meringue Tarts

    I love lemon meringue pie and these tarts are a great little twist – they are bite-sized, quick to make and would be lovely for afternoon tea. I made them when we had friends dropping by a few weekends ago. I used shop-bought lemon curd though you can make your own; for me though the great thing about these are that they are so quick to make.
      
    To make about 8, you need:
    225g plain flour plus extra for flouring the work surface
    110g butter
    80g caster sugar
    1 egg
    8-16 tbsp lemon curd (about half a large jar)
    4 egg whites (I used Two Chicks egg white that comes in a carton so I didn’t have yolks to use up)
    100g caster sugar
    Preheat the oven to 180C.
    In a bowl, cream together the flour and butter then work in the caster sugar and egg until you have a dough. Knead on a lightly floured work surface and roll out. Cut out small rounds with a circular cutter, and place in a greased muffin tin. This is the base of the tart; cut a strip of dough and place this around the side of the muffin hole, and press together with the base piece so they are joined. Alternatively if you have a big enough cutter, cut a circle that is large enough to place into the muffin tin so that as well as covering the bottom, it comes up the sides.
    Bake in the oven for 15-20 minutes depending on the thickness of your pastry. When cool, place 1-2 tbsp lemon curd inside each pastry case.
    Beat the egg whites until stiff and gradually add the sugar; continue beating until thick and glossy. Spoon the meringue onto the top of each tart.
    You can then either brown these under the grill or use a cook’s blowtorch as I did, to caramelize the top. Allow to cool before eating.
    I'm sending these to the Pastry Challenge, hosted by Jen's Food; this month she is looking for pastry-based recipes that are quick to make.
     
    I'm also sending them to Treat Petite, hosted by Stuart at Cakeyboi and Kat aka The Baking Explorer, as they are hosting a 'summertime special'.


    Thursday, 10 April 2014

    Slimming World-style Apple Creme Brulee


    This dessert was inspired by one from the Slimming World Love Desserts recipe book but adapted to fit the ingredients I had in the house. I made it for a food tasting at my Slimming World group and was meant to use sliced mango for the base. I thought I had a tin of mango in the cupboard but the night before found it was mango puree, and I didn't have time to go shopping again, so I decided to use apples instead! It worked fine and while it isn't my favourite dessert I have ever made, it is pretty healthy and is a nice light alternative. The recipe I used was for individual desserts but I made this in one large dish as it is easier to share at food tasting.

    Serves 4
    3 apples, peeled and sliced
    300g fat free Greek-style yogurt
    4 tbsp sweetener
    a few drops of vanilla flavouring
    4 tbsp caster sugar
    Each serving is 3 syns on all choices

    Slice the apples and layer in the bottom of a dessert serving bowl.


    Mix the yogurt, sweetener and vanilla and spoon over the apple.


    Sprinkle the caster sugar over the top, and caramelise using a cook's blowtorch or a hot grill.


    And that's all you need to do! The caramelised sugar on top gives a lovely snap when you dig in with a spoon and it's nice to have a slightly naughty topping on what is otherwise a very virtuous dessert.


    I'm sending this to Dead Easy Desserts, hosted this month by Utterly Scrummy and created by Maison Cupcake, as this dessert is very easy and probably takes no more than about ten minutes to make.


    Tuesday, 28 January 2014

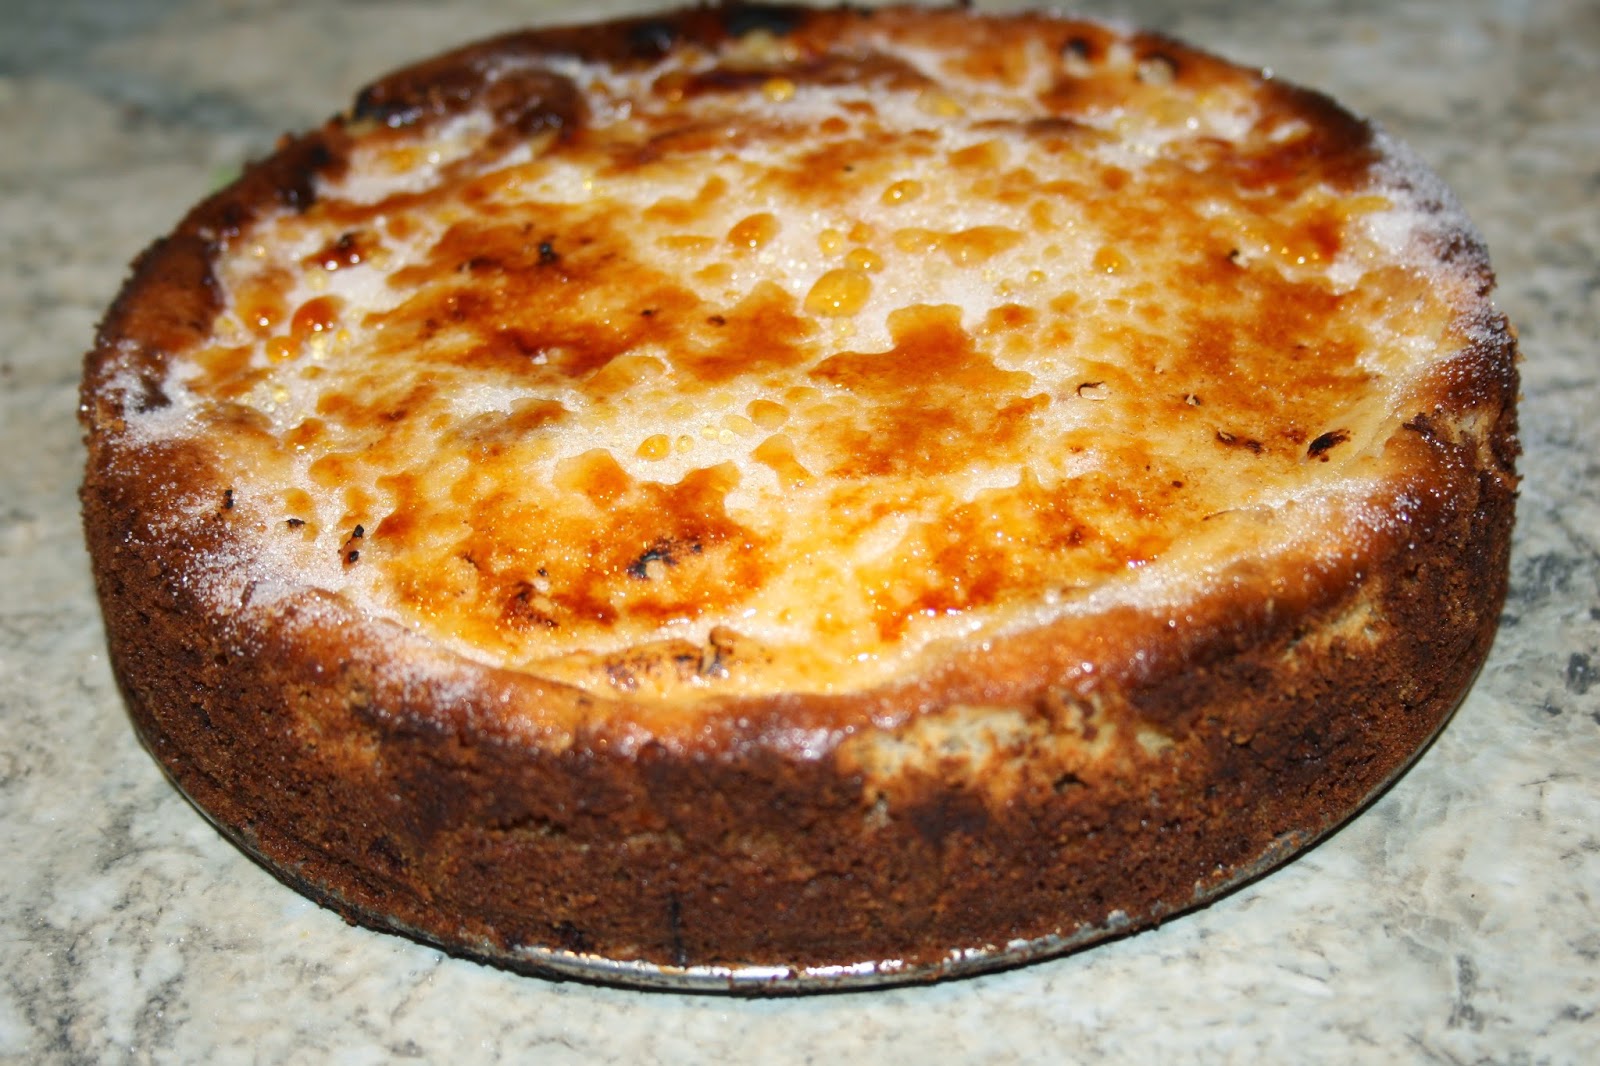
    Creme Brulee Cheesecake

    creme brulee cheesecake

     I got a cook's blowtorch for Christmas and obviously the first thing I wanted to try making with it was a creme brulee, but instead I decided to turn it into a cheesecake.

    I adapted the recipe from one on an Australian website called Taste.com.au. You can make it without using a cook's blowtorch as well; it tasted delicious.

    You need:

    200g digestive biscuits
    80g butter or marg, melted
    250g soft cheese
    1/4 cup caster sugar plus extra for the topping
    grated rind of one orange
    1/2 tsp of vanilla flavouring
    2 eggs
    1/2 cup condensed milk  

    Reduce the biscuits to crumbs either in a plastic bag using a rolling pin or in a food processor.


    Mix with the melted butter and press down into a loose-bottomed cake tin. Preheat oven to 170C and in the meantime place the biscuit base in the fridge for 20 minutes. When the oven is hot, bake the base for 10 minutes then allow to cool in the tin.


    Mix the cream cheese, sugar, orange rind, vanilla and condensed milk. For convenience I decided to do this in the same food processor.


    Pour over the base of your cheesecake and bake in the oven for 20 minutes, then leave to cool.


     Refridgerate for 3 hours until chilled.


    To finish, sprinkle sugar generously over the top of the cheesecake. If you don't have a cook's blowtorch you can place this under the grill for a couple of minutes until the sugar has caramelised.


    Instead, I used my new cook's blowtorch. I was a bit nervous about using it initially but it is very simple. You need a butane cannister, which my mum had bought me along with the blowtorch, and you fill the blowtorch with the fuel which involves little more than pushing a nozzle in (holding the blowtorch upside down - if you have one, follow the manufacturer's instructions). It has a safety catch and a trigger and when used correctly, it emits a flame - not as powerful or as scary as I was expecting, but you still need to be careful! Here you can see me holding the blowtorch ready to use on top of the cheesecake.


     Hold the blowtorch fairly close to the cake and keep it on the same patch of sugar until the sugar first melts then bubbles then turns golden.


    Carefully move the blowtorch around the cake until the whole of the top is caramelized.


    Don't forget the top will be hot to the touch once you have finished!


    The cheesecake tasted lovely and light and the caramelized topping was the perfect addition.


    The theme for this month's Calendar Cakes, hosted by Rachel at Dollybakes and Laura at Laura Loves Cakes, is "if it makes you happy". Rachel says that can be interpreted in different ways including trying something new for the first time. This is the first time I've used my cook's blowtorch and the result definitely made me happy!