Showing posts with label gift. Show all posts

Sunday, 13 February 2022

Valentine's Chocolate Bark

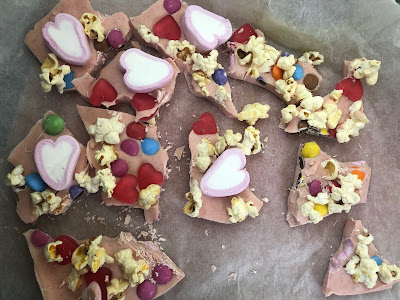
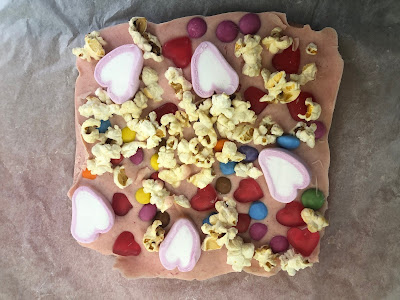
Chocolate bark is a flat slab of chocolate covered with things like nuts, dried fruit, sweets or with a different colour chocolate swirled through it. I decided to make some chocolate bark with my daughter for Valentine’s Day and made up a recipe as I went along (with a nod to Marks & Spencer’s Percy Pig Choc Corn which I had at Christmas). This makes plenty for a family to enjoy or to give to three or four people in little gift bags.

You need:

300g white chocolate

Pink food colouring

Handful of gummy sweets - I used Haribo Heart Throbs which are usually part of their star mix but you can buy them separately especially at this time of year - I got a box in Poundland Handful of Smarties or M&Ms. I was going to just pick out the pink smarties from a sharing bag I had but my daughter ate most of them!

Handful of popcorn

Handful of marshmallows - I used heart shaped marshmallows that I got from Flying Tiger

Line a small square baking pan with greaseproof paper. Melt the chocolate in a Bain Marie or in the microwave and stir in a couple of drops of pink food colouring.

Pour the melted chocolate into your prepared tin and sprinkle liberally with sweets, marshmallows and popcorn. Put in the fridge until set.

When the chocolate has set hard, remove from the pan and peel off the greaseproof paper. Carefully cut into chunks - I found the easiest way was inserting the point of a dinner knife and pressing down and the chocolate broke itself into random shaped chunks. We ended up giving these as a gift to my daughter’s nursery teachers!


Tuesday, 23 November 2021

Make your own motivational quote cards

I'm not sure what these cards are actually called - 'motivational quote cards' sounds a bit worthy and the sort of thing you might find at a company team-building day. What I mean is a postcard with a message that is in some way inspiring, uplifting or encouraging - something that we could all use every now and then!

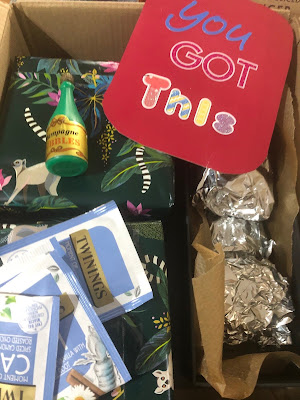
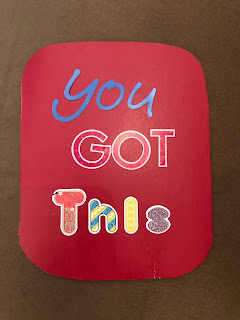
During lockdown I was sending a birthday present to a friend, who I hadn't been able to see for a long time because of Covid. I didn't want to just wrap her present and put it in a jiffy bag so I found a box (from one of my many online purchases) and filled in the gaps around her present with a few other things - some mini bubbles (the kind you blow, not drink), a couple of camomile tea bags and a package of home-made chocolate brownies. I also popped in this card:


They are really easy to make - you just need a small piece of card, and some letters. You can buy alphabet letter stickers or rubber stamps very cheaply, or if you are good at calligraphy write your own - or type it on the computer and print something out. I used a piece of red card and multi-coloured letters so didn't add any other embellishments, but you can design the card however you want.

Sunday, 27 January 2019

A Unique Valentine's Day Gift - Engraved Silver Marmite Lid


What do you get for the man who has everything? OK not everything, but if there's something my husband decides he wants, one click of a button and it turns up the next day from Amazon Prime. It takes a lot of thought at birthday and Christmas to come up with something he will like but hasn't already bought himself, and I try hard to find slightly quirky or unusual gifts from independent retailers or online gift companies (one stocking filler I got him this year was a doorstop for his 'man cave' (study) carved with the word 'hodor').

Game of Thrones is all very well but not the most romantic inspiration when it comes to Valentine's day (I don't even watch the show but can tell most relationships on it have met a nasty end). Marmite may also not seem the most romantic of gifts - until you think of the famous advertising strapline: 'Marmite - you either love it or hate it'. Believe it or not, that advert was devised in the mid 90s, and has lasted so long that it's become a metaphor for anything people have strong feelings towards.

People who love Marmite, love Marmite. It is a sign of true love for them to say they love you more than they love Marmite!

So what better way to say I love you this Valentine's day than with a jar of Marmite? Well how about this: a personalised engraved silver Marmite lid that is a beautiful keepsake, and actually fits on top of your jar of Marmite so you can either keep it in the larder or on your bedside table (the engraved lid that is, not the Marmite - unless you really love it).

There are a few different places that sell engraved Marmite lids but this one from The Engravers Guild has a beautiful design of a cupid and hearts and the words 'I love you even more than Marmite' along with the recipient's name. You could even get your own name as a keepsake for yourself!

Made of solid 925 sterling sliver in a UK silversmiths, the lid fits a standard 250g jar of Marmite. The engraving is done with a diamond-tipped machine cutter so it will last a lifetime making this a really lovely keepsake for your valentine. This one, the sterling 925 silver, retails at £79 including the cost of the engraving and a gift box.

The Engravers Guild has some other options as well including a Brexit/Remainer version, a plain silver lid (£59.95) which you could have engraved with a message for a birthday or Christening or anything else, or one finished with 9 carat gold for £140 if you want to treat your love to something even more lavish.


I love the way it has turned out - you can see more of the details on the lid in this close up photo above.
Standard delivery is 3-5 working days but they also offer a next day service if you've left it a bit late - and the lid is of course delivered with a jar of Marmite!

Thanks to The Engravers Guild of London which offers a range of personalised gifts for the complimentary engraved Marmite lid. All opinions are my own and this is not a paid-for post though I was sent an engraved lid free of charge.


Wednesday, 20 December 2017

Personalised Hand-Decorated Ceramics: Father's Day Plate and Egg Cups

I love crafts and making homemade and personalised gifts and this year I kept seeing decorated plates and bowls that I thought looked really cool. I’d seen them on various sites including the local Facebook selling group and could tell they were homemade, so had a look online to figure out how to make them so I could do something myself!
 
You can buy pens that let you draw or almost paint on ceramic crockery; they are not that expensive and you can buy a basic set with a selection of colours for less than £10 on Amazon; they are also available in craft shops. It’s important to make sure that the pens are non-toxic! I bought these ones from Amazon:  Fine Paint Oil Based Art Marker Pen Permanent Chalk Pens Boxed for Metal Rubber Glass Waterproof 12 Pack Colors
 
Some of what I’d read online suggested you need to put the ceramics in the oven after you have decorated them, to fire and set them so the design won’t wash off. I baked the plate at 150C for 30 minutes; I followed the advice to put the plate in a cold oven so it would warm up gradually to prevent cracking.

I'd be interested to know what other people have done because my parents told me even after a few washes it looks like the colour was starting to come off a bit.

 
I created this plate for my dad for Father’s Day but it's also a good idea for gifts at Christmas or any time of year. I bought various bits of ceramic very cheaply at Ikea and decided a plate was the most likely thing my dad would use.
 
He likes a fry-up on the weekend so I decided that would be a good theme for the plate. I like Emma Bridgewater’s style with words around the edge of the plate so I decided to do something similar and started with the words ‘Dad’s big breakfast’, then a star in a different colour, then ‘fry-up’ and another star, then as I still had space, the word ‘yum’ – which makes the plate a bit fun and irreverent I think. There’s plenty of white space in the middle to put the food on, which I think looks better than if there was a design across the whole plate.
 
It was very quick and pretty cheap to do if you intend to use the marker pens again.
 
 
I used them again almost straight away on these two egg cups, which again were very cheap from Ikea. I had a personalised egg cup as part of a set (with a mug as well) as a young child, I remember having it when I was about 8, and I’ve still got them today! I simply wrote the names of my friend’s two daughters on the egg cups and decorated them with polka dots – I think I will give them to the girls at Christmas. 

Wednesday, 23 August 2017

Scrabble Letter Cookie Cutters and Biscuits

 
These scrabble cookie cutters are a fun way to send a message to a loved one or decorate a cake. I got a set for my birthday this year – they come in a sturdy metal tin and are the same size as actual scrabble letters. Made of plastic, they let you cut out a square of dough with one side, then turn the cutter over and use the letter to imprint in the dough.
 

Since you use these to stamp the letters and don’t actually use the letters in the oven to shape the cookies, it means you can make as many of the same letter as you like, and bake them all at once.
 
You could also use these to stamp letters into fondant but personally I’d prefer to do that with standard letters rather than ones with scrabble numbers on them, unless the cake was specifically for someone who liked scrabble.
 
 
As cookies though, these are really fun – I baked some for a friend’s birthday (actually the same friend who had given me the kit) and jumbled up the letters into a box and got her to work out what the message spelled. It didn’t take her long to figure out it said Happy Birthday and her name!
 
A standard sugar cookie recipe is probably best for this, which you could also flavour with something like lemon, but to mimic scrabble letters you want the cookies to be quite pale. I actually used a vegan recipe I found online as I knew a vegan friend would be there as well and I wanted her to be able to eat them too but as we’d actually been out for afternoon tea, these cookies didn’t get eaten until another time!
 
These are available for sale on loads of websites including Amazon.


Saturday, 12 August 2017

Paper 1st Wedding Anniversary Gift Ideas

Everyone has heard of golden wedding anniversaries and ruby wedding anniversaries, but if you’re not married yourself, you may not know that every year has a theme! The theme is supposed to represent the gifts that the husband and wife give each other, and there is a traditional list and a modern list - for some countries they differ slightly but this is what I’ve found online:
 
Anniversary   Traditional                    Modern            
1st                     paper                              clock                                                               
2nd                    cotton                             china
3rd                     leather                            crystal or glass
4th                     fruit or flowers               electrical appliances
5th                     wood                               silverware
6th                     sugar                              wood
7th                     copper or wool               desk sets/ pen and pencil sets
8th                     bronze or pottery            linens or lace
9th                     pottery or willow            leather
10th                   tin                                   diamond jewellery
11th                   steel                                fashion jewellery, accessories
12th                   silk or linen                    pearls, coloured gems
13th                   lace                                textiles, furs
14th                   ivory                              gold jewellery
15th                   crystal                            watches
16th                   -                                     silver holloware
17th                   -                                     furniture
18th                   -                                     porcelain
19th                   -                                     bronze
20th                   china                              platinum
21st                   -                                     brass, nickel
22nd                   -                                     copper 
23rd                   -                                     silver plate
24th                   -                                     musical instruments
25th                   silver                              silver
30th                   pearl                               diamond
35th                   coral                               jade
40th                   ruby                               ruby
45th                   sapphire                         sapphire
50th                   gold                               gold
55th                   emerald                         emerald
60th                   diamond                        diamond

 
I’m a bit surprised at some of the themes on the modern list – in this digital age, I doubt many people want desk sets, and electrical appliances doesn’t seem particularly romantic! (Then again I suppose neither does the more traditional tin). Furs are a throwback from a former era unless it means fake fur, and I do think it’s slightly mercenary that women can expect diamonds after only ten years of marriage rather than 60 – in fact according to the modern list, there are three opportunities for women to receive diamonds!
 
I do think these lists are rather unrealistic because how many people can afford real diamonds? But still, I know a lot of people enjoy coming up with quirky gifts that fit each theme.
 
The first anniversary, paper, is quite good for people who may have overspent on their wedding or are still setting up home together – it’s also a fairly easy one if you haven’t gotten around to printing out wedding photos or doing a wedding photo album!
 
Here are some of my favourite suggestions for 1st (paper) anniversary gifts – and read on to see what my husband and I got each other!
  •  A card – you don’t need to give each other anniversary gifts on top of birthday and Christmas presents so why not agree from the outset you will just do cards?
  • Photo album, photo book or printing out photos to frame – of your wedding or honeymoon, or moments from your first year together, or a photo story from when you met right up to when you got married
  • A bunch of paper flowers – which you can fold yourself following an origami book, or buy ready made
  • A book – something romantic, or a copy (even a first edition) of a book they really love
  • The lyrics to the song you chose for your first dance, or your wedding vows, printed out and framed
  • A calendar made up of photos of you both
  • A personalised print like this or like this
  • A framed map, where you’ve marked places you have been together and places you want to go
  • A framed picture of your wedding venue – there are places online where you can commission a painting or line drawing, or you can frame a photo
  • A framed paper-cut picture like this or this
  • A scrapbook of photos and memories if you are the sort of person like me who keeps ticket stubs and mementos from places you have been together. You could also turn this into a memory board and frame to go on the wall.
  • A personalised notebook
  • Tickets to a show or gig or similar – the tickets are made of paper, or if you print an e-ticket that works too!
  • Write them a poem if you are feeling creative – this is a nice cheap idea. Or if you’re a bit more flush, you could commission someone to write a poem about your beloved!
  • Write them a love letter, or a series of love notes that you can surprise them with
  • A flying lesson – this is not strictly a paper anniversary gift, but you can give your partner a paper plane folded from a print-out of the details of the lesson!
My husband got me a fantastic anniversary gift which I hadn't spotted despite it being from Not on the High Street.com, which I had combed myself looking for gift ideas! It's the perfect present for me and shows how well he knows me, because I like to scrapbook and do papercrafts, and to make lists and fill in notebooks.
 
It's a wedding anniversary album, with 50 pages. Each page has the same layout, with a space for a photo, and places to write down where you spent your anniversary, what you gave each other and a space to write either some notable things that have happened over the past year or your wishes for the year ahead. It's really lovely and I'm looking forward to filling it in!


I was debating between several ideas for my husband and decided to get him two things - and after having a look online decided to make rather than buy them. First I went with one of the ideas I'd seen on various websites, getting the lyrics to our first dance printed out. It would have looked better if I'd had it professionally done but I don't think this looks bad at all - I selected a font and made different lines different sizes depending on how many words per line.

 
 Then because I wanted to do something a bit more creative I did a papercut of our wedding venue. A paper cut is where you use a sharp craft knife to cut out around a picture - every section must be connected to the edge of the paper otherwise you'd find parts of the picture come away in the middle. So it can be a little challenging but it's good fun!

I drew a sketch of the roman temple at the Larmer Tree Gardens which is where we stood during the ceremony (our guests were seated on the grass in front) and added some words at the top with our names and wedding date. As each letter has to be attached to the edge of the paper somehow the easiest way to do this is make the letters look like flags flying on bunting, and attach each letter to the bunting and attach the bunting to the edge of the paper.


The Larmer Tree has several peacocks which wander around and one featured in several of our wedding photos so I wanted to include a peacock in this picture. I decided to add some different colour and texture by using a peacock sticker that had little gems on it, and added a couple of other gems to the temple outline. I bought frames for each pictures as well.

It's a bit different, very personal to us, and homemade with love.

Tuesday, 20 June 2017

Dr. Oetker Popcorn Fudge Brownies

These treats are really good at this time of year if you want something chocolately that isn't going to melt! I made them for Father's Day and was meaning to post this beforehand but ran out of time as we were away for the weekend celebrating our first wedding anniversary, which this year fell on Father's Day.

The recipe is one by Dr. Oetker, who sent me a selection of the ingredients to try out. Their salted caramel easy-fill cake centre is brilliant - it comes in a pouch with a handy nozzle that you can stick into a cupcake to pipe caramel filling right into the cupcake. In this case I used it to mix with popcorn and also to spread on top of the brownies; as well as being easy to use it tasted really nice.

The popcorn does go soft quite quickly so if you can, I would make these as close to when you want to eat them as possible.

Dr. Oetker's recipe is gluten free but I used ordinary plain flour. The recipe below is Dr. Oetker's; the photos and opinions are my own.
 

Gluten Free Popcorn Fudge Brownies
Preparation time: 40 minutes plus cooling, chilling and setting
Cooking time: 55 minutes  (including chocolate melting time)
Makes: 16

Ingredients
For the brownie layer:
150g bar Dr. Oetker Fine Cooks’ 54% Dark Chocolate
100g (3 ½ oz) Unsalted butter, softened
100g (3 ½ oz) Dark brown sugar
2 Medium eggs, beaten
100g (3 ½ oz) Gluten free plain flour

For the blondie layer
150g bar Dr. Oetker Fine Cooks’ White Chocolate
100g (3 ½ oz) Lightly salted butter
100g (3 ½ oz) Caster sugar
2 Medium eggs, beaten
2.5ml(1/2 tsp) Dr. Oetker Caramel Flavour
100g (3 ½ oz) Gluten free plain flour

For the topping:
1 sachet Dr. Oetker Salted Caramel Easy Fill Cake Centre
25g (1oz) Lightly salted popcorn
 
Method
1. Grease and line a 20cm (8inch) square cake tin.

2. First make the brownie layer. Break up 100g (3 ½ oz) Dark Chocolate into pieces and place in a saucepan with the butter and sugar. Heat very gently, stirring occasionally until melted. Remove from the heat and cool for 10 minutes. 


3. Whisk the eggs into the melted mixture to make a thick glossy batter. Sift the flour on top and carefully mix all the ingredients together. Pour into the prepared tin, smooth to the edges and chill in the fridge for 1 hour.

4. Meanwhile, preheat the oven to 180˚C (160˚C fan oven, 350˚F, gas 4


5. To make the blondie layer, follow the same instructions for making the brownie batter as above, using 100g (3 ½ oz) White Chocolate -  you will find that the melted mixture separates during melting, but once the eggs and flour are added, the mixture will blend together again. Stir in the Caramel Flavour. Carefully spread the White Chocolate batter over the brownie layer, trying not to press too heavily as you spread - there is no need to chill this layer

 
6. Bake for about 35 minutes until slightly risen, lightly golden and lightly crusty on top – the mixture should be slightly soft underneath. Leave to cool in the tin completely then remove from the tin, peel away the tin lining parchment and place the cake on a board.

 
7. For the topping, melt the remaining White Chocolate as above. Put the popcorn in a bowl and squeeze in 50g (2oz) Dr. Oetker Salted Caramel Easy Fill Cake Centre and add the melted chocolate. Mix well to make sure that all the popcorn is coated


8. Squeeze the remaining Dr. Oetker Salted Caramel Easy Fill Cake Centre over the top of the cake and spread right to the edge. Spoon over the caramel popcorn mix, and spread it out so that the whole top is thickly covered. Pat it down a little using the back of a spoon


9. Melt the remaining Dark Chocolate as above. Using a teaspoon, drizzle the top all over with melted chocolate. Leave in a cool place for a few minutes to set. Using a large bladed knife, cut into 16 chunky pieces. Your brownies are now ready to serve and enjoy!


Replace the gluten-free flour with plain white flour if preferred – this will give a slightly less dense texture. 
 
Thanks to Dr Oetker for the recipe and ingredients
Thursday, 6 April 2017

Mums Are Like Buttons Box Frame with Buttons - Mother's Day Gift


I've been seeing the phrase 'mums are like buttons' everywhere recently - or at least in the run up to Mothers' Day, which in the UK was March 26 this year (it falls later in the year in other countries including the US).

The whole of that phrase is 'Mums are like buttons - they hold everything together'. I thought that sounded lovely and wanted to make my mum a Mothers' Day card with it on. In fact it started out as a card and turned into a gift!

I tracked down a rubber stamp with that exact sentiment which I stamped onto a square white card blank, and using glue dots stuck buttons in various shades of red and pink around it. I realised afterwards the quote was slightly off centre which was a shame but I'm sure my mum didn't mind too much.

The card looked too heavy with the buttons and I wanted it to be more of a keepsake, so I decided to make it into a framed picture instead.

The box frames sold in Hobbycraft are brilliant for this sort of thing and they are often in half price sales where you can get the smallest size for as little as 2 pounds, so I tend to stock up on a couple every now and then.

The frame made the perfect setting for my Mothers' Day gift.


I'm sharing this with the Addicted to Stamps challenge and Fab Funky Challenges

Tuesday, 21 February 2017

Scrabble Name Picture for a Londoner

I like giving homemade gifts and ever since I discovered Hobbycraft's box frames I haven't run out of ideas. I first made a picture spelling out a family's names in scrabble letters several years ago; now they are much more common and it's easy to buy packs of the wooden letters with flat backs which are easy for gluing (for instance Hobbycraft, Amazon and the Works sell them quite cheaply).

I wasn't planning to make another one any time soon until I found this piece of wrapping paper with a fab London design. I thought it would look great in a frame, and it made me think of my friend Alice who had a birthday coming up, as she lives in central London.


 The wrapping paper, from Scribbler, features London landmarks and various city skyscrapers which I recognise from around where I work. I decided the picture needed something to stand out against the background and so I found a design in the Silhouette store and used by Silhouette Cameo to cut out a few shapes from black card:

 
The umbrella was part of the set but I decided not to use it! I mounted them on top of the backing paper and put it in the frame.


My husband thought that the scrabble letters would be the finishing touch and I wasn't sure, as they would stand out better against a plain background, but personalising a gift definitely makes it more special. I hope Alice liked it!


Sunday, 4 December 2016

Morse Toad Personalised Chocolate Greeting Cards

Most people love to get some kind of chocolate for Christmas, whether it's a box of chocolates or a bag of chocolate coins. I've come across a great alternative for the chocolate-lover in your life that is really unusual, makes a great gift and can be easily sent by post. I've also got a 10% discount code for my readers.

Morse Toad’s messaging service allows you send chocolate cards by post - with a message spelled out in individual chocolate letters, chosen especially for the recipient. They gave me a discount code so I could order something to review; I decided to treat my husband to something as an early Christmas present.
 

The website has sections for Christmas, birthdays and other occasions; each one has suggested messages which are great if you are lacking time or inspiration - everything ranging from standard sentiments to "I love you more than wine" and "All I want for Christmas is diamonds". You can also write your own message, so I went for: "Our first Christmas as Mr & Mrs".

Prices start at £9.50 for short messages (eg "super mum", including a heart and a star) up to £17.50 for longer ones; you can write your own messages for around the £15 mark. That price includes the packaging and a photo which you can upload and have placed inside the lid of the box. I chose a picture of my husband and I on our wedding day in front of the building in which we got married.

Mine cost £18 and for that I got 33 chocolates - the chocolate is handmade in the UK and tastes really good.

I've got a 10% discount code especially for readers to be used at Morse Toad, which expires on Christmas Day: enter the following at checkout: HappyToadmas

I think these make lovely little Christmas gifts, don't you?

Thanks to Morse Toad for the discount code. All opinions are my own

Sunday, 25 September 2016

Sailing Family Scrabble Name Picture

 
There’s something special about handmade gifts as you know that extra attention has gone into them – all the more so if it was handmade by the person giving the gift.
 
Several years ago I made a scrabble name picture for my now-husband’s brother and his family. I think it’s a lovely thing to have, and when it was my friend’s birthday this summer and I was struggling to think of a gift, I remembered this and thought she would like it. (Luckily, she did!)
 
 
I found it much easier to purchase a frame this time, that was both a better size and price; Hobbycraft had these white box frames for £8 – which are currently only £4 in the sale, in fact I think I might buy a few more.
 
 
I bought the scrabble letters from Amazon; they are not real scrabble pieces with the little legs on the back to fit into the holes on a scrabble board, but instead are flat, which makes them much easier to glue.


My friend and her husband are really into sailing so I bought some sailing patterned paper from Ebay to use as the backing paper and used my Silhouette die cutter to cut out a sailing boat.
 
 
I used the letters to spell out their names and that of their son, and the words ‘family’ and ‘love’ and placed the sailing boat at the bottom. I was really pleased with this and my friend said she loved it.


Saturday, 10 September 2016

Mary Berry Lavender Shortbread Biscuits


The area around where I live in Surrey is known for its lavender – in fact, it was once known as the lavender capital of the world. In the summer there are beautiful purple fields stretching into the distance. Apparently Yardley, a British toiletries brand that is known for lavender talcum powder, ties back to the area but eventually cheaper French lavender flooded the market and a lot of the lavender fields in Surrey were given over to housing estates.
 

Now, there are two main operators of the lavender fields, at least that I'm aware of. Mayfield Lavender is a commercial enterprise, but still a family-run farm; they are open every day through June, July and August where you can buy lavender plants and products. I've never been and it's not clear to me from their website whether you can actually pick your own lavender or not - I would assume so, but can't be sure!


The place that I've preferred to go to over the last couple of years is the non-profit allotment run by Carshalton Lavender. It's a volunteer-led project and they have an annual harvest one weekend a year (this year it was at the end of July) where you can go and pick your own lavender. They charge a reasonable £5 for a large bunch and £10 for a bucket-ful, and there are stands selling food and drinks, cakes and lavender products. That's me in the photo above picking lavender.

My husband and I went with some friends who live locally and I picked a large bunch of lavender, as I was planning to do various things with it from baking to making lavender bags (if I ever get around to using my sewing machine!).

It was my father-in-law's birthday not long after and he really likes shortbread, so I decided to make him some lavender shortbread with local lavender, and parcel a few pieces (as he isn't meant to be eating much sugar) up as a gift.

I used this Mary Berry recipe - lavender shortbread seems a very Mary Berry thing to make. It was very easy to make though you do need to factor in chilling time for the dough - I actually did mine overnight.

Here's the lavender that I picked:


I made up the dough and added the lavender


Make into a cylinder, roll in brown sugar, wrap in foil or parchment and chill in the fridge until firm.


Slice into rounds and bake in the oven


The finished product

 
 I'm sharing these with Treat Petite, hosted by Kat at the Baking Explorer and Stuart at Cakeyboi.