Showing posts with label birthday cake. Show all posts

Sunday, 22 May 2022

3D Dinosaur Cake - Children's Birthday Cakes


The lockdown in 2020 meant I didn’t post anything on my blog for several months, as I tried to juggle a full-time job with a toddler at home every day for nearly three months while nursery was shut. So I’ve only just realised that I never posted anything about her birthday cake in spring of 2020 – better late than never!

Sophie is a big fan of dinosaurs, and from a young age has been able to correctly identify dinosaurs to the extent that I think she already knows more types than I do! We have encouraged her love of dinosaurs through toys and books and also a green dinosaur-patterned beanbag for her room to counteract some of the pink! If I recall correctly, she actually asked for a dinosaur cake for her second birthday, and I was happy to oblige!

We held her birthday party at My Gym, where we go to a class every week – it’s a cross between gymnastics, exercise, games and play, and they do brilliant birthday parties where you get an hour of gym-based games and half an hour in the party room with food and drink, and of course cake. I had the option of providing my own cake so of course that’s what I did.

I wanted a cake that would actually look like a dinosaur – I saw some lovely ideas online of round cakes with dinosaurs on top (either made from icing or plastic toys), where the cake itself was decorated to look like the dinosaur habitat. But I wanted instant recognition and wow factor, and decided it had to be a three-dimensional dinosaur. Luckily, it was easier to make one than I thought, thanks to this brilliant tutorial on WikiHow!

I baked a round vanilla sponge cake and then cut it up according to the tutorial instructions, then covered it in green roll-out fondant. I used yellow fondant to add some spots, and a darker green modelling paste – a kind of icing that is stiffer, so better to use when you are making something that needs to stand up – to make the spines along the dinosaur back. It wasn’t difficult or even massively time-consuming at all and I was really pleased with the finished cake, and I think the kids at the party all enjoyed it!


Tuesday, 1 February 2022

Unicorn Birthday Cake - Cakes for Children


Last year my daughter had a ‘lockdown birthday’; COVID-19 restrictions meant that we couldn’t have a party, couldn’t have family to visit and couldn’t do anything much at all really. We still had a nice day, as we got Sophie a balance bike for her birthday, and were able to go to a local park to try it out. Of course I was still going to make her a birthday cake, and this year she asked (repeatedly) for a unicorn cake.

I’ve made a unicorn cake before, but thought this style was a bit grown-up for a three year old and possibly not even as instantly recognisable, so instead I invested in a unicorn cake mould to make it easier for myself. I bought a silicon mould from Ebay for around £7 which I thought wasn’t too bad; I’m sure I will end up using the mould again and if not I can pass it on to someone else. 

I wasn’t entirely sure of the quantity of cake mixture I would need to fill the mould, but luckily the scale of this BBC GoodFood recipe for an easy chocolate cake was just right. My daughter had requested a chocolate cake and I thought this recipe didn’t look too rich, compared to some others I have made in the past.

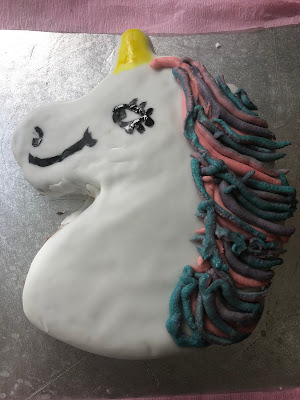
The cake was really easy to make and un-mould (I use PMW Cake Release spray to grease all my cake tins), and decorating was fairly straightforward too. I’m sure a more artistic person – or more professional cake decorator – could make a more beautiful unicorn, but my daughter loved this! 

The cake was covered in a chocolate buttercream and then rolled out white fondant. I coloured some buttercream in various colours and used a piping bag to pipe each section of the mane – after all, everyone knows that unicorns have rainbow hair! 

This photo has come out a little darker than the real thing – you can’t quite see the purple in with the blue and pink, but my daughter thought it was great. She also had a unicorn helium balloon and a few unicorn-related gifts, so referred to this birthday – and continues to do so several months later – as “my unicorn birthday”. 

The year before was “my dinosaur birthday” – when she had a dinosaur cake and several dinosaur-related gifts – and she has already told me that her next birthday, even though it is nearly six months away, is going to be “my Sofia birthday”. So I’m already squirreling away Sofia the First gifts and thinking about how to make a Princess Sofia cake!

Wednesday, 5 May 2021

How to make an Amazon parcel cake


We fall squarely in the camp of ‘how on earth did people manage before Amazon Prime?’. A combination of not wanting to go to shops during lockdown, working full time and not really wanting to spend my free time trawling the high street and a toddler who often needs stuff at short notice means we probably get more Amazon parcels than most. Then there is the fact that my husband actually works for a branch of the company so it’s not far from the truth to say that his bank statement looks quite funny.... money comes in from Amazon... money goes out to Amazon!
 
So when it came to his birthday there was really only one cake I was ever going to make. I'd seen a few pictures on the internet of cakes that look exactly like Amazon parcels, complete with shipping labels - which are all edible. The cake itself looked fairly simple, but the question was, where do you get edible Amazon labels to go on cakes?

 
It turns out that these are actually made of icing sheets, printed using edible ink. You can buy your own icing printer and edible ink and they aren't quite as expensive as I imagined - they seem to start at around £200. Which is a lot, but not prohibitively expensive if you were going to use it a lot. However, I knew I wasn't going to get much use out of one so couldn't justify buying one, and instead found someone selling what I needed on Etsy.

When I bought this in March I could only find one UK seller on Etsy making these, but now there seem to be quite a few, and I've found the same thing on Ebay as well. I paid £9 which was quite a bit for a cake decoration but I was happy to pay it for something this unique!
 
Making the cake itself is relatively easy - you need a square or rectangular cake tin, some roll-out fondant icing, some food colouring and that's about it - as well as your cake and icing ingredients.

My husband loves chocolate cake so I browsed the internet for a recipe that looked nice - I didn't want to use any of the really fudgy chocolate cake recipes I've made before that use a lot of melted chocolate in the cake batter, as our three-year-old daughter would be eating it too. So I wanted it to be delicious but not too rich, and used this recipe from Charlotte's Lively Kitchen, which was really good.
 
If you don't have a rectangular cake tin you can bake two square cakes and join them together, but you might have a bit of a dip in the icing where there is a join.
 
To cover the cake I mixed some fondant icing with a little gel paste in teddy bear brown. You can buy ready made icing by Renshaw in this colour but it's cheaper to add your own colour to white icing, at least if you will be using gel colours regularly (they tend to last a long time). I think the shade looks very similar to Amazon packaging!
 
As well as filling the cake with chocolate buttercream I spread a thin layer over the top and around the sides, then rolled out the fondant to cover it. All I then had to do was add the labels.


They came on an A4 sheet with instructions that said if I had difficulty in peeling the icing off the backing (which I did - it was impossible) to put the sheet in the oven at a particular temperature, and it would harden and come off the backing sheet easily. It worked perfectly, and I only needed to moisten the fondant on the cake a little to get the labels to stick. I was able to get them personalised, with my husband's name and birthday date.
 
My icing isn't perfect - I live in envy of people who can make perfectly sharp corners - but from a distance this looked very realistic, and my husband thought it was brilliant as he hadn't seen these cakes before!


Sunday, 26 January 2020

Elderflower and white chocolate cake: Free Cakes for Kids

Think back to when you were a child and celebrated your birthday. I’ll bet there was cake, and you can probably remember some of your favourite cakes as a child, right? I was obsessed with Sarah Lee Double Chocolate Gateaux and often had one of those for my birthday but I also remember very clearly when my mum baked several loaf cakes to make the shape of the number 14, decorated with chocolate icing. I have a feeling I remember a hedgehog cake with chocolate buttons when I was younger as well!
Some children aren’t lucky enough to get a birthday cake, for all sorts of reasons - money is tight, they are living in temporary accommodation without the facilities to easily bake a cake, their families have got a lot on their plate due to illness or disability or maybe the child is a young carer themselves and deserves a treat. Free Cakes for Kids is an organisation that links up local amateur cake makers to provide birthday cakes for underprivileged children and makes sure they get a homemade treat on their birthday, which makes them feel special.

I’ve written about Free Cakes for Kids before as I’ve been involved with the group for a little while. To find out if there is a local group in your town check out the website.
For a little while now my local group has been baking a cake once a week for an Age UK tea party at a residential care home. I was just about to go back to work after maternity leave (yes, there’s been a bit of a delay in posting this!) and knew I wouldn’t have much time to bake any more so signed up to do one of these as it fell nicely into my last week off when my daughter was doing half days at nursery, so I could bake the cake and deliver it while she was there.

I wasn’t doing any grocery shopping for the next few days and rather than make a special trip out (which is not as quick as it used to be before I had a one year old in tow) so decided if at all possible to use ingredients I already had at home. I knew I had an unopened bottle of elderflower cordial in the cupboard and that I had seen recipes for elderflower cake somewhere.

I made Lynn Hill’s elderflower cordial cake with white chocolate ganache from the original Clandestine Cake Club book - you can find part of the recipe online here though to see the whole thing you will have to buy the book!
I found it interesting that the cake itself doesn’t use butter; it seemed to give a light texture to the finished cake but of course I didn’t get to eat any as it was for Age UK!
The white chocolate ganache was a little tricky as first it was too thick to spread (I left it too long in the fridge) then it was too runny. I wasn’t happy with the finish and decided I needed to decorate it but not in a way that would be too time consuming.
 
I loved the idea of piping ‘hello’ on the cake, since this was for a tea party and wasn’t a birthday cake, so I used some melted milk chocolate and a tiny piping bag. I then got out my special flower piping nozzles that make beautiful shaped petals of different kinds - you don’t have to have any special piping skills as the nozzles do all the work! The purple flowers were a bit darker than I would have liked as I used a bit too much food colouring but overall I was happy with the effects and hope the residents of the care home enjoyed their cake!


Saturday, 29 June 2019

1st Birthday Cakes - giraffe cake with giraffe pattern inside

My daughter got to have two birthday cakes for her first birthday, as had a party with her dad’s family one weekend and a celebration with my family (who live a few hours away and weren’t able to come to the first party) a week later. So of course I had to make her two cakes!
 

The first cake was decorated as a tribute to her favourite You Tube channel, Cocomelon. The channel consists of short animations of nursery rhymes, all a couple of minutes long, with the same characters – a family of five and various animals – cropping up regularly. Until she was about a year old this was pretty much all my daughter watched on TV – I wasn’t sure she would follow programmes that had episodes or dialogue, and she seemed to really like the songs. The channel’s logo looks a bit like a watermelon with a television screen face so I did my own version as a tribute, covering a cake in pale green fondant and adding dark green stripes and using flesh coloured fondant for the face. I bought a ‘1st birthday’ cake topper on two long sticks to go in the top, and of course a number 1 candle.
 

Baby S is allergic to egg and I wanted her to be able to try a little bit of the cake, so I used a vegan recipe for lemon cake that I’ve used before. I was careful not to let her try the icing as I thought it contained too much sugar, but I didn’t worry about reducing the sugar content of the cake itself as I thought she wouldn’t have more than a couple of mouthfuls. As it was, she wasn’t really interested in eating the cake at all! (Since then five months later she had some of her granny’s birthday cake and really liked it).


I can’t seem to find the recipe anywhere now but it’s quite easy to search for vegan lemon cake recipes online.


For her second cake, I didn’t make it egg-free since I correctly assumed baby S wouldn’t want to eat any. In the end when we had the cake at her grandparents’ house I think she was getting ready for a nap.


I wanted the cake to represent something else that my daughter liked and remembered she was really attached to her Sophie the giraffe – she has two in fact. She seems to have lost interest in the giraffe over the past few months and prefers to play with other toys but there was a time when she was happiest clutching the giraffe in her little fist and waving it aloft.


It’s fun to make cakes with a surprise inside – particularly in this case because my two-year-old niece would be there and I thought she might enjoy it. It’s a lot easier than you might think to make a polka dot effect inside a cake – or in this case, giraffe print.


So how do you make a cake with a giraffe pattern inside? I used a standard vanilla cake recipe, and split the batter into two bowls, adding cocoa powder to one to turn it chocolatey. For this cake, you want to have about two thirds of your batter yellow vanilla and a third chocolate – I also added a bit of yellow food colouring to the vanilla batter.


If you want a perfectly even pattern – almost a chequerboard effect – inside, then you pipe concentric rings of alternative colours around your prepared (greased) cake tin. As I wanted the giraffe print to be a more natural random pattern, I put a layer of vanilla cake in the bottom, piped some very uneven circles of chocolate cake batter and then a layer of vanilla over the top. You can see what this looks like when it has baked, and here it is after I sliced the top off the cake to make it flat – and then the inside when it was sliced.


I covered the cake in white fondant and decided to turn the giraffe itself into the number 1, so I cut a 1 out of yellow fondant and added brown spots as well as ears, a face and hair. I don’t think giraffes have hair quite like that down their backs but never mind! I decided the rest of the cake looked a bit plain but I hadn’t left enough room for my daughter’s name (if you have a one year old, you will understand the rush things have to be done in while they nap!). So I used some of the leftover green fondant from her other birthday cake to make some trees and used a butterfly plunger cutter to do some little pink butterflies at the top. I was quite pleased with how it looks overall and have printed out some photos for my daughter’s baby book so when she is older she can look back and see what cake and presents she had for her first birthday!

Thursday, 19 October 2017

Banoffee Tool Box Birthday Cake


We had a family barbecue for my father-in-law’s birthday in August and I wanted to make a cake that would stand out. I tried to think of things I associated with him – my father-in-law is really handy, at everything from fixing fences to building a child’s ride on car from scratch so I had the idea of a tool box cake.
 
Looking at Google Images I realised there were some incredibly detailed, realistic tool box cakes and figured I wouldn’t have the time or skill to do anything like that. Rather than make something else altogether, I decided to make a simple rectangular red toolbox, with a separate lid, and make some tools separately to pull the whole thing together.


My father-in-law really likes banoffee pie so I decided that would be a good flavour for the cake and found a recipe in Fiona Cairns’ Birthday Cake book. The recipe in her book is designed to make cakes in the shape of a pair of dice – for someone who likes a game of chance perhaps – but it was easily adapted to a loaf tin shape. You can find the recipe online at Cooked.

 
I decided to make the lid separately and as I didn’t want it to be too heavy, I thought rice krispie cakes would be perfect. I’ve seen cakes where all sorts of parts were sculpted from rice krispies – like an animal or person where the limbs were made from rice krispies. I wasn’t sure what consistency to make my rice krispie cake so took the easy way out and (kind of) cheated by using Kelloggs Rice Krispie squares. I sandwiched 6 – a mixture of chocolate flavour and plain – together with melted chocolate, in a block the length of my loaf tin, and put them in the fridge to set.

 
For the cake, I followed the recipe, mixing butter, sugar, mashed banana, eggs, vanilla, milk, flour, baking powder, salt, nutmeg and cinnamon. The mixture baked nicely in my loaf tin – it did create a bit of a dome which had to be sliced off to level the cake. I also cut some corners – because I had a lot of other food to prepare for the barbecue as well – with the frosting. Fiona Cairns gives a recipe for toffee buttercream which sounds really nice, but as I had a tin of Carnation Caramel I decided to make some regular buttercream and add that.


After filling the cake I covered the whole thing plus the rice krispie cake block in red fondant, and made a handle out of fondant for the lid and some black panels for the front of the box. I wasn’t that confident at making tools even if I drew a template and followed it, so I bought some cookie cutters from Amazon and cut out a saw, pair of pliers, hammer and spanner, then did the same again in coloured fondant to make the handles. I think they worked really well, what do you think? These are the ones I used:


Finally I placed the tools on or around the tool box, secured the lid with a couple of cocktail sticks in an open position and the cake was ready to be presented. The cake itself was moist and delicious – I do recommend checking out Fiona Cairns’ recipe!


Saturday, 19 August 2017

D'lish Donut Shopkins Birthday Cake


Do you know what Shopkins are? If you have children then you might… if like me you are yet to become a parent then you can be excused for having absolutely no idea!
 
I’ve written before about the fantastic charity Free Cakes for Kids – I made a Rapunzel cake for a girl who otherwise wouldn’t have had a birthday cake.
 
Another request came through from the same group that I decided to volunteer for, for a child who would like a Shopkins cake, even though I didn’t know what that was. Shopkins turned out to be a collection of characters based on items you find in the supermarket – everything from cakes to fruit to a loaf of bread, bottle of bubble bath and even clothes and shoes. They have names like Suzie Sundaw, Mandy Candy and Angie Ankle Boot.
 
I browsed the website for a while until I was able to find a character I thought I could easily incorporate into a cake and remembered I had a giant doughnut cake mould I bought in the sale ages ago and had never used. There is a Shopkins character called D’lish Donut that looks like a pink iced ring doughnut with sprinkles (and of course arms, legs and a face) which I thought would be perfect.

 
The mould comes in two pieces - simply grease them and fill with cake mix.

 
I used a standard Victoria sponge cake recipe for this cake – as it was for a child, I wanted to avoid strong flavours or making it too rich and thought that the icing would be sugary enough!


 I filled the cake with jam and buttercream – the cake mould worked perfectly, turning out the bake cake into a perfect ring doughnut shape.


It wasn’t too hard to decorate – I decided water icing with pink food colouring might be too runny and not look very neat so I coloured some white roll-out fondant, cut it into a  circle large enough to go over the cake and cut a space in the middle. The arms and legs are also made of fondant, and I used some tiny plunger cutters to cut out diamonds from pink, blue and yellow fondant, and stuck them with a dab of water on top to look like sprinkles.
 
The eyes took a couple of attempts and my husband actually ended up helping with these! We made four circles of diminishing size in white, blue, black and white, and layered them to make the eyes. I then used black fondant to make a nose and some eyelashes and pink fondant for the mouth.
 
 
I put the cake onto a silver board and at the last minute decided to spell out the little girl’s name with leftover icing. I had a lovely email afterwards from the charity co-ordinator saying she had been really pleased with her cake – it was fun for me to make a cake for a child and to copy a cartoon character as I don’t get a lot of opportunity to do that (my neice is 8 months old so too young for cake) – and of course I was able to do something good and help a charity that hopefully made a difference and helped that little girl have a happy birthday.
 

Thursday, 3 August 2017

Lemon Meringue Celebration Cake


This cake was easier than it looks to make, and a dream to eat - it looks really impressive and trust me, it tastes even better!

The recipe comes from Fiona Cairns’ Birthday Cake book but is also available online here.
 
Making meringues is sometimes a bit hit and miss; I followed Fiona Cairns’ recipe mixing egg whites with icing sugar, which was a first – I normally use caster sugar. Try as I might, I couldn’t get my egg whites to form soft peaks – the mixture was still quite runny. It may have been that there was some grease in the bowl or on my whisk but I thought they were clean – eventually I gave up and decided to make the meringues with caster sugar, which worked fine!


I followed the recipe for making the cake batter and the cake turned out really well. I forget how good crème fraiche can be in a cake – it’s delicious, though you need to be careful about leaving the cake out too long on a hot day (I’d rather not refrigerate cake if I can help it).


I found it tricky to make the almonds around the sides look neat but I still like the effect. With the meringues placed on top this is a pretty cake, and one that looks a bit special without needing to go to a lot of effort with decorations or covering it in fondant. A lovely cake for a birthday or a summer's afternoon tea.


Saturday, 13 May 2017

40th Birthday Showstopper Chocolate Drip Cake With All the Chocolate

This was my husband's second birthday cake - well, it was his 40th!

We spent his birthday with some of his family then saw other family the following weekend, so I wanted to make a cake for both occasions. For his birthday itself I made this chocolate R2D2 cake (a throwback to his childhood) and the following weekend I wanted to make more of a serious classic cake - but at the same time I wanted it to be a showstopper.

My husband loves chocolate so I decided to celebrate his love of chocolate by making something I'd seen a few (or more than a few) times on the internet. It's a 'drip cake' which means a chocolate cake with a chocolate glaze or ganache that is dripping down the sides of the cake; it's also something of an 'explosion' cake with various chocolate bars and types of chocolate sticking out of the top. They are intended to look as if they have been placed in a fairly haphazard fashion but are actually carefully arranged with pieces of different heights to create interest and balance and the appearance of a lot of chocolate bursting out of the cake!

For the cake itself, I actually had enough mixture leftover from the R2D2 cake (as the cake mould just said it took an 8-egg batter, but the recipe I used gave me far too much) to make a normal round sponge cake which I froze, and defrosted in time to make this.

For the other layer, I made the chocolate cake from this Konditor and Cook Curly Whirly cake as I remembered it being really good before (and it was).

To make the chocolate ganache on top, I used:
200ml double cream
200g plain chocolate, chopped

Heat the cream in a small pan and when it is just simmering, remove from the heat and stir in the chocolate until it has melted. Allow to cool until it is still a thick pouring consistency.

Here's a nice pic of some cake batter... I do like the before and after photos!

The cake, sliced through the middle - with the one I had in the freezer I ended up with four layers. For a drip cake you do want it to be quite tall.


 Like this - four layers of chocolate cake


I coated the top and sides of the cake in chocolate buttercream then poured the chocolate ganache over the top, encouraging it to drip down the sides. I stuck various chocolate bars and pieces of chocolate in the top, sprinkled over some giant chocolate buttons, and added some red stars (made of icing, which I bought from a cake decorating website) and a diamante '40' pick I bought from the same website.

 
 My husband's family seemed quite impressed and my husband loved it - though he had better not get used to having two birthday cakes!


Friday, 5 May 2017

Vegan Chocolate Peanut Butter Birthday Cake


I just had to share this with you even though it's not my own recipe. It's not only the best vegan cake I've ever made, but it's up there with the best cakes I've made, full stop.

Unlike other vegan cakes it doesn't contain a cupful of oil (I read the number of calories recently in a bottle of vegetable oil, and am still reeling). But it's still incredibly moist, so much so that you need to eat it with a fork rather than fingers, and really chocolatey. The peanut butter filling and topping are delish - even my husband loved this and he doesn't really like peanut butter. All together, it's a gooey cake that feels very indulgent - a real treat both for vegans and non-vegans alike.

I made this the day after my birthday as I had a couple of friends coming over to do a room escape game (which was brilliant by the way, I can't recommend them enough). One friend is vegan and I wanted to make a cake she could eat, so had a look online and found this recipe on Dora's Daily Dish - pop over and have a look.
The recipe was quite interesting - as I said a lot of the vegan cakes I've made use oil. This one uses melted vegan margarine, flax seed, almond milk and coffee.


It's really easy to make, you just mix the wet ingredients into the dry ingredients.


Here the cakes have just come out of the oven


The frosting unusually doesn't use icing sugar and is just peanut butter, vegan margarine and agave nectar. I spread half in the middle of the cake and the other half on the top.


A fairly simple, classic cake - the two layers were pretty deep, this is a good recipe in that sense - and in fact in every sense!
 
I'm sharing this bake with We Should Cocoa at Tin and Thyme.

Sunday, 23 April 2017

Chocolate Star Wars R2D2 40th Birthday Cake

My husband was very lucky for his 40th birthday. As well as some great presents including a 'carvolution' framed picture of all 9 cars he'd ever owned  - interestingly, they seem to have put their prices up quite a bit since I bought it a few weeks ago - and a meal at Hawksmoor, he had two birthday cakes.

We were spending his birthday with some of his family - more on this in another post as I will do a restaurant review.  In the evening after a day out in London we had a takeaway at his brother's house so he could put the children to bed and keep an eye on them. There were six adults but I knew that the following weekend we were seeing more of my husband's family with up to ten people - so I wanted to make him a birthday cake for his birthday but also another cake a week later.

He requested a chocolate cake and I planned a chocolate extravaganza for the bigger occasion, and had an idea for the other one quite some time ago. My husband has mentioned a few times a birthday cake he had as a child in the shape of R2D2 which he thought was brilliant - I thought it would be fun for him to have the same sort of cake when he turned 40!

I bought an R2D2 silicon cake mould for only £5 or so in the Lakeland sale back in January which I hoped would make the cake a doddle, though I wasn't sure how easy decorating it would be. In the end it was actually relatively easy.

The cake mould is quite large and it says on the box to use an 8-egg recipe; but other than that there wasn't any guidance. I spent a while googling 'what recipe to use for Lakeland R2D2 cake mould' and didn't really come up with much, so decided to use my trusty chocolate wedding cake recipe. This is the recipe from BBC Good Food that I used for the middle layer of my wedding cake and when I made the wedding cake of Ros from The More Than Occasional Baker. It works brilliantly every time and is a 10-egg recipe; I scaled it down to use eight eggs but had enough mixture left over after filling the R2D2 pan to make another 9-inch cake which I put in the freezer!

So I recommend that for the R2D2 cake pan you use a six or even five egg recipe; you can basically divide the quantities of the BBC chocolate cake recipe in half. You'd then need to adjust the cooking time and I'd advise keeping an eye on it and testing with a skewer - I think I baked mine for an hour and a half but didn't make a note as I was playing it by ear.

A lot of chocolate

The cake turned out perfectly and as always with this recipe was moist and super-chocolatey.


I had sprayed the pan liberally with PME Release-a-Cake spray, making sure I got into all the nooks and crannies. The cake came out of the silicon mould perfectly and you can see all the details of R2D2.

I wanted these details to show through when I decorated the cake so instead of covering the cake with buttercream, I brushed it with some warm runny apricot jam. I carefully sliced the cake through the middle and filled the centre with chocolate buttercream and then covered it with white fondant, rolled fairly thin, which I smoothed down so the details of the cake still showed through.


I then cut some pieces of blue fondant for the details and before I stuck them onto the cake, sprayed the white parts silver with PME edible silver lustre spray.


Lakeland R2D2 cake


I'm sharing this with We Should Cocoa, hosted by Choclette at Tin and Thyme.