Showing posts with label pumpkin. Show all posts

Sunday, 4 November 2018

Easy Vegan Pumpkin Pie to use your leftover pumpkin


I was determined to use up my pumpkins in cooking this year and not just throw them away so as well as this pumpkin and gnocchi gratin I made a pumpkin pie. I've made a pumpkin cheesecake (vegan) before, and this chocolate pumpkin cheesecake, but I've never made an actual pumpkin pie before.

I was spending the weekend with friends so a pie seemed like a nice thing to take; one friend is vegan so I needed to find a vegan recipe. I had a look online and ended up creating my own recipe based on this one from Yummy Mummy Kitchen, but using shop-bought shortcrust pastry, which is vegan, and using my fresh pumpkin rather than canned, coconut milk and cornflour to thicken, and brown sugar and golden syrup to sweeten it. The end result was a soft baked pie filling, almost the consistency of a baked cheesecake, which tasted delicious! It was very popular with my friends, vegan and non-vegan alike.

See below for the full recipe - I also want to mention here the vacuum seal food storage container from Ozeri that I used to transport and store my pie in. You get two large domed containers in the pack, and you simply close the valve at the top and push down to create a vaccum seal; when you want to open the container just open the valve. This keeps the food fresh and there's also a handy dial you turn to show which day you put the food in the container. They are fairly large to store but are a nice sturdy design and I like the fact that the lid is clear plastic so you can see what's inside, so this is also a nice way to serve food for instance when you are outside in the summer and want to keep the insects away!


It's currently available on the UK Amazon site but with fairly high shipping costs as it comes from the US, or you can find it on other Amazon sites which are cheaper to ship to the UK.

So here's how I made my pumpkin pie
Serves 10-12

Flesh from one large pumpkin, skin removed, chopped
500g shortcrust pastry block
The cream from the top of a 400ml tin of coconut milk plus some of the milk making up 200ml in total
150ml golden syrup
75g brown sugar
1 tsp ground cinnamon
1 tsp ground nutmeg
3 tbsp. cornflour

Stew the chopped pumpkin in a pan of boiling water until softened then drain. Allow to cool then pulse in a food processor until you have a smooth puree.


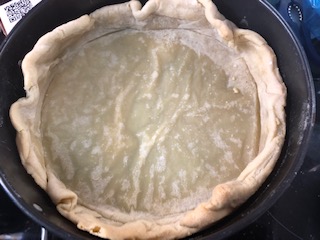
Preheat oven to 180C. Roll out the pastry and use to line either a deep tart tin or a loose bottomed cake tin. Line with greaseproof paper and fill with baking beans and blind bake in a preheated oven for 15-20 minutes until the pastry is starting to turn golden brown. Remove from the oven and allow to cook while you make the filling.


In a large bowl, mix the pumpkin puree, coconut cream and milk, golden syrup, brown sugar, cinnamon, nutmeg and cornflour and beat until smooth.

Pour into the pie crust and return to the oven for 45 minutes. If the top of the pie starts to brown too much, cover with foil.


Remove from the oven and leave to cool then chill overnight in the fridge - this should make the filling set.

I'm sharing this with Baking Crumbs hosted by Jo's Kitchen Larder and CookBlogShare hosted by EasyPeasyFoodie.
 

Thanks to Ozeri for the food storage containers to review.

Thursday, 1 November 2018

Pumpkin and Gnocchi Gratin


Around eight million pumpkins are expected to be thrown away in the UK after Halloween this year - and according to this Guardian article, only a third of consumers will cook and eat any of them.

I didn't get around to carving a pumpkin this year but did buy two, for some photos with my little girl!

I then made use of them in various ways - soup, pie, and this pumpkin and gnocchi gratin. The recipe is from an old issue of Weightwatchers magazine; but I added bacon lardons as well (if you want it without, this makes a nice vegetarian dish). I also used more cheese and allowed more gnocchi per person.
This is really tasty - I'm not a huge fan of gnocchi as it's very doughy and needs more than just a tomato sauce, but it works wonderfully in this recipe - you could also substitute the pumpkin for butternut squash.

Serves 4
400g pumpkin or butternut squash, peeled and cut into chunks
2 garlic cloves, unpeeled
1 small red onion, cut into wedges
4 tbsp. chopped fresh sage - I used 4 tsp dried sage to keep the cost down
200g bacon lardons
low fat cooking spray (or oil if you are not following Weightwatchers)
500g gnocchi
250g tomato passata
5 tbsp. grated cheddar


Preheat oven to 180C. Line a baking tray with foil and spray with non stick spray or pour in a little oil. Roast the pumpkin, garlic, onion and sage, and sprinkle over some salt and pepper then toss in the oil. Roast for 20-25 minutes until the pumpkin has softened.

Meanwhile fry the bacon lardons in a frying pan.

Cook the gnocchi in boiling water according to the pack instructions - it only takes a few minutes.

Squeeze the garlic out of its skin and mash with a fork, discarding the skin. In a large ovenproof dish mix the garlic, pumpkin and onion, bacon lardons, gnocchi, then pour over the passata and gently mix in. Finally sprinkle over the cheese.

 
Bake in the oven for 15-20 minutes; serve with a green veg like broccoli or a salad and garlic bread.

A lovely winter warmer, and a good way to use up pumpkin so it isn't wasted.


 And here's my little pumpkin herself!


I'm sharing this with Cook Blog Share, hosted by Easy Peasy Foodie.

Sunday, 22 October 2017

Mini Trick or Treat No Bake Lemon Cheesecakes for Halloween Party

 
Party food for Halloween parties is pretty easy, I think - as well as all the usual suspects (sausage rolls, sandwiches or mini burgers or quiche or whatever) and then any kind of 'scary stuff'. Here's an idea that's hopefully a little bit different.

I wanted to make something a bit different for Halloween but wasn’t quite sure what. I was in Iceland picking up a few groceries and saw these on the Halloween display: a pack of six mini plastic pumpkins, which you can fill with treats (or tricks!) and use as a game, a bit like an Easter egg hunt perhaps. They were only £1 so I bought them. I had a better use for them though – use them to serve desserts!
 
 
Of course these are plastic and can’t go in the oven but my mind went straight away to no-bake mini cheesecakes. When I got home I devised the following recipe.


I made, and served, each mini cheesecake inside the pumpkins – I went with a lemon flavour with a ginger biscuit base, but you could always do pumpkin flavour cheesecake or anything you like. I wanted to make one of the six a ‘trick’ rather than ‘treat’ and thought about putting a small plastic spider inside to surprise the recipient – but didn’t think that would go down too well with my husband!
 
Instead I decided to colour one of the cheesecake toppings green with food colouring. You could easily do that to all of them for a children’s Halloween party, but I thought it would be a nice touch when I served the mini cheesecakes in the closed pumpkins, if everyone chose their own and when one person opened theirs, they got a bit of a surprise!

Here’s the recipe I came up with

Mini no bake Halloween lemon and ginger cheesecakes - an original recipe by Caroline Cowe @Caroline Makes


Makes six mini cheesecakes

You can also make these mini cheesecakes in paper cupcake cases, or ramekins, or anything you think will work!

6 McVitie’s ginger biscuits
2 level tbsp. butter or marg, melted
175g cream cheese
60ml double cream
50g caster sugar
Juice of ½ lemon (or more to taste)
Couple of drops of green food colouring if desired


Crush the biscuits either in a food processor or with the back of a wooden spoon. Melt the butter either in a small pan over a low heat or in the microwave and stir in the crushed biscuits.

Divide between the cheesecake cases and press the biscuit mixture down using the back of a teaspoon.

In a separate bowl, beat the cheese, cream, sugar and lemon. If you want to colour all the cheesecakes, add the food colouring now.
 
Divide the cheesecake mixture between the cases. If you are only making one green, reserve a little of the cheesecake mixture in the bowl, add the food colouring then fill the final cheesecake.

Refrigerate until ready to serve.
 
 
I'm sharing these with Treat Petite, hosted by Kat the Baking Explorer and also with Cook Blog Share.

Sunday, 30 October 2016

How to Carve a Halloween Pumpkin


Before this year, I'd only carved a Halloween pumpkin once before and used a kitchen knife to make very crude triangles for eyes and a nose and some sort of jagged mouth. It really wasn't very good, yet year after year I've been marvelling at my friend Julianne's amazing creations. She carves brilliant designs and has done everything from spooky scenes to cartoon characters to Game of Thrones.

This year I asked her advice and spent a very enjoyable afternoon at her house learning the tricks of pumpkin carving. There are some basic rules or pieces of advice to follow, and after that it's just a case of patience and a steady hand!

The right tools are essential but not expensive. Julianne has invested in a set of proper wood carving tools, as she is now at the stage where she is adding shading to her pumpkin designs, but I used a simple set of pumpkin carving tools that only cost £2 in Sainsbury's (on sale right next to the pumpkins).


You get a scoop, two mini saws (one finer than the other), a cutting wheel and a poking tool. The set also comes with a book of stencils which are a mixture of easy and a bit more complicated (if you want really complex ones or something more topical, look online. Some of the Donald Trump pumpkins I've seen this year are brilliant!).

 
To start, use a large kitchen knife to cut the lid off the pumpkin. Angle the knife rather than hold it vertically; this will allow the lid to sit better. When you have taken the lid off cut the stringy bits of pumpkin off it.

Use the scoop to remove the seeds and stringy inside of the pumpkin - we ended up with a bowlful. Keep scraping until the inside of the pumpkin is clean - you will need to get your hands right inside the pumpkin as well to get all the stuff out.

We found it easier to do this on the floor, with a plastic sheet (a children's play mat, but you can use anything) to stop the mess getting all over the floor.

When you've done that, choose your stencil and sellotape it on to the pumpkin. Use the poking tool to poke holes where you need to cut (usually the black parts of the stencil).


Remove the stencil, and use the mini saw to cut out the sections you have marked. I was going to start with the largest sections first thinking they would be easiest, but Julianne told me that would weaken the front of the pumpkin and make it much harder to cut the smaller sections. Instead, cut the smaller, more fiddly parts first, and don't push out the sections of pumpkin you have cut. Sometimes they fall out which is fine, but if you leave them in place, it does make it easier to cut the rest of the pumpkin.

When you carve, hold the saw at a straight vertical angle and cut down - this is why we were sitting on the floor as the easiest way is to hold the pumpkin in your lap.

When you have finished, use the poking tool to push out the parts of the pumpkin you have cut and discard (carving pumpkins don't tend to be that good for eating). Put a tealight candle or battery operated candle or even some glowsticks inside the pumpkin to light it up and replace the lid.

I had a lot of fun carving these pumpkins; they are not perfect but for a first time at doing it 'properly' I'm quite pleased!


Friday, 6 November 2015

Mini Pumpkin Stuffed with Cauliflower Rice


It may be a little late now but perhaps you have your Halloween pumpkin left over and are wondering what to do with it? Providing it isn't too past it - or you haven't left it out on your doorstep all night for passing wildlife to nibble on (or worse) then of course you can eat it!


I bought a couple of mini pumpkins or 'munchkins' from Sainsburys for 90p each which I thought were just the right amount for one person - though I forgot that once you scoop the seeds out, there's not a huge amount of pumpkin left. So I would do these as a side vegetable rather than as the main course -though you could use the same recipe with a larger pumpkin for a main course.


I roasted the whole mini pumpkin in the oven for about half an hour, by which point it was soft enough to cut in half and scoop out the seeds (if you can, just cut a small section off the top and scoop it out that way as it looks better when it's served).


For the filling, I mixed some cauliflower rice - which I explained how to make here, but in this case I bought a tub of it from Tesco - with some diced red pepper and red onion, though you can add whatever veg you like. I fried it until the peppers and onion were soft and then filled the pumpkin with it.

 I served it on a bed of spiralized carrot which I also bought in Tesco.


I'm sending this to the Extra Veg challenge hosted by Helen at Fuss Free Flavours - I don't often have entirely vegetarian meals and I don't even like pumpkin all that much but these are fun and seasonal so I can't resist!


Saturday, 31 October 2015

Halloween Cake Pops - Skulls and Ghosts


Halloween is definitely more fun if you have kids - or if you are in your 20s and want an excuse to dress in a sexy costume! This year I'm not doing anything for Halloween - I was going to carve a pumpkin but it's 5pm on October 31 and I haven't been to the supermarket yet!
 

I suddenly remembered a cake pop mould I bought in the Selfridges January sale and had put in a cupboard; I also had some offcuts of another cake in the freezer so I decided to make cake pops.


This mould is made of silicon and is designed so you can actually bake your cake mixture into the appropriate shapes, but I found you can also use it as a mould.


I mixed the crumbled cake with some buttercream until I had a dough-like consistency - I've written several posts before on how to make cake pops so won't explain in detail again.

I then pressed the mixture into the silicon mould, put both sides of the mould together and put it in the fridge for an hour to set.


The shapes came out of the mould very easily - there was a skull, a ghost, a pumpkin and a ball that you can decorate as an eyeball. I stuck the end of some cake pop sticks into some melted candy melts and put them into the cake balls and left them to set.


Unfortunately I hadn't left them quite long enough (or my dough was too soft - you can always pop them in the freezer if you are worried) because the pumpkins and eyeballs fell apart when I was dipping them into the candy melts (I was only making one or two of each as they were only for my fiancé and I - I don't get trick or treaters where I live!).


However, the skulls and ghost turned out really well and you can still see the detail of the shapes, eg the hollows of the skulls eyes.


I dipped them in melted white candy melts and left them to set, then used a brush and a little black food colouring to paint on the details.


For the final touch I stood them in these mini pumpkins, called 'munchkins' - I had to make a hole with a skewer first, then pushed the cake pop sticks in.


Last year I made ghost and Frankenstein cake pops, which you can see here.

The Food Year Linkup on Charlotte's Lively Kitchen is still open so I am sending her these Halloween cake pops.
Food Year Linkup Badge
 
I've also just got time to share this with Treat Petite hosted by Stuart at Cakeyboi and Kat at the Baking Explorer, as their theme is black and orange.


Thursday, 29 October 2015

Halloween Toffee Apple Cupcakes


Halloween toffee apple cupcakes by Caroline Makes


It was announced at work yesterday that we were going to have a bake sale - today. A bit short notice for my liking but I really wanted to make something! I didn't have time to buy any extra ingredients so had to make do with what I had at home (and one thing I picked up in M&S at the train station) - but this is me after all. I had plenty of stuff at home!
 

I decided cupcakes would be quickest and easiest and I could decorate them with different Halloween toppers. I was originally going to make chocolate cakes but decided to use a flavour combination that you get a lot at this time of year: toffee apple.

I decided to go with a basic recipe and then add my flavourings and see how it turned out; the result was a light, bouncy cake with both flavours definitely coming through.

Toffee Apple Cupcakes - an original recipe by Caroline Makes

175g butter
175g caster sugar
3 eggs
175g apple sauce
175g Carnation caramel
175g self-raising flour

to decorate:
400g icing sugar
2 egg whites
1/2 tsp cream of tartar
assorted coloured fondant and mini cookie cutters
I also used Marks & Spencer meringue ghosts to decorate - you can easily make your own but I didn't have time

Preheat oven to 175C.

Cream the butter and sugar and add the eggs, the mix in the apple sauce and the caramel.


Finally fold in the flour.


Spoon into cake cases - I had some Halloween ones left over from last year. Bake in the preheated oven for 15-20 minutes until cooked but still springy to the touch.


Allow to cool. When the cakes are cool, decorate them however you wish.


I made up some royal icing for another recipe, by  whisking egg whites and cream of tartar with the icing sugar, and spread this on top of several of the cupcakes.

I sat the M&S meringue ghosts on top of some of the cupcakes, and for others used black fondant and a mini cookie cutter to cut out bat shapes. I also moulded a skull and some pumpkins from white fondant that I coloured orange and green. I made a monster's head with the rest of the green fondant.


I am sending these to the blog challenge Food 'n' Flix, hosted this month by Elizabeth at the Lawyer's Cookbook, as the film she has chosen is perfect for Halloween - Hocus Pocus.


I'm also sending this to the Food Year Linkup, hosted by Charlotte's Lively Kitchen, as she welcomes recipes that fit to the time of year or topical events that are happening.

Food Year Linkup October 2015
 
Finally I am sharing these with Treat Petite, hosted by Stuart at Cakeyboi and Kat aka the Baking Explorer. Their theme is black and orange, or anything Halloween related.