Showing posts with label children's cakes. Show all posts

Tuesday, 1 February 2022

Unicorn Birthday Cake - Cakes for Children


Last year my daughter had a ‘lockdown birthday’; COVID-19 restrictions meant that we couldn’t have a party, couldn’t have family to visit and couldn’t do anything much at all really. We still had a nice day, as we got Sophie a balance bike for her birthday, and were able to go to a local park to try it out. Of course I was still going to make her a birthday cake, and this year she asked (repeatedly) for a unicorn cake.

I’ve made a unicorn cake before, but thought this style was a bit grown-up for a three year old and possibly not even as instantly recognisable, so instead I invested in a unicorn cake mould to make it easier for myself. I bought a silicon mould from Ebay for around £7 which I thought wasn’t too bad; I’m sure I will end up using the mould again and if not I can pass it on to someone else. 

I wasn’t entirely sure of the quantity of cake mixture I would need to fill the mould, but luckily the scale of this BBC GoodFood recipe for an easy chocolate cake was just right. My daughter had requested a chocolate cake and I thought this recipe didn’t look too rich, compared to some others I have made in the past.

The cake was really easy to make and un-mould (I use PMW Cake Release spray to grease all my cake tins), and decorating was fairly straightforward too. I’m sure a more artistic person – or more professional cake decorator – could make a more beautiful unicorn, but my daughter loved this! 

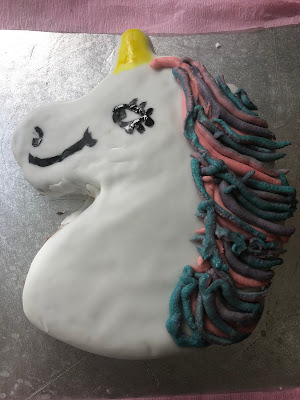
The cake was covered in a chocolate buttercream and then rolled out white fondant. I coloured some buttercream in various colours and used a piping bag to pipe each section of the mane – after all, everyone knows that unicorns have rainbow hair! 

This photo has come out a little darker than the real thing – you can’t quite see the purple in with the blue and pink, but my daughter thought it was great. She also had a unicorn helium balloon and a few unicorn-related gifts, so referred to this birthday – and continues to do so several months later – as “my unicorn birthday”. 

The year before was “my dinosaur birthday” – when she had a dinosaur cake and several dinosaur-related gifts – and she has already told me that her next birthday, even though it is nearly six months away, is going to be “my Sofia birthday”. So I’m already squirreling away Sofia the First gifts and thinking about how to make a Princess Sofia cake!

Saturday, 27 February 2021

Strawberry and white chocolate crispy cakes with pink Coco Pops

Kellogg’s new strawberry and white chocolate flavour coco pops are pink and a fun option for breakfast - but there is a lot more you can do with them than just add a splash of milk!

So what can you make with pink coco pops?

Since I got them a couple of days before my daughter’s third birthday I had the perfect idea - unicorn poo! Or rather, the equivalent of chocolate Rice Krispie cakes, but using the pink coco pops and white chocolate (and a little golden syrup). They are so easy to make and something that children can make with you or even by themselves.

Melt 100g white chocolate and mix with 200g strawberry and white chocolate coco pops - you can always add a little more cereal if the mixture looks too ‘wet’. I added two tablespoons of golden syrup as well.

Spoon into paper cupcake cases and then decorate however you like - I used mini white chocolate stars as I figure unicorns must poop stars, right? Or maybe edible glitter would have been good!

Leave in the fridge to set for a couple of hours then enjoy!


Have a look at my other blog Mini Moo Life for more ideas of things to do with children!

Saturday, 29 June 2019

1st Birthday Cakes - giraffe cake with giraffe pattern inside

My daughter got to have two birthday cakes for her first birthday, as had a party with her dad’s family one weekend and a celebration with my family (who live a few hours away and weren’t able to come to the first party) a week later. So of course I had to make her two cakes!
 

The first cake was decorated as a tribute to her favourite You Tube channel, Cocomelon. The channel consists of short animations of nursery rhymes, all a couple of minutes long, with the same characters – a family of five and various animals – cropping up regularly. Until she was about a year old this was pretty much all my daughter watched on TV – I wasn’t sure she would follow programmes that had episodes or dialogue, and she seemed to really like the songs. The channel’s logo looks a bit like a watermelon with a television screen face so I did my own version as a tribute, covering a cake in pale green fondant and adding dark green stripes and using flesh coloured fondant for the face. I bought a ‘1st birthday’ cake topper on two long sticks to go in the top, and of course a number 1 candle.
 

Baby S is allergic to egg and I wanted her to be able to try a little bit of the cake, so I used a vegan recipe for lemon cake that I’ve used before. I was careful not to let her try the icing as I thought it contained too much sugar, but I didn’t worry about reducing the sugar content of the cake itself as I thought she wouldn’t have more than a couple of mouthfuls. As it was, she wasn’t really interested in eating the cake at all! (Since then five months later she had some of her granny’s birthday cake and really liked it).


I can’t seem to find the recipe anywhere now but it’s quite easy to search for vegan lemon cake recipes online.


For her second cake, I didn’t make it egg-free since I correctly assumed baby S wouldn’t want to eat any. In the end when we had the cake at her grandparents’ house I think she was getting ready for a nap.


I wanted the cake to represent something else that my daughter liked and remembered she was really attached to her Sophie the giraffe – she has two in fact. She seems to have lost interest in the giraffe over the past few months and prefers to play with other toys but there was a time when she was happiest clutching the giraffe in her little fist and waving it aloft.


It’s fun to make cakes with a surprise inside – particularly in this case because my two-year-old niece would be there and I thought she might enjoy it. It’s a lot easier than you might think to make a polka dot effect inside a cake – or in this case, giraffe print.


So how do you make a cake with a giraffe pattern inside? I used a standard vanilla cake recipe, and split the batter into two bowls, adding cocoa powder to one to turn it chocolatey. For this cake, you want to have about two thirds of your batter yellow vanilla and a third chocolate – I also added a bit of yellow food colouring to the vanilla batter.


If you want a perfectly even pattern – almost a chequerboard effect – inside, then you pipe concentric rings of alternative colours around your prepared (greased) cake tin. As I wanted the giraffe print to be a more natural random pattern, I put a layer of vanilla cake in the bottom, piped some very uneven circles of chocolate cake batter and then a layer of vanilla over the top. You can see what this looks like when it has baked, and here it is after I sliced the top off the cake to make it flat – and then the inside when it was sliced.


I covered the cake in white fondant and decided to turn the giraffe itself into the number 1, so I cut a 1 out of yellow fondant and added brown spots as well as ears, a face and hair. I don’t think giraffes have hair quite like that down their backs but never mind! I decided the rest of the cake looked a bit plain but I hadn’t left enough room for my daughter’s name (if you have a one year old, you will understand the rush things have to be done in while they nap!). So I used some of the leftover green fondant from her other birthday cake to make some trees and used a butterfly plunger cutter to do some little pink butterflies at the top. I was quite pleased with how it looks overall and have printed out some photos for my daughter’s baby book so when she is older she can look back and see what cake and presents she had for her first birthday!

Wednesday, 28 March 2018

Easy Easter Rice Krispie Cakes

Last Easter I did loads of baking and card making and the year before and the year before I made an elaborate anti-gravity Mini Egg cake which I was really proud of (it tasted great too) - here's a quick pic:

This year however I will have a four-week old baby at Easter so I definitely won't be doing anything like that! In fact it's my husband's birthday and I make him a showstopper chocolate cake every year but I knew I wouldn't have time to do anything remotely time consuming and there was a chance I wouldn't even get time to bake a basic sponge cake, so I've enlisted the help of a local lady who runs a baking business and for the first time ever am actually buying a birthday cake rather than making it - which is a bit of a shame but needs must, and I'm sure it will taste great.
 
I was starting to miss baking though especially at Easter so I decided I could just about manage making some rice krispie cakes. I used to love them as a child, and still make them every once in a while now! You can make them look like little nests with the addition of a few mini eggs but I used some Easter marshmallows from Lidl, in the shapes of chicks and rabbits. They are a bit big for the 'nests' perhaps but never mind!

Here's a quick and easy recipe that is fun for children to join in and make with you - just be careful when melting the chocolate.


Makes about a dozen Rice Krispie cakes depending on size
100g Rice Krispies
60g butter, chopped into small pieces
3 tbsp. golden syrup
100g milk chocolate

Melt the chocolate in the microwave or a bain marie then stir in the chopped butter until melted. Stir in the golden syrup.

Place the Rice Krispies in a large bowl and pour over the chocolate mixture, stirring gently until all the cereal is coated.

Spoon into paper cakes cases and leave to set - they will set at room temperature but you can also put in the fridge.

Decorate with mini eggs or marshmallows or anything you like - or eat them as they are.

Saturday, 19 August 2017

D'lish Donut Shopkins Birthday Cake


Do you know what Shopkins are? If you have children then you might… if like me you are yet to become a parent then you can be excused for having absolutely no idea!
 
I’ve written before about the fantastic charity Free Cakes for Kids – I made a Rapunzel cake for a girl who otherwise wouldn’t have had a birthday cake.
 
Another request came through from the same group that I decided to volunteer for, for a child who would like a Shopkins cake, even though I didn’t know what that was. Shopkins turned out to be a collection of characters based on items you find in the supermarket – everything from cakes to fruit to a loaf of bread, bottle of bubble bath and even clothes and shoes. They have names like Suzie Sundaw, Mandy Candy and Angie Ankle Boot.
 
I browsed the website for a while until I was able to find a character I thought I could easily incorporate into a cake and remembered I had a giant doughnut cake mould I bought in the sale ages ago and had never used. There is a Shopkins character called D’lish Donut that looks like a pink iced ring doughnut with sprinkles (and of course arms, legs and a face) which I thought would be perfect.

 
The mould comes in two pieces - simply grease them and fill with cake mix.

 
I used a standard Victoria sponge cake recipe for this cake – as it was for a child, I wanted to avoid strong flavours or making it too rich and thought that the icing would be sugary enough!


 I filled the cake with jam and buttercream – the cake mould worked perfectly, turning out the bake cake into a perfect ring doughnut shape.


It wasn’t too hard to decorate – I decided water icing with pink food colouring might be too runny and not look very neat so I coloured some white roll-out fondant, cut it into a  circle large enough to go over the cake and cut a space in the middle. The arms and legs are also made of fondant, and I used some tiny plunger cutters to cut out diamonds from pink, blue and yellow fondant, and stuck them with a dab of water on top to look like sprinkles.
 
The eyes took a couple of attempts and my husband actually ended up helping with these! We made four circles of diminishing size in white, blue, black and white, and layered them to make the eyes. I then used black fondant to make a nose and some eyelashes and pink fondant for the mouth.
 
 
I put the cake onto a silver board and at the last minute decided to spell out the little girl’s name with leftover icing. I had a lovely email afterwards from the charity co-ordinator saying she had been really pleased with her cake – it was fun for me to make a cake for a child and to copy a cartoon character as I don’t get a lot of opportunity to do that (my neice is 8 months old so too young for cake) – and of course I was able to do something good and help a charity that hopefully made a difference and helped that little girl have a happy birthday.