Showing posts with label CookBlogShare. Show all posts

Sunday, 4 November 2018

Easy Vegan Pumpkin Pie to use your leftover pumpkin


I was determined to use up my pumpkins in cooking this year and not just throw them away so as well as this pumpkin and gnocchi gratin I made a pumpkin pie. I've made a pumpkin cheesecake (vegan) before, and this chocolate pumpkin cheesecake, but I've never made an actual pumpkin pie before.

I was spending the weekend with friends so a pie seemed like a nice thing to take; one friend is vegan so I needed to find a vegan recipe. I had a look online and ended up creating my own recipe based on this one from Yummy Mummy Kitchen, but using shop-bought shortcrust pastry, which is vegan, and using my fresh pumpkin rather than canned, coconut milk and cornflour to thicken, and brown sugar and golden syrup to sweeten it. The end result was a soft baked pie filling, almost the consistency of a baked cheesecake, which tasted delicious! It was very popular with my friends, vegan and non-vegan alike.

See below for the full recipe - I also want to mention here the vacuum seal food storage container from Ozeri that I used to transport and store my pie in. You get two large domed containers in the pack, and you simply close the valve at the top and push down to create a vaccum seal; when you want to open the container just open the valve. This keeps the food fresh and there's also a handy dial you turn to show which day you put the food in the container. They are fairly large to store but are a nice sturdy design and I like the fact that the lid is clear plastic so you can see what's inside, so this is also a nice way to serve food for instance when you are outside in the summer and want to keep the insects away!


It's currently available on the UK Amazon site but with fairly high shipping costs as it comes from the US, or you can find it on other Amazon sites which are cheaper to ship to the UK.

So here's how I made my pumpkin pie
Serves 10-12

Flesh from one large pumpkin, skin removed, chopped
500g shortcrust pastry block
The cream from the top of a 400ml tin of coconut milk plus some of the milk making up 200ml in total
150ml golden syrup
75g brown sugar
1 tsp ground cinnamon
1 tsp ground nutmeg
3 tbsp. cornflour

Stew the chopped pumpkin in a pan of boiling water until softened then drain. Allow to cool then pulse in a food processor until you have a smooth puree.


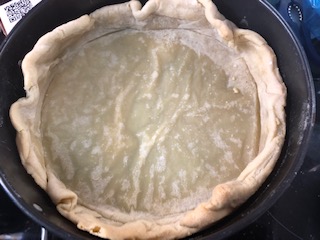
Preheat oven to 180C. Roll out the pastry and use to line either a deep tart tin or a loose bottomed cake tin. Line with greaseproof paper and fill with baking beans and blind bake in a preheated oven for 15-20 minutes until the pastry is starting to turn golden brown. Remove from the oven and allow to cook while you make the filling.


In a large bowl, mix the pumpkin puree, coconut cream and milk, golden syrup, brown sugar, cinnamon, nutmeg and cornflour and beat until smooth.

Pour into the pie crust and return to the oven for 45 minutes. If the top of the pie starts to brown too much, cover with foil.


Remove from the oven and leave to cool then chill overnight in the fridge - this should make the filling set.

I'm sharing this with Baking Crumbs hosted by Jo's Kitchen Larder and CookBlogShare hosted by EasyPeasyFoodie.
 

Thanks to Ozeri for the food storage containers to review.

Thursday, 1 November 2018

Pumpkin and Gnocchi Gratin


Around eight million pumpkins are expected to be thrown away in the UK after Halloween this year - and according to this Guardian article, only a third of consumers will cook and eat any of them.

I didn't get around to carving a pumpkin this year but did buy two, for some photos with my little girl!

I then made use of them in various ways - soup, pie, and this pumpkin and gnocchi gratin. The recipe is from an old issue of Weightwatchers magazine; but I added bacon lardons as well (if you want it without, this makes a nice vegetarian dish). I also used more cheese and allowed more gnocchi per person.
This is really tasty - I'm not a huge fan of gnocchi as it's very doughy and needs more than just a tomato sauce, but it works wonderfully in this recipe - you could also substitute the pumpkin for butternut squash.

Serves 4
400g pumpkin or butternut squash, peeled and cut into chunks
2 garlic cloves, unpeeled
1 small red onion, cut into wedges
4 tbsp. chopped fresh sage - I used 4 tsp dried sage to keep the cost down
200g bacon lardons
low fat cooking spray (or oil if you are not following Weightwatchers)
500g gnocchi
250g tomato passata
5 tbsp. grated cheddar


Preheat oven to 180C. Line a baking tray with foil and spray with non stick spray or pour in a little oil. Roast the pumpkin, garlic, onion and sage, and sprinkle over some salt and pepper then toss in the oil. Roast for 20-25 minutes until the pumpkin has softened.

Meanwhile fry the bacon lardons in a frying pan.

Cook the gnocchi in boiling water according to the pack instructions - it only takes a few minutes.

Squeeze the garlic out of its skin and mash with a fork, discarding the skin. In a large ovenproof dish mix the garlic, pumpkin and onion, bacon lardons, gnocchi, then pour over the passata and gently mix in. Finally sprinkle over the cheese.

 
Bake in the oven for 15-20 minutes; serve with a green veg like broccoli or a salad and garlic bread.

A lovely winter warmer, and a good way to use up pumpkin so it isn't wasted.


 And here's my little pumpkin herself!


I'm sharing this with Cook Blog Share, hosted by Easy Peasy Foodie.

Saturday, 13 October 2018

Easy Loaf Tin Carrot Cake


This is a very easy carrot cake using ingredients you probably already have in the cupboard and fridge that takes very little time to throw together. It was really light and moist and absolutely delicious!

I didn’t actually realise it was a loaf cake until I was part way through the recipe but it makes baking and decorating it much easier. I made this while my baby daughter was having a nap, as my mother in law was having friends over the following day and had invited us to drop in and mentioned not having had time to make a cake so I wanted to help (though in the end she made a fantastic coffee cake as well!).

This recipe comes from the Abel and Cole Cookbook, which I bought (I think on a special offer) back in the days when I had a veg box delivered every week. These days it doesn’t seem worthwhile as my husband is very fussy particularly when it comes to veg and we wouldn’t get through even their smallest box, though now we’ve started weaning our daughter maybe it is something to look into again!

Abel and Cole has a similar recipe on their website where they say they spruced up the recipe from their first cookbook, which is the considerably simpler one that I made.

 
This is what I did:

You need:
185g sugar
180ml vegetable oil
2 eggs
150g self-raising flour
130g grated carrots
1/2 tsp baking powder
1/2 tsp bicarbonate of soda
1/2 tsp salt
1 tsp ground cinnamon

for the icing:
175g cream cheese
175g butter at room temperature
225g icing sugar
1/2 tsp vanilla essence

Preheat oven to 180C. Beat the sugar, oil and eggs together until well combined, then fold in the flour. Stir in the grated carrots, the baking powder, bicarb of soda, salt and cinnamon.

Grease a loaf tin - I use PME Release A Cake Spray 600 ml - and pour in the cake mix. Bake for 30 minutes, testing with a skewer, then turn onto a wire rack to cool.



To make the icing beat together the cream cheese, butter, icing sugar and vanilla. Slice the cake through the middle (this wasn't in the original recipe but I decided to do it and loved it) and spread over one half of the cake and sandwich together then use the rest to cover the top of the cake.

 
 I'm sharing this with Baking Crumbs hosted by Only Crumbs Remain and CookBlogShare hosted this time by Monika at Everyday Healthy Recipes.


Tuesday, 28 August 2018

Vegan Chocolate Baby Shower Cake

 
One of my friends has just had her second baby, another boy, the day before her own birthday. We - my group of school friends - all went to see her a couple of weeks ago for a combined birthday and baby shower celebration.

I wasn’t sure if I was going to be able to go until the last minute as we already had two other things on that weekend - a relative visiting and my father in law’s birthday - but we were able to arrange things so that we were able to go.

Making cakes for celebrations when we get together is usually my thing so I couldn’t turn up empty handed, but I didn’t have the confidence I would have enough time in between taking care of my five month old to make anything really elaborate so I decided to keep it simple.

One of my friends is vegan and I remembered seeing a recipe for a vegan chocolate cake in Tea with Bea, the recipe book from the Bea's of Bloomsbury café.

I'm also publishing this recipe on my new parenting blog, Mini Moo Life - if you're interested in all things baby, parenting and family related, hop on over and have a look! Or follow the blog on Twitter @MiniMoo_Life or Instagram @mini_moo_life.


I used white wine vinegar instead of the red wine vinegar given in the recipe as I had a bottle in the cupboard already (and white wine vinegar is often used in vegan baking so I knew it would be ok). I made a simple vegan buttercream from Pure dairy-free spread, icing sugar and cocoa powder.

The guideline cooking time was given as 40-55 minutes with an extra 5-10 minutes if necessary, which is quite a large range. I found the cake needed the full 65 minutes, in fact I think I left it in even for slightly longer and it was still really light and moist.

I bought a gold cake pick with the word 'baby' from my local party store to go in the top and sprinkled the top with edible gold lustre dust. The cake tasted really good - if you are new to vegan baking and need reassuring, this cake tastes even better than a lot of non-vegan chocolate cakes!

Here's what I did
To make one 8 or 9 inch cake you need:

275g plain flour
100g cocoa powder
2 tsp bicarbonate of soda
1 tsp baking powder
pinch of salt
450ml soya milk
2 tsp red wine vinegar (I used white wine vinegar)
320g caster sugar
320ml sunflower oil (I used vegetable oil)
2 tbsp. vanilla extract

For the buttercream
200g vegan spread eg Pure
400g icing sugar

Here's what I did


Preheat oven to 160C. Mix the flour, cocoa powder, bicarb of soda, baking powder and salt in a large bowl.

In another bowl, mix the soya milk, vinegar, sugar, oil and vanilla, whisking until combined.

Fold into the dry ingredients and mix well.

Grease an 8 or 9 inch cake tin and spoon in the prepared mixture and bake for 45 minutes to 1 hour (I've increased the cooking time slightly from the original recipe). Test the middle with a skewer and bake for another 5-10 minutes if needed.

Allow to cool in the tin then turn out onto a baking rack.

When cool, make the buttercream - cream together the marg and icing sugar. Carefully slice the cake through the middle and spread with the buttercream.

You can spread buttercream over the top and around the sides as well if you wish; I left mine plain and decorated the top with edible gold lustre powder.


I'm sharing this with the final We Should Cocoa linkup over at Tin and Thyme and also with CookBlogShare over at Easy Peasy Foodie.

9 Summer Chocolate Recipes for We Should Cocoa #WeShouldCocoa #chocolate #recipesCook Blog Share Linky

Friday, 22 June 2018

Lotus Biscoff Chocolate Mousse

 
If you haven't discovered Lotus Biscoff spread yet, I urge you to try it now. The little caramelised biscuits you often get with a cup of coffee in cafes have been turned into a spread that is the consistency of Nutella, but tastes like biscuits!

The company's website suggests it as a breakfast food spread on toast which I think might be a bit sweet - I don't even eat Nutella on toast though I do have it on croissants, but otherwise I use it in desserts. Or eat it straight from the jar with a spoon!


I wanted to make an easy dessert for a barbecue with family and found a recipe for Lotus Biscoff and chocolate mousse on the Ocado app. The recipe had  step missing - it didn't tell you what to do with the egg whites that were listed in the ingredients - so I took a punt, and will explain here what I did.

I didn't buy any of the actual Lotus Biscoff biscuits as they are for decoration only and make the recipe quite expensive if you need to buy a whole packet only to use a few, unless you are going to eat the rest of the biscuits later!

The recipe says it serves 8; I did it for 5 and for 8 people the portions would be quite small, so you could use this quantity to serve 6


You need:
200g Lotus Biscoff smooth spread (see link above)
200g dark chocolate
5 eggs
200ml whipping cream - I used double cream as I couldn't get whipping cream and it worked fine

Heat the chocolate and Biscoff spread in the microwave until melted- I did on the 5 setting (medium heat) for 2 minutes.

Separate the egg and in one bowl, beat the egg whites with a whisk until stiff and set both whites and yolks aside. Whip the cream and set aside.

Beat the egg yolks one at a time into the chocolate mixture then fold in the beaten egg whites. Finally fold in the whipped cream.

Spoon into individual serving dishes and chill for a few hours until set; these will also keep overnight in the fridge.

The mousse was very rich but really light in texture, this is definitely something to make again!

 
I'm sharing this with CookBlogShare hosted by Everyday Healthy Recipes and We Should Cocoa hosted by Tin and Thyme

Monday, 7 May 2018

Lemon and Poppyseed Loaf Cake


Towards the end of my maternity leave - and right after my baby was born - I developed the famous 'nesting instinct' and decided to sort out my kitchen cupboards. It's been really helpful because now I'm short of time I can find everything more easily - I also made a fair bit of space by throwing out packets of food I'd forgotten I'd bought that were long out of date!

I found a packet of poppy seeds - still in date - which I'd bought for a recipe ages ago and never used. I was expecting neighbours around the following afternoon to meet baby S and thought a lemon and poppy seed cake - lemon is commonly paired with poppy seeds for some reason - would be a nice easy one to make if I did it as a loaf cake.

I used this recipe from BBC Good Food which turned out really well - very light and fluffy and surprisingly moist. In the end the neighbours had to cancel and reschedule for the following week so I ended up eating most of this cake myself!

The mixture looks quite odd when you add the poppy seeds:


Much better when the other ingredients are in.


Before baking in the loaf tin:


The baked cake, cooling on a rack.


 With the lemon glaze

Perfect with a cup of tea!


.I'm sharing this with CookBlogShare and Love Cake hosted by JibberJabberUK.

Sunday, 22 April 2018

Sticky Ginger and Apple Flapjacks


When I was a child I remember my mum and sister making some flapjacks that were so sticky, we were picking bits of kitchen towel off them as we ate - they had been kept in a Tupperware dish lined with kitchen paper and were almost oozing with golden syrup.

I love sticky, soft flapjack, but not that soft - they need to hold together and be slightly chewy at the edges but soft and buttery in the middle. This recipe offers just that.

These were made in preparation of my sister and her partner coming to visit to meet their new niece, and even though I only made them the day before, about half the pan had been eaten before they even arrived!

The recipe is based on one from Good Housekeeping's The Baking Book; I halved the quantities but also added grated apple for extra flavour as I had a few apples that needed using up. The result was absolutely delicious and the texture was perfect.

Here's what I did:
You need:

175g butter or marg (I used Stork)
135g caster sugar
120g golden syrup
225g rolled oats
1 tsp ground ginger
2 apples, peeled and grated

Preheat oven to 175C. Grease and line a square cake tin.

Heat the butter, sugar and golden syrup in a saucepan over a gentle heat until melted. Stir in the rolled oats, ginger and apple until combined.

Spoon into the cake tin and press down gently to spread the mixture out and flatten it. Bake for 30 minutes until the edges have turned golden brown and slightly crispy; the middle will still be soft and sticky.


 I'm sharing this with Only Crumbs Remain
 and CookBlogShare.
Only Crumbs Remain Hijacked By Twins


Sunday, 24 December 2017

Chocolate Orange Christmas Bundt Cake


This cake is delicious and a special treat at any time of year but especially at Christmas where chocolate oranges are often a popular gift (though I also asked for a Terry's chocolate orange at Easter some years!).

I had decided to make it before finding out I had gestational diabetes and still wanted to bake the cake, as I was planning to take it to my brother in law's on Boxing Day for everyone to eat anyway - it's not like I was going to eat the whole cake myself. Depending on my blood sugar readings and what else I've had I may be able to have a very small piece of it anyway - the diabetes midwife did say it wasn't a case of not being able to ever have anything sweet, but it has to be a small amount on rare occasions.

Terry's chocolate oranges are, as I said, pretty iconic at Christmas. A month or so ago Tesco had a really good offer of 3 for the price of 1 (no that's not a typo) so I think I paid £3 for three. I decided at the time to give my husband one for Christmas and use the other two for baking.

I thought the chocolate orange slices would look great across the top of a bundt and that the cake itself should be chocolate orange flavour. I'd like to be able to say I developed my own recipe but these days I'm so busy preparing for the baby as well as doing everything else, and I am very tired all the time - I actually baked three different things today and had a nap in between as well! So I used a recipe I found online at Marsha's Baking Addiction.


It was easy to make and delicious (according to my husband who ate the offcuts when I levelled the cake) - really moist and you can taste the orange with the chocolate. I definitely recommend this recipe!


The cake came out of my Nordicware bundt tin easily after I sprayed it with PME Release A Cake Spray 600 ml - sometimes I've had problems with cakes sticking in my metal bundt tins but I really wanted to use it because the ridges around the cake are beautiful and I thought would be perfect for this particular cake.

To decorate the cake once it had cooled, I melted a whole Terry's chocolate orange (broken into segments) and stirred in about 50 ml double cream.


I planned to pour this over the top of the cake but it was still a bit thick so I spooned and spread it into the ridges, and topped each one with another piece of chocolate orange (using half of another one so you need one and a half in total). As a final touch I added some Dr. Oetker gold pearls.

 
I'm pleased with the way it turned out and my husband loved how it tasted so I hope the family enjoy it on Boxing Day!


I'm sharing this with We Should Cocoa hosted by Tin and Thyme and Cook Blog Share, hosted by Recipes Made Easy.