Showing posts with label biscuits. Show all posts

Wednesday, 25 October 2023

Halloween Spooky Sugar Cookies


I recently did a class with Biscuiteers which I shall write about separately - and since then I've been enjoying baking and decorating biscuits at home, now I know the 'proper' techniques for decorating! The trick is to use royal icing to pipe an outline, then when it has set, use thinner royal icing to 'flood' the inner part of the biscuit.

I have a large collection of cookie cutters and among them, a pumpkin, ghost and bat. I used a Biscuiteers recipe which you can find online here - the addition of golden syrup makes the dough less likely to spread during baking.

I tried a few different designs, including writing 'Boo' on a ghost, and a pumpkin with a face - but I prefer the look of the plain pumpkin cookies. I think the bats came out fairly well too. I made a few of each type and plan to serve these when my daughter has a couple of friends around for a mini Halloween party - if they aren't eaten already before then!

Saturday, 6 May 2023

Coronation Cookies

I couldn't miss the opportunity/excuse to do some baking for the coronation of King Charles III - it's certainly a momentous occasion no matter what you think of the royal family, and we are merrily joining in with the celebrations, with a street party and parties at school and Rainbows for my daughter.

My husband 3D printed me a crown-shaped cookie cutter, and I bought a cookie stamp from Etsy - not having realised this is something he could have 3D printed me as well so I will remember that for next time! I also had some red, white and blue sprinkles left over from last year's Jubilee which came in handy.

My icing technique is far from perfect but I'm quite pleased with these compared to my usual fairly messy icing. It is a bit fiddly to keep switching colour and icing bags but I think worth it!

I used a standard sugar cookie recipe, from BBC Good Food. My cookie cutter was quite large so I didn't get that many cookies out of it - about 9 crowns and 5 circles. My daughter had most of them to decorate as you can see below!


For the ones I did, I copied the shape and colours of the actual coronation crown and added what is supposed to be some gems along the bottom. I definitely need more practice with icing though but it's all just for fun - and my daughter had a great time making hers!


Friday, 15 April 2022

Easter Imprint Plunger Cookies

I’m ever hopeful that one day I will develop the knack of decorating cookies so they don’t look like a child has done it, and have resigned myself to thinking I need to book a place on a Biscuiteers course.

But in the meantime I decided to have another go at making and decorating some Easter biscuits. I used a standard sugar cookie recipe like this one:

2800g plain flour

1/2 tsp baking powder

pinch of salt

170g butter, softened

150g caster sugar

1 egg

a few drops of vanilla flavouring

Cream together the butter and sugar and then beat in the egg and vanilla flavouring. Next fold in the flour, baking powder and salt.

Knead until you have a ball of dough and wrap in clingfilm. Ideally place in the fridge for at least an hour (though I often skip this part!).

When you are ready to use the dough, roll it out on a lightly floured surface and cut out using cutters.

Bake in a preheated oven at 180C - the baking time will depend on the size and thickness of your cookies, but you don't want them to be overbaked, so I would recommend 10-12 minutes then checking if they look like they need longer.

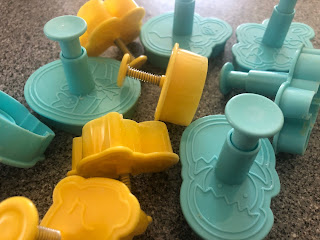
For Christmas I got a set of Easter cookie cutters (which seemed odd to my sister who got them for me, but as I pointed out, my birthday is right after Easter so I would have had to wait a year before I could use them!).

I like these cutters because they have a design that imprints into the dough, and you use the little plunger to push the cookie out. When they are baked, the design did lose a little definition but could still be seen quite clearly.

I used the design as a guide for icing, piping royal icing in different colours and snipping the tiniest piece off the end of a piping bag rather than using a nozzle. Even then I found it really hard to decorate them neatly!


Thursday, 29 March 2018

Easy Easter Decorated Biscuits


I’m determined not to let having a new baby mean I have to give up my hobbies of baking and card baking but at the moment I definitely have very little time for either! There are lots of things you can make that are quick and easy and take minimal fuss though, like these decorated sugar cookies for Easter.
We had some friends visit for a couple of hours last Sunday afternoon; they had said they would  bring some cake but I also wanted to be able to offer something as well, but didn't know if I would have time to make even a simple cake, and wasn't sure what they were going to bring and didn't want to make the same thing, so cookies seemed the answer.

I already had some biscuit dough in the freezer from a previous recipe pre-baby (which I don’t seem to have blogged about); here's a basic sugar cookie recipe you can use, though you can add other flavourings like a bit of lemon zest or butterscotch flavouring, vanilla essence and so on.

225g butter, softened
200g caster sugar
1 egg
340g self-raising flour

Cream the butter and the sugar and beat in the egg. Then fold in the flour until you have a pliable dough. Keep in the fridge until you need to use and roll out to use with cookie cutters.

The size and thickness of the cookies will dictate how long they would need to bake in the oven but I would usually give them 8-10 minutes at 180C as they will continue to harden as they cool out of the oven.

I defrosted my dough and used a set of Easter cookie cutters I bought last year (or maybe even the year before) from one of the pound shop chains and had never used. The set included two different bunnies, a chick, and an egg.


They took no time at all to cut out and bake in the oven and I decided they needed decorating even if I didn't have a lot of time until our friends arrived - or until the baby woke up and wanted feeding again! So I mixed some icing sugar with water and added some different food colourings and did my best to ice the biscuits with a teaspoon (I didn't have time to faff around with piping and flooding properly!) and added a few sprinkles on top.


They aren't particularly neat, but tasted good which was the main thing, and the presentation was helped by this cute little felt Easter basket I bought for a couple of pounds in Lidl last year.


Saturday, 6 January 2018

Low Sugar Low Carb Diabetic Lemon Cheesecake


My sister, her partner and their one-year-old came to stay for new year which was lovely (especially fun introducing my niece and my cat to each other – I think it went fairly well!). I wanted to make a nice dessert for new year’s eve but of course am a bit limited now I have gestational diabetes (sorry to keep harping on about that – but it’s relevant to this recipe!).
 
Sweetener is a god-send when you can’t eat sugar – though I know there are people who avoid artificial sweeteners and have health concerns, so it’s not something I use often but as I did want to make an actual dessert that others would enjoy as well, it came in very handy.
 
I can also eat dairy products like cream, soft cheese, yogurt etc, so quickly decided on making a cheesecake. I prefer no-bake cheesecakes for the taste and texture, but a lot of them involve using condensed milk (I don’t know if you can get an unsweetened one but I figured it probably wasn’t possible to get sugar-free) and some cheesecakes involve raw egg. I made mine very simply, using a tub of Quark (curd cheese that is a bit like cream cheese only thicker, and doesn’t really have much of a flavour) mixed with soft cheese, lemon juice and sweetener – it tasted really good.
 
 
I’d read on a gestational diabetes diet sheet that I could have a couple of light digestive biscuits or rich tea biscuits (which struck me as odd as they do contain carbs and sugar) but I wasn’t going to look a gift horse in the mouth. I crushed up some digestives with a rolling pin in a plastic bag (the biscuits were in a plastic freezer bag, that is – not the rolling pin) and mixed with some melted butter and pressed into the base of a loose-bottomed cake tin. I then spooned the cheese topping on top and decided not to decorate it as most of the things I could think of involved sugar!
I left the cheesecake in the fridge for a day until we wanted to eat it – it really was the easiest thing to make and tasted really good. My sister was surprised that I could have it, even after I told her what was in it, but I had a reasonably-sized portion after a dinner of chicken and vegetables, and got a blood sugar reading that was perfectly within range. So this is a dessert I can recommend!
 

Sunday, 17 December 2017

3D Christmas Cookie Tree


I feel like Christmas has almost passed me by this year. Normally I do all my shopping in November if not before, and do plenty of Christmas baking. This year being pregnant has meant I'm tired a lot of the time, spending half my weekends having naps, and when I am awake I have far more important things to do like register for nurseries which have a one-year waiting list!

My beloved cat was also unwell over the past week but is much better now, and I feel a bit more awake at the moment (I hope that lasts!) so decided it was about time I did something festive. Yesterday I listened to Christmas music while wrapping gifts and actually did some baking.


I bought the Lakeland 3D Christmas cookie cutter set in their January sale last year and hadn't used it yet so this was the perfect time. You get a set of star shaped plastic cookie cutters in varying sizes and two piping bags and nozzles.


There's a recipe on the back of the box which I followed though I also added some cinnamon for a more Christmassy taste. You need to make two cookies from each cutter, though I found the recipe recommended baking the cookies for 12 minutes, which I think works for the larger ones but once you get to the very small cookies, 12 minutes is too long. I baked them in batches and reduced the oven time as the cookies got smaller.


I left them all to cool, then mixed up some icing sugar with water to make a thick paste that I could pipe. I found the nozzle provided in the kit a bit thin so just snipped off the end of the piping bag and piped an outline around the edge of each cookie star. I then added some Dr Oetker gold pearls to the tip of each star while the icing was still soft.


Next I made up some thinner icing and used it to flood the inside of the cookies, and left them all to set.

The final step is to layer the cookies starting with the largest on the bottom; as you have two of each size, rotate one so that the points on the star are sticking out between the points of the cookie underneath.

I placed the final small star standing up on the top of the 'tree' though you could also add another decoration on top if you like.


The effect is really pretty and it is a little time consuming to bake this many cookies when you can't get them all in the oven at once but otherwise it's a very easy kit to use and something you could do with children. The cookies tasted really nice too - we tucked into them after helping my mother-in-law decorate her tree.

I'm sharing this with Cook Blog Share, hosted this week by Hijacked by Twins.

Saturday, 15 October 2016

Jammie Dodger Cupcakes


We had a bake sale for Macmillan at work recently and even though I wasn't going to be in the office that day, I wanted to take part. I decided to make cupcakes as I was going to have to do them mid-week after work, and I don't get home that early thanks to a long commute.

When there is a lot of choice in a bake sale, the things that go first tend to be the more indulgent-looking or more unusual. I remembered ages ago seeing some Jammie Dodger cupcakes online and knew there was a recipe in the Hummingbird Bakery book .

The recipe in the  book explains how to make your own Jammie Dodger-style biscuits, which might be a fun thing to do one day, but I didn’t have time for that, so I bought a packet of mini Jammie Dodgers to use on top of the cupcakes. I remembered how good my cupcakes were that have an Oreo biscuit base and a Jaffa Cake base and decided to use a full-size Jammie Dodger in the base, before the batter was cooked, and also add a spoonful of jam in the middle of the cake after it was baked, which isn’t part of the recipe and is my own adaptation.
 
 
Here’s what I did
Makes around 15 cupcakes
 
For the cake:
15 Jammie Dodger biscuits
70g butter, softened
210g plain flour
250g caster sugar
1 tbsp baking powder
½ tsp salt
210ml whole milk
2 large eggs
1 tsp vanilla extract
15 tsp strawberry jam (about 200g)
 
 
For the frosting:
15 mini Jammie Dodgers
500g icing sugar, sifted
250g butter, softened
 
Preheat oven to 180C.
 
Mix the flour, butter, sugar, baking powder and salt with an electric mixer. Normally I would cream the butter and sugar first then add the eggs; this way gives you a breadcrumb-like texture which I think gives a more biscuity-flavour somehow, which is just right for this recipe.
 
Pour the milk into a jug and beat in the eggs and vanilla, and gradually pour the liquid into the dry ingredients, mixing slowly as you go. Increase the speed of the mixer until you have a smooth batter.
 
 
Line a cupcake or muffin tin with large cupcake cases. Place a Jammie Dodger – with the heart facing up – in the bottom of each cake case, then spoon the cake batter on top until the cake cases are almost full. Bake for 20-25 minutes then leave to cool.
 
 
When the cakes have cooled, use a teaspoon to remove a little of the centre of the cake, retaining the part you removed in one piece. Add a teaspoon of strawberry jam to each cupcake, and replace the 'lid'.


To make the icing, beat the icing sugar and buttercream until smooth. I had intended to pipe swirls onto the cupcakes but ran out of icing (I thought I had more but didn’t!) so ended up spreading it on top to make it go further. Top with a mini Jammie Dodger.
 
 
I'm sharing these with Charlotte's Lively Kitchen as she runs the Food Calendar challenge, and this month was the Macmillan Big Coffee Morning.
 
thefoodcalendar-october-2016
 

Friday, 16 September 2016

Ultimate Chocolate Chip Cookies


One weekend in the summer we were going out for the day and I made us a picnic lunch. I wanted something sweet that would travel well and not be messy and decided to make cookies. My cookies are usually good but not brilliant - I have a tendency to over bake them, forgetting that cookies harden as they cool.

I had a look in a big recipe book I've got called the Good Housekeeping Baking Book and found a recipe for "the ultimate chocolate chip cookie". I was pretty dubious as I've heard that claim often, but these were absolutely amazing! Soft and just the right amount of chewy and they tasted delicious.

You need:
225g unsalted butter, softened
125g caster sugar
150g light brown sugar
1 and 1/2 tbsp. golden syrup
1 tsp vanilla extract
2 eggs, beaten
375g plain flour
1 tsp bicarb of soda
1/4 tsp salt
350g milk chocolate, cut into chunks

Preheat oven to 200C. Mix the butter, sugars, golden syrup and vanilla, then beat in the eggs


Fold in the flour and bicarb of soda then the chocolate - I used mini Hershey's Kisses from America, which worked really well.


Drop spoonfuls of the mixture onto a lined baking sheet, spaced well apart, and press down slightly


Bake in the oven for 10 minutes until golden brown and still soft


Allow to cool on a wire rack. Delicious!


I'm sharing these with Treat Petite, hosted by Kat at the Baking Explorer and Stuart at Cakeyboi.


Saturday, 10 September 2016

Mary Berry Lavender Shortbread Biscuits


The area around where I live in Surrey is known for its lavender – in fact, it was once known as the lavender capital of the world. In the summer there are beautiful purple fields stretching into the distance. Apparently Yardley, a British toiletries brand that is known for lavender talcum powder, ties back to the area but eventually cheaper French lavender flooded the market and a lot of the lavender fields in Surrey were given over to housing estates.
 

Now, there are two main operators of the lavender fields, at least that I'm aware of. Mayfield Lavender is a commercial enterprise, but still a family-run farm; they are open every day through June, July and August where you can buy lavender plants and products. I've never been and it's not clear to me from their website whether you can actually pick your own lavender or not - I would assume so, but can't be sure!


The place that I've preferred to go to over the last couple of years is the non-profit allotment run by Carshalton Lavender. It's a volunteer-led project and they have an annual harvest one weekend a year (this year it was at the end of July) where you can go and pick your own lavender. They charge a reasonable £5 for a large bunch and £10 for a bucket-ful, and there are stands selling food and drinks, cakes and lavender products. That's me in the photo above picking lavender.

My husband and I went with some friends who live locally and I picked a large bunch of lavender, as I was planning to do various things with it from baking to making lavender bags (if I ever get around to using my sewing machine!).

It was my father-in-law's birthday not long after and he really likes shortbread, so I decided to make him some lavender shortbread with local lavender, and parcel a few pieces (as he isn't meant to be eating much sugar) up as a gift.

I used this Mary Berry recipe - lavender shortbread seems a very Mary Berry thing to make. It was very easy to make though you do need to factor in chilling time for the dough - I actually did mine overnight.

Here's the lavender that I picked:


I made up the dough and added the lavender


Make into a cylinder, roll in brown sugar, wrap in foil or parchment and chill in the fridge until firm.


Slice into rounds and bake in the oven


The finished product

 
 I'm sharing these with Treat Petite, hosted by Kat at the Baking Explorer and Stuart at Cakeyboi.

Thursday, 5 November 2015

Delicious Alchemy Gluten-free, Dairy-free Oaty Cookies


One of my work colleagues is gluten intolerant but most of the bakes I’ve brought into work recently have been things I’ve made to have at home and had some left, and I thought it was about time I actually made something gluten free.
 
Every so often I purchase a Degustabox – it’s a monthly subscription service but you can dip in and out, which I have reviewed (after buying with my own money) before. I had one of their boxes a couple of months ago which included a packet of gluten-free cookie mix so one evening – given I’m always short of time after work – I decided to make the cookies.
 
The company behind these mixes is called Delicious Alchemy; they make cake and bread mixes and cereals as well and have a limited edition Christmas fruit cake mix available at the moment as well. It was started by a computer games producer who discovered she was coeliac and went off to university to study food science and marketing. They’ve launched products in Sainsburys and Waitrose and they are also available through their website. I’d never come across the company before but I love their colourful packaging and fun approach – the company history timeline has an anecdote about how the founder discovered she was coeliac (an ear of wheat down her sock!) and another about the time the company accountant got stuck in a lift.
 
The mix I had, the Oaty Cookie mix, was so easy to make. All you do is mix the contents of the bag with melted butter and water – you can also make these cookies vegan by using a butter-substitute which is what I did, after hearing that another colleague also can’t eat gluten or dairy.

 
I got 9 cookies out of the mixture and they were so quick and easy to make, and tasted pretty good too. I think they would have been better with butter and they were not particularly sweet – which is a good thing as it makes them feel a bit healthier. Also, my colleague said that often gluten-free products are packed full of sugar and she finds them too sweet, so she really likes these. In fact when I told her about the packet mix I’d used, she went on to the company’s website and ordered some herself!


I'm sharing these with Treat Petite, hosted by Kat the Baking Explorer and Stuart at Cakeyboi, as their theme this month is autumn, and I think there is something very autumnal and warming about oats.