Showing posts with label icing. Show all posts

Wednesday, 25 October 2023

Halloween Spooky Sugar Cookies


I recently did a class with Biscuiteers which I shall write about separately - and since then I've been enjoying baking and decorating biscuits at home, now I know the 'proper' techniques for decorating! The trick is to use royal icing to pipe an outline, then when it has set, use thinner royal icing to 'flood' the inner part of the biscuit.

I have a large collection of cookie cutters and among them, a pumpkin, ghost and bat. I used a Biscuiteers recipe which you can find online here - the addition of golden syrup makes the dough less likely to spread during baking.

I tried a few different designs, including writing 'Boo' on a ghost, and a pumpkin with a face - but I prefer the look of the plain pumpkin cookies. I think the bats came out fairly well too. I made a few of each type and plan to serve these when my daughter has a couple of friends around for a mini Halloween party - if they aren't eaten already before then!

Saturday, 6 May 2023

Coronation Cookies

I couldn't miss the opportunity/excuse to do some baking for the coronation of King Charles III - it's certainly a momentous occasion no matter what you think of the royal family, and we are merrily joining in with the celebrations, with a street party and parties at school and Rainbows for my daughter.

My husband 3D printed me a crown-shaped cookie cutter, and I bought a cookie stamp from Etsy - not having realised this is something he could have 3D printed me as well so I will remember that for next time! I also had some red, white and blue sprinkles left over from last year's Jubilee which came in handy.

My icing technique is far from perfect but I'm quite pleased with these compared to my usual fairly messy icing. It is a bit fiddly to keep switching colour and icing bags but I think worth it!

I used a standard sugar cookie recipe, from BBC Good Food. My cookie cutter was quite large so I didn't get that many cookies out of it - about 9 crowns and 5 circles. My daughter had most of them to decorate as you can see below!


For the ones I did, I copied the shape and colours of the actual coronation crown and added what is supposed to be some gems along the bottom. I definitely need more practice with icing though but it's all just for fun - and my daughter had a great time making hers!


Friday, 15 April 2022

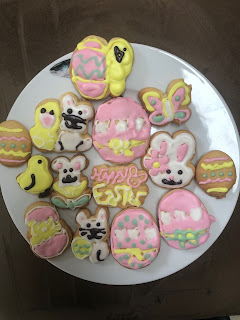
Easter Imprint Plunger Cookies

I’m ever hopeful that one day I will develop the knack of decorating cookies so they don’t look like a child has done it, and have resigned myself to thinking I need to book a place on a Biscuiteers course.

But in the meantime I decided to have another go at making and decorating some Easter biscuits. I used a standard sugar cookie recipe like this one:

2800g plain flour

1/2 tsp baking powder

pinch of salt

170g butter, softened

150g caster sugar

1 egg

a few drops of vanilla flavouring

Cream together the butter and sugar and then beat in the egg and vanilla flavouring. Next fold in the flour, baking powder and salt.

Knead until you have a ball of dough and wrap in clingfilm. Ideally place in the fridge for at least an hour (though I often skip this part!).

When you are ready to use the dough, roll it out on a lightly floured surface and cut out using cutters.

Bake in a preheated oven at 180C - the baking time will depend on the size and thickness of your cookies, but you don't want them to be overbaked, so I would recommend 10-12 minutes then checking if they look like they need longer.

For Christmas I got a set of Easter cookie cutters (which seemed odd to my sister who got them for me, but as I pointed out, my birthday is right after Easter so I would have had to wait a year before I could use them!).

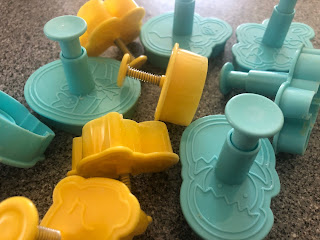
I like these cutters because they have a design that imprints into the dough, and you use the little plunger to push the cookie out. When they are baked, the design did lose a little definition but could still be seen quite clearly.

I used the design as a guide for icing, piping royal icing in different colours and snipping the tiniest piece off the end of a piping bag rather than using a nozzle. Even then I found it really hard to decorate them neatly!


Wednesday, 5 May 2021

How to make an Amazon parcel cake


We fall squarely in the camp of ‘how on earth did people manage before Amazon Prime?’. A combination of not wanting to go to shops during lockdown, working full time and not really wanting to spend my free time trawling the high street and a toddler who often needs stuff at short notice means we probably get more Amazon parcels than most. Then there is the fact that my husband actually works for a branch of the company so it’s not far from the truth to say that his bank statement looks quite funny.... money comes in from Amazon... money goes out to Amazon!
 
So when it came to his birthday there was really only one cake I was ever going to make. I'd seen a few pictures on the internet of cakes that look exactly like Amazon parcels, complete with shipping labels - which are all edible. The cake itself looked fairly simple, but the question was, where do you get edible Amazon labels to go on cakes?

 
It turns out that these are actually made of icing sheets, printed using edible ink. You can buy your own icing printer and edible ink and they aren't quite as expensive as I imagined - they seem to start at around £200. Which is a lot, but not prohibitively expensive if you were going to use it a lot. However, I knew I wasn't going to get much use out of one so couldn't justify buying one, and instead found someone selling what I needed on Etsy.

When I bought this in March I could only find one UK seller on Etsy making these, but now there seem to be quite a few, and I've found the same thing on Ebay as well. I paid £9 which was quite a bit for a cake decoration but I was happy to pay it for something this unique!
 
Making the cake itself is relatively easy - you need a square or rectangular cake tin, some roll-out fondant icing, some food colouring and that's about it - as well as your cake and icing ingredients.

My husband loves chocolate cake so I browsed the internet for a recipe that looked nice - I didn't want to use any of the really fudgy chocolate cake recipes I've made before that use a lot of melted chocolate in the cake batter, as our three-year-old daughter would be eating it too. So I wanted it to be delicious but not too rich, and used this recipe from Charlotte's Lively Kitchen, which was really good.
 
If you don't have a rectangular cake tin you can bake two square cakes and join them together, but you might have a bit of a dip in the icing where there is a join.
 
To cover the cake I mixed some fondant icing with a little gel paste in teddy bear brown. You can buy ready made icing by Renshaw in this colour but it's cheaper to add your own colour to white icing, at least if you will be using gel colours regularly (they tend to last a long time). I think the shade looks very similar to Amazon packaging!
 
As well as filling the cake with chocolate buttercream I spread a thin layer over the top and around the sides, then rolled out the fondant to cover it. All I then had to do was add the labels.


They came on an A4 sheet with instructions that said if I had difficulty in peeling the icing off the backing (which I did - it was impossible) to put the sheet in the oven at a particular temperature, and it would harden and come off the backing sheet easily. It worked perfectly, and I only needed to moisten the fondant on the cake a little to get the labels to stick. I was able to get them personalised, with my husband's name and birthday date.
 
My icing isn't perfect - I live in envy of people who can make perfectly sharp corners - but from a distance this looked very realistic, and my husband thought it was brilliant as he hadn't seen these cakes before!


Sunday, 22 May 2016

Alpaca Cookies and Alpaca Adventure, Dorset


I wouldn't say I'm alpaca-mad... I just have an alpaca cuddly toy, an alpaca hat, a scarf made from alpaca wool, alpaca writing paper, stickers and post-it notes, and a bag that says "alpaca bag" (geddit?). Oh and some alpaca cookie cutters.
 
So it perhaps wasn't surprising that when my friends and my sister came to organise my hen night that they decided alpacas should be involved! There's a place very close to my wedding venue called Alpaca Adventure, run by the very hard-working Wendy (and I think her husband) who has a full time day job as well as running a farm with over 30 alpaca plus sheep, hens and a pig. She takes the alpacas to competitions and has won several rosettes for effectively 'best in class' and sells the wool to a mill which uses it to make clothing.
 
She also does alpaca walking, which means you can basically go and walk an alpaca round a field on a lead. It sounds a bit random, and perhaps it is, but it's great fun!
 
First we fed some lambs, then we petted the pig, then got introduced to our alpacas - mine was a gorgeous guy called Teddy Edward. They each wore a bridal and we basically went for a walk for about 45 minutes around a field, leading our alpacas who were very sweet and docile, if occasionally trying to stop and munch some grass or sniff each other's bums.
 
 
Look at this dude!


This is what alpaca walking looks like


It's also pretty inexpensive and only cost £10 each - not bad given I imagine it costs a lot to keep the animals! The only thing I would say is that if you are booking this as a surprise for someone's birthday or hen night, make sure you tell Wendy that it's a secret - I'd actually met her at an event and she let the cat (alpaca?) out of the bag that I was coming here for my hen night even though I wasn't supposed to know!

After my hen night I wrote my friends some little thank you notes as it seemed a good excuse to use my alpaca writing paper! My fiancé got me this for Christmas - he knows me so well :-)

I also thought it was a good opportunity to use the alpaca cookie cutters he got me at the same time!

Here are my cutters:


I used a basic sugar cookies recipe and rolled out the dough and cut out the shapes


Ready to go in the oven


And here they are. These could easily be llamas and I think they could pass for giraffes too, but if you look at the necks, I think you can see the fatness that suggests the big fluffy wool of an alpaca.


I made up some royal icing as I wanted to recreate the thick wool of the alpacas, but I got the quantities slightly wrong and the icing wouldn't set enough and even though I piped it in dots, they all ran together. Still, you get the idea! I gave these to two of my bridesmaids when they came up the weekend after the hen night for their dress fittings as a nice reminder of the hen night!


Thursday, 23 July 2015

Pina Colada Cupcakes


I've written before about Sugar and Crumbs, a company which makes flavoured icing sugars and cocoa powders from natural ingredients. I first came across them at a cake show and I think it's a brilliant idea, especially for those flavours which are hard to replicate. So I was excited when they sent me a packet of pina colada icing sugar to try. It costs £1.99 for 250g or £3.49 for 500g which is plenty for a dozen cupcakes. So not something I would buy every day (you have to pay postage as well) but it's a great idea for something a bit different.


I've made pina colada cupcakes once before but this time I used a different recipe from a fun book called Make Bake Cupcake. I didn't use the frosting recipe from the book though. This is what you need to make 12:

190g plain flour
1.5 tsp baking powder
pinch of salt
115g butter, softened
200g caster sugar
2 eggs
2 tbsp. rum
125ml milk
85g tinned pineapple, crushed
60g of dessicated coconut to decorate
500g Sugar and Crumbs pina colada flavour icing sugar
250g butter, softened
cocktail umbrellas to decorate

Preheat oven to 180C and line a muffin tin with paper cases - I used yellow ones.

Cream the butter with the sugar then beat in the eggs. Mix in the rum and milk and gradually add the flour along with the baking powder and salt. Finally stir in the pineapple.

Spoon the mixture into the paper cases and bake for 18-20 minutes until cooked. Allow to cool.


Mix the Sugar and Crumbs pina colada flavour with the softened butter for the buttercream. Using a piping bag and star nozzle pipe swirls on top of the cupcakes. Sprinkle over the dessicated coconut to decorate and top with a mini cocktail umbrella.


I'm sending these to Tea Time Treats, hosted by Jane at the Hedgecombers and Karen at Lavender and Lovage as their theme is barbecues.


And I'm sending these to Treat Petite, hosted by Stuart at Cakeyboi and Kat the Baking Explorer; the theme this month is summertime special.


Thanks to Sugar & Crumbs for sending me the icing sugar to review.

Tuesday, 21 July 2015

Mini Vegan Chocolate Blueberry Cakes


Sugar & Crumbs, a maker of flavoured icing sugar, recently sent me a few samples to try, including a tiny amount of blueberry flavoured buttercream. When I saw that the chosen ingredient for We Should Cocoa this month is blueberries, I decided to order a bag of the icing sugar and incorporate that into a recipe.


A little while ago I was in a café and saw some really cute stacked cakes that were like mini Victoria sponges, but cupcake sized. I thought these would be fun to make for a barbecue when I had some friends over including a vegan so found one of my most successful vegan chocolate cake recipes so far, which you can find here.


I baked them as cupcakes, and when they had cooled carefully sliced off the top of the cupcake as it was domed, so I had several flat discs of cake.


I made up the icing which just involves mixing the icing with softened butter but I used vegan margarine; the flavoured icing sugar itself is suitable for vegans. It has a lovely blueberry taste but I decided I wanted it to be blue in colour as well so added a few drops of food colouring.


I then used some of the buttercream to sandwich the cakes together and placed a circle of fresh blueberries on the icing in the middle of the cakes. It did make the cakes a little hard to keep upright though! I decorated some of them with blueberries on top as well but as the cakes were in danger of falling over decided not to do it on all of them!


I'm sending this to We Should Cocoa, hosted by Choclette of Tin and Thyme, as the chosen ingredient this month is blueberry.


I'm also sharing these with Tea Time Treats, hosted by Karen at Lavender and Lovage and Jane at the Hedgecombers as I made these for a barbecue which is their theme this month.


For the same reason I'm sending this to Treat Petite, hosted by Stuart at Cakeyboi and Kat aka the Baking Explorer as their theme is summertime.

Friday, 12 June 2015

Pink Lemonade Cupcakes

 
It is hard to add certain flavours to icing sugar, so I think these pre-flavoured packs from Sugar & Crumbs – which use all-natural ingredients – are brilliant.
  
 
I got three packs for my birthday: salted caramel, key lime and pink lemonade. Pink lemonade is one of my boyfriend’s mum’s favourite drinks, and as her 60th birthday was approaching – and her other daughter-in-law was making the birthday cake – I decided to use the flavoured icing sugar to make her some cupcakes.
 
I looked for some recipes online and couldn’t find anything that looked quite right; many of them used lemon flavour but nothing to get across the sparkle and fizz of actual lemonade, so I decided to create my own recipe.
 
These cupcakes were amazingly light and fluffy and tasted delicious (the icing was a big part of that!) – I was told that someone who doesn’t normally eat cake at all was persuaded to try one, and went back for seconds! More importantly, my boyfriend’s mum loved them.
 
I used some cow-print cupcake cases that I was sent by cake decorating equipment supplier Mein Cupcake, which trades in the UK as Cake Mart. They were very appropriate as my boyfriend's mum's last name is Cowe (pronounced cow) and I thought they were very good - the pattern remained bright and clear after baking, which doesn't always happen with cupcake cases.


Pink Lemonade Cupcakes – an original recipe by Caroline Makes
 
Makes about 18 cupcakes
¾ cup butter, softened
1 ½ cups caster sugar
2 eggs
2 ½ cups self-raising flour
75ml lemonade (or pink lemonade, if you have it)
Tiny amount of pink food colouring
 
For the frosting:
1 500g packet Sugar & Crumbs pink lemonade icing sugar (or, plain icing sugar mixed with the juice of 1 lemon)
250g butter, softened
Tiny bit of pink food colouring
 
Preheat oven to 180C. Beat the butter with the caster sugar, then beat in the eggs. Fold in the flour a little at a time, then pour in the lemonade and mix carefully. Add the food colouring and mix until the batter turns pink.
 
Line a muffin tin with cake cases and spoon the batter in so each one is about 2/3 full. Bake for 15-20 minutes then remove from the oven and allow to cool.
 
For the frosting, beat the icing sugar with the butter, and the lemon juice if you are using, and add the food colouring. Choose your favourite piping nozzle, attach to a piping bag and pipe pretty swirls.
 
 
I'm sending these to Love Cake, hosted by Ness at JibberJabber UK, as the theme is midsummer madness, and these little cakes are very summery.
 

I'm also sharing these with Tea Time Treats, hosted by Karen at Lavender and Lovage and Jane at The Hedgecombers; their theme is cupcakes.


Saturday, 3 November 2012

Ginger Bonfire Night cupcakes with popping candy


I wanted to make something for Bonfire Night as we were going to watch the fireworks then back to a friend's house for some food afterwards, and for a long time have had the idea of popping candy in my head. Do you remember eating that when you were a kid? I used to love the way it would fizz and pop in your mouth, and hoped it would have the same effect sprinkled on cupcakes!

I also wanted to make my cupcakes fit the theme so decorated them to look like little bonfires. The cakes themselves are ginger flavour which I think also works really well for this time of year!

The recipe I used was from the book Cupcakes from the Primrose Bakery, though the decoration idea was my own.

There is a separate recipe for the frosting below. For the cakes, you need:

200g butter, softened
175g brown sugar
3 tbsp black treacle
150ml milk
4 pieces stem ginger from a jar of stem ginger in syrup. Chop the ginger and reserve the syrup for the icing.
2 eggs
300g self-raising flour
1 tbsp ground ginger
pinch of salt

Preheat oven to 180C/ 160 C fan.

In a saucepan, melt the butter, sugar and treacle over a low heat. Take off the heat then stir in the milk.


Beat the eggs in another bowl, chop the stem ginger (reserving the syrup) and add the ginger pieces to the egg mixture. Beat this into the butter mixture- either still in the saucepan or you can transfer it to a bowl.


Add the flour, ground ginger and salt and mix well.


Spoon into cupcake cases - I had some Halloween ones as I couldn't find anything that would have specifically worked for Bonfire Night, though in retrospect I think a metallic red would have been good. But I did pretty well with this recipe and had all the ingredients in the house already - even the stem ginger and the treacle - so didn't want to go out and buy cake cases specially.


Bake in the oven for about 30 minutes then leave to cool.


Ginger buttercream frosting
280g butter, softened
8 tbsp ginger syrup from the jar of stem ginger
600g icing sugar

You can either make this in one batch then separate it, or in two as I did. If you want to make two batches, halve the ingredients.
Otherwise, beat the butter until creamy, add the syrup then the icing sugar and mix to make buttercream.


Take each bowl - or separate the mixture into two bowls - and colour one orange and one red. I used some orange Wilton gel colour that I had from Halloween last year, and it only needed a tiny amount to turn a lovely orange colour. For the pink, I used a few drops of liquid food colouring - admittedly it was one that was made from natural ingredients so wasn't neon pink like some are - but then I added a few more drops, and a few more, and still wasn't happy with the colour, so I used a tiny dab of Sugarflair ruby red sugarpaste colouring and that was perfect.


Spoon each icing into a piping bag. This is the point at which I started wishing I had the new duo colour piping bag set from Lakeland as it would have been perfect to use here - you can pipe two colours at once and swirl them together. That was the effect I wanted to create with the red and the orange icing, to look like the flames of the bonfire, so I took it in turns to pipe some of each colour onto the cupcake. I did a small blob of icing and drew the bag upwards so it stood up like a little flame. Unfortunately the red was a little softer than the orange (from all the liquid food colouring, I expect!) so it didn't quite stand up as well, but I thought it still looked nice.

Here you can see how I did one colour first, then the second colour in the gaps around it:


Next I cut up some Cadbury's Flake and arranged the pieces on the cupcake to look like logs on the bonfire.


Now for my favourite part: the popping candy!


I sprinkled a little popping candy on each cupcake in the gap at the top of the flake pieces. I wonder whether I should warn people before they eat the cake, or just let them have the surprise? I think the popping candy will mimic the effect of fireworks going off.


The finished cupcakes for tonight's Bonfire Night party