Showing posts with label dessert. Show all posts

Friday, 2 September 2022

Cherish Finden's Shiok - Expensive but worth it

Beautiful presentation, fantastic flavours but you will get a ‘shiok’ from the prices!

I had a £16 individual dessert in Bake Off Professionals star Cherish Finden’s new patisserie… and was it worth it? Find out what I thought of the Apple Tin below!

Cherish Finden is a celebrity chef known for her appearances as a judge on Great British Bake Off: The Professionals and as the pastry chef at London’s luxury Langham hotel. Her formidable demeanour combined with fabulous outfits and comments to the contestants that have launched countless memes have made her something of an icon, so when I read that she had opened a new patisserie just up the street from my office I decided to pay a visit.


Part of the Pan Pacific hotel but in a standalone building with its own entrance (so you don’t go into the hotel itself), Shiok! looks fairly unassuming from a distance, but as you get closer you can see rows and rows of perfectly formed sweet treats on the counter. There’s a seating area that gave off a peaceful, tranquil vibe - possibly because there was only one other couple in there on the weekday lunchtime when l visited. 

There are comfy chairs at the back and more formal hard chairs and little tables at the front, and the three staff hovering at the counter were friendly if a little intimidating - I watched one line up desserts in the display and check the distance between them with precision that the GBBO judges would have loved.


I spent some time admiring the display of treats, as much for their finesse and beauty as deciding which one I wanted to order. I have to admit having a bit of a ‘Shiok’ when I saw the price tags (this is not where the name comes from, and it apparently means ‘very tasty’, but perhaps it should be). Most of the patisserie was priced around the £15 mark and the one I chose was £16. Obviously aimed at the luxury market (I would say mainly tourists and business travellers) it is nonetheless an afternoon tea lover’s heaven. From traditional Singaporean biscuits to what looked like a chocolate tea pot, this is a feast for the eyes.


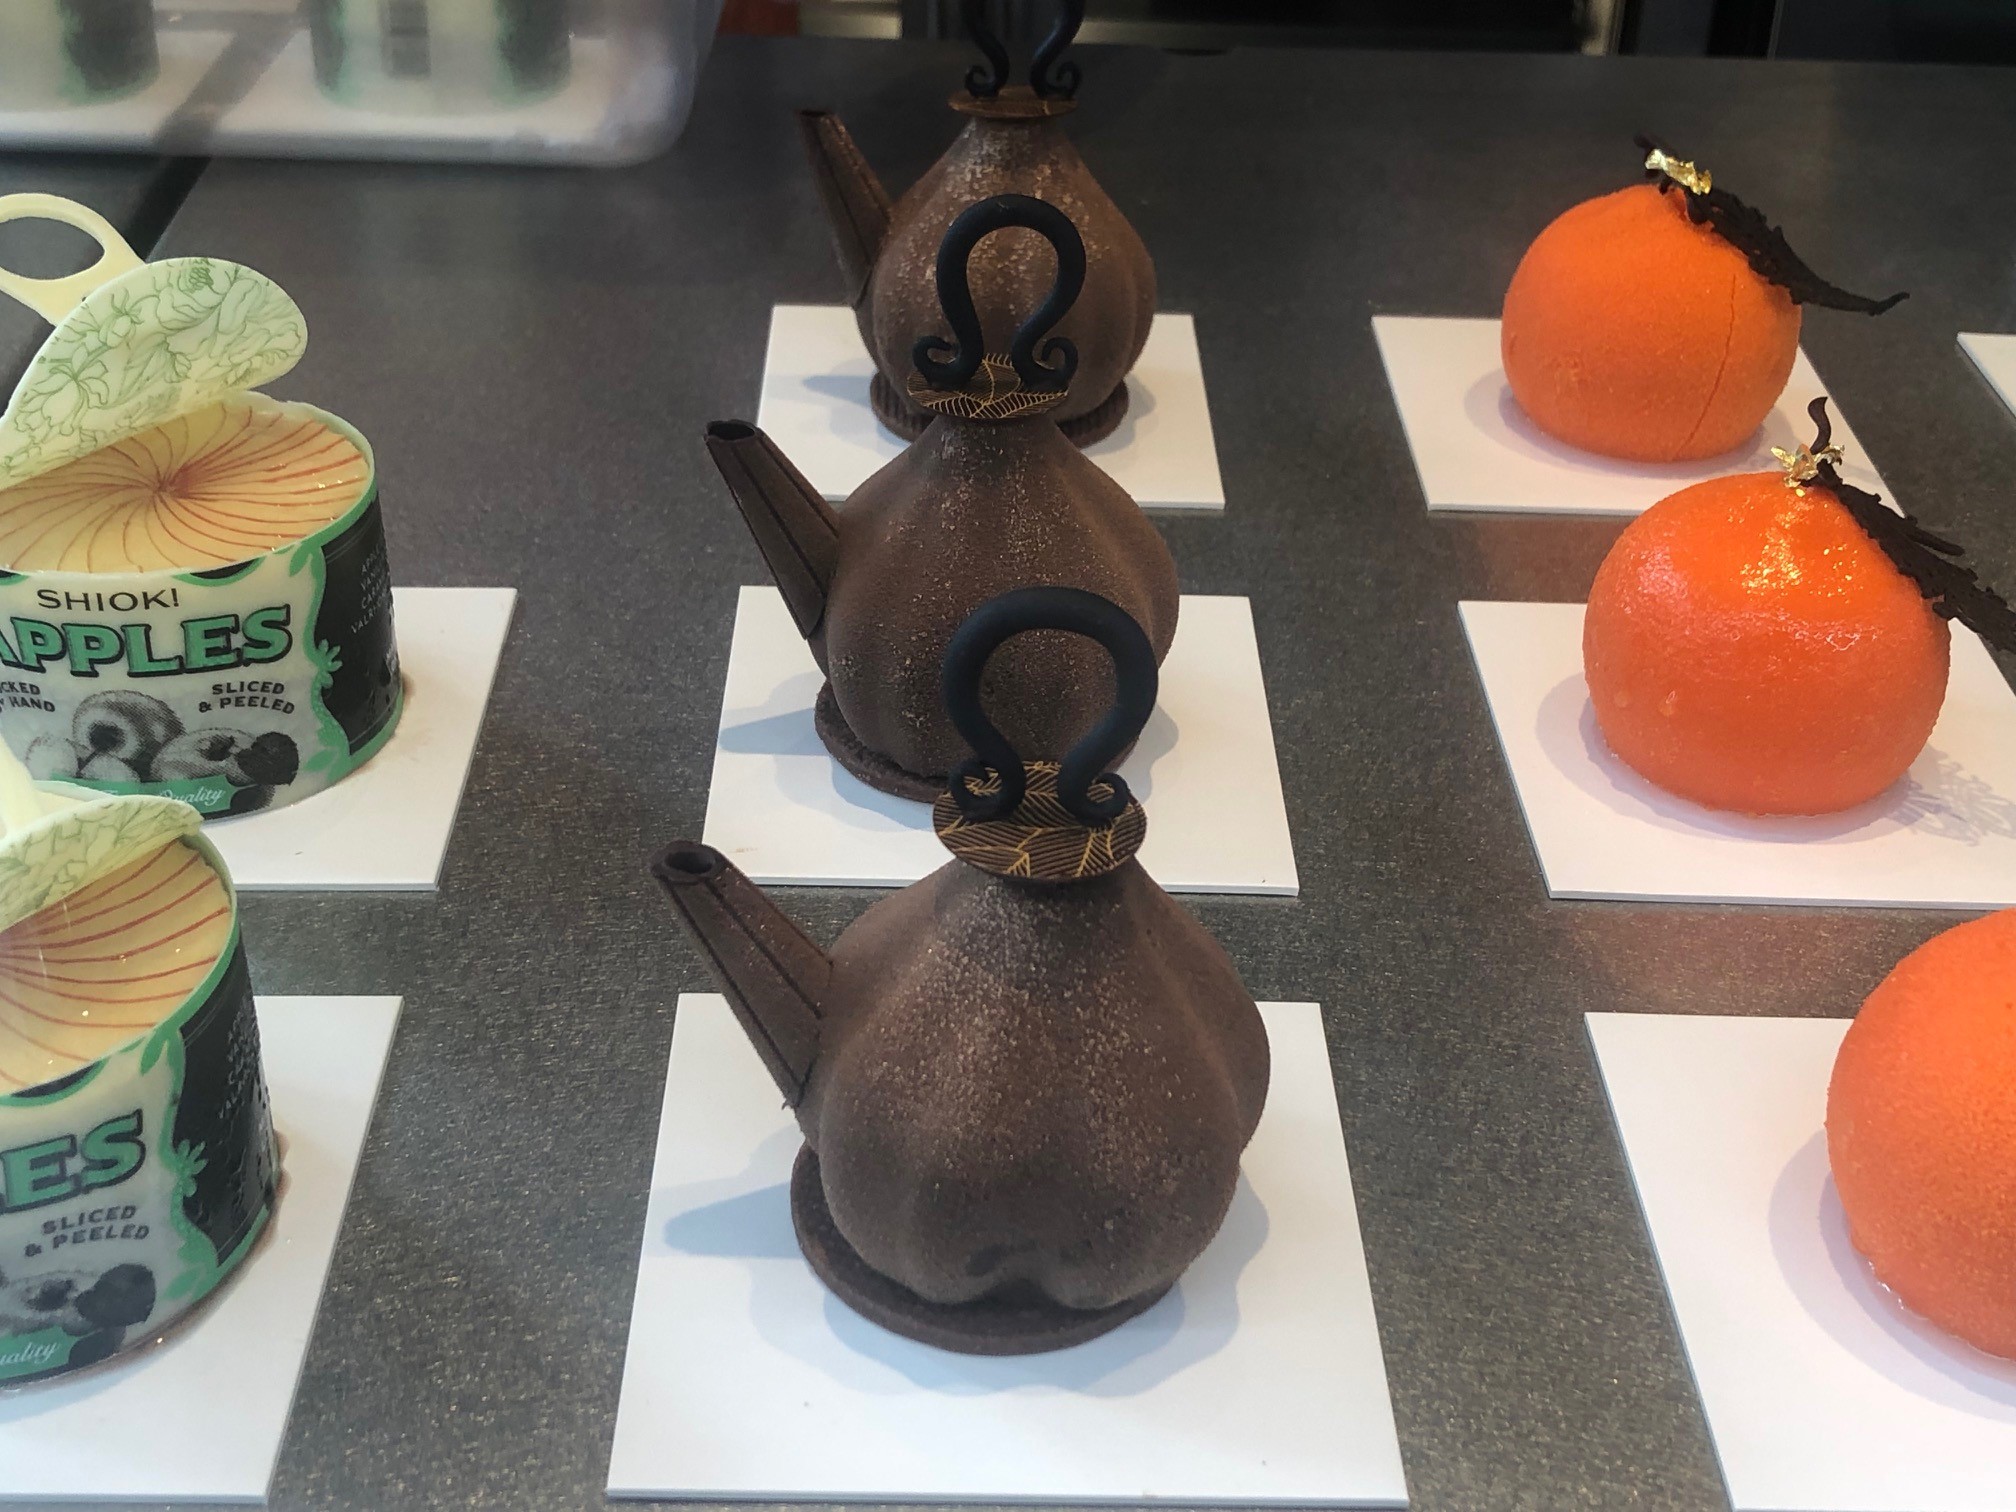
Cherish has revealed that the Apple Tin was inspired by her childhood where she would open a tin of lychees and eat them straight from the tin. Here, the tin itself is edible too- white chocolate printed with a design. Inside is caramel sponge, apple compote, apple slices and cinnamon crumble. Each mouthful was delicious, a perfect combination of flavours and textures, and at £16 it probably does scale up consistently from when you pay £50 for an afternoon tea for similar bite size patisserie (as the sandwiches and scones aren’t exactly the expensive part). Even do it was definitely a one off treat and not something I would spend that much on every week!

If you do get a chance to check out Shiok I recommend it - but don’t expect it to be cheap!

Sunday, 4 November 2018

Easy Vegan Pumpkin Pie to use your leftover pumpkin


I was determined to use up my pumpkins in cooking this year and not just throw them away so as well as this pumpkin and gnocchi gratin I made a pumpkin pie. I've made a pumpkin cheesecake (vegan) before, and this chocolate pumpkin cheesecake, but I've never made an actual pumpkin pie before.

I was spending the weekend with friends so a pie seemed like a nice thing to take; one friend is vegan so I needed to find a vegan recipe. I had a look online and ended up creating my own recipe based on this one from Yummy Mummy Kitchen, but using shop-bought shortcrust pastry, which is vegan, and using my fresh pumpkin rather than canned, coconut milk and cornflour to thicken, and brown sugar and golden syrup to sweeten it. The end result was a soft baked pie filling, almost the consistency of a baked cheesecake, which tasted delicious! It was very popular with my friends, vegan and non-vegan alike.

See below for the full recipe - I also want to mention here the vacuum seal food storage container from Ozeri that I used to transport and store my pie in. You get two large domed containers in the pack, and you simply close the valve at the top and push down to create a vaccum seal; when you want to open the container just open the valve. This keeps the food fresh and there's also a handy dial you turn to show which day you put the food in the container. They are fairly large to store but are a nice sturdy design and I like the fact that the lid is clear plastic so you can see what's inside, so this is also a nice way to serve food for instance when you are outside in the summer and want to keep the insects away!


It's currently available on the UK Amazon site but with fairly high shipping costs as it comes from the US, or you can find it on other Amazon sites which are cheaper to ship to the UK.

So here's how I made my pumpkin pie
Serves 10-12

Flesh from one large pumpkin, skin removed, chopped
500g shortcrust pastry block
The cream from the top of a 400ml tin of coconut milk plus some of the milk making up 200ml in total
150ml golden syrup
75g brown sugar
1 tsp ground cinnamon
1 tsp ground nutmeg
3 tbsp. cornflour

Stew the chopped pumpkin in a pan of boiling water until softened then drain. Allow to cool then pulse in a food processor until you have a smooth puree.


Preheat oven to 180C. Roll out the pastry and use to line either a deep tart tin or a loose bottomed cake tin. Line with greaseproof paper and fill with baking beans and blind bake in a preheated oven for 15-20 minutes until the pastry is starting to turn golden brown. Remove from the oven and allow to cook while you make the filling.


In a large bowl, mix the pumpkin puree, coconut cream and milk, golden syrup, brown sugar, cinnamon, nutmeg and cornflour and beat until smooth.

Pour into the pie crust and return to the oven for 45 minutes. If the top of the pie starts to brown too much, cover with foil.


Remove from the oven and leave to cool then chill overnight in the fridge - this should make the filling set.

I'm sharing this with Baking Crumbs hosted by Jo's Kitchen Larder and CookBlogShare hosted by EasyPeasyFoodie.
 

Thanks to Ozeri for the food storage containers to review.

Wednesday, 22 August 2018

Peach Melba Cheesecake for a summer party


Cheesecake seems to be my default dessert in the summer as it's light and creamy, and you can add all sorts of flavours - my husband prefers chocolate desserts but I don't want to cook with chocolate that much when the weather is hot!

Last weekend we went to his aunt and uncle's house for a family party and I was asked if I could make a dessert. Cheesecake is usually popular and easy to make, so I chose a peach melba cheesecake recipe from a book called Cheesecake by Hannah Miles.

I was buying the ingredients several days in advance and have found fresh raspberries go mouldy very quickly before, so decided to use tinned; I also had tinned peaches in the cupboard so decided to use those instead of fresh. Finally I decided not to make the glaze to go on top - so here's what I did.

for the base
300g malted milk biscuits
150g butter, melted
300g tin of raspberries in syrup, drained - reserve a few for the decoration

for the filling
4 sheets leaf gelatine
410g tin of peach slices in juice or syrup, drained
100g caster sugar
200g cream cheese
250g ricotta
150ml double cream

for the topping
half a 410g tin of peach slices in juice or syrup, drained
a few raspberries to decorate

I didn't make the glaze to go on the top partly due to lack of time but partly as I didn't think I fancied it - it looked like a thin layer of jelly essentially. If you want to find out how to do that part have a look at the book.

Crush the biscuits in a blender in a few batches.

Melt the butter in a small pan or in a microwave-proof bowl in the microwave and stir in the biscuits.

Press into the bottom of a loose-bottomed cake or tart tin, pressing some of the biscuit up the sides to form a crust. Spread the raspberries over the biscuit base.


Soften the gelatine leaves in a bowl of water for 5 minutes or according to pack instructions.

Meanwhile puree the peaches in a food processor and set aside.

Mix the sugar, cream cheese and ricotta in a large bowl until creamy.

Heat the cream in a small pan until it is just warm. Squeeze the water out of the gelatine leaves and stir into the cream, mixing until all the gelatine has dissolved. Whisk into the cheese mixture in the bowl and then fold in the peach puree.

Pour onto the prepared base and leave overnight in the fridge to set.


Just before you want to serve, decorate the top of the cheesecake with the peach slices and reserved raspberries.

This cheesecake was really light and creamy, with a nice flavour from the peaches and a burst of raspberry on the base. It disappeared quite quickly at our family lunch!


I'm sending this to Baking Crumbs hosted by Only Crumbs Remain
 and  CookBlogShare hosted by Glutarama

Only Crumbs RemainCook Blog Share

Wednesday, 18 July 2018

Oreo Marshmallow Fluff Cheesecake

Whenever I buy a jar of marshmallow fluff for a recipe I end up eating the whole jar  - not in one go, but it doesn't usually end up being used in the recipe I intended!

This time around I bought two jars so I could definitely make the recipe I wanted! My husband loves Oreos and I decided to make an Oreo cheesecake and use the marshmallow fluff in the filling.

I kind of made the recipe up as I went along and it didn't set particularly firm - you need to eat this with a spoon rather than a fork - but it tasted really good!

See the recipe below..


You need:
1 packet Oreos
50g butter
213g jar marshmallow fluff
200g tub soft cheese
100ml crème fraiche
100g icing sugar

 
Crush the Oreos either with a rolling pin or in a blender. Melt the butter in a small pan over a low heat or in the microwave and stir in the crushed Oreos.

Press into the bottom of a 7 or 8 inch loose-bottomed cake tin.

In a large bowl, mix together the marshmallow fluff, soft cheese, crème fraiche and icing sugar and spread over the crushed Oreo base.

Allow to set in the fridge, ideally overnight.


I'm sharing this with Baking Crumbs and Casa Costello's Bake of the week (even though there is no actual baking involved!) and CookBlogShare.

Friday, 22 June 2018

Lotus Biscoff Chocolate Mousse

 
If you haven't discovered Lotus Biscoff spread yet, I urge you to try it now. The little caramelised biscuits you often get with a cup of coffee in cafes have been turned into a spread that is the consistency of Nutella, but tastes like biscuits!

The company's website suggests it as a breakfast food spread on toast which I think might be a bit sweet - I don't even eat Nutella on toast though I do have it on croissants, but otherwise I use it in desserts. Or eat it straight from the jar with a spoon!


I wanted to make an easy dessert for a barbecue with family and found a recipe for Lotus Biscoff and chocolate mousse on the Ocado app. The recipe had  step missing - it didn't tell you what to do with the egg whites that were listed in the ingredients - so I took a punt, and will explain here what I did.

I didn't buy any of the actual Lotus Biscoff biscuits as they are for decoration only and make the recipe quite expensive if you need to buy a whole packet only to use a few, unless you are going to eat the rest of the biscuits later!

The recipe says it serves 8; I did it for 5 and for 8 people the portions would be quite small, so you could use this quantity to serve 6


You need:
200g Lotus Biscoff smooth spread (see link above)
200g dark chocolate
5 eggs
200ml whipping cream - I used double cream as I couldn't get whipping cream and it worked fine

Heat the chocolate and Biscoff spread in the microwave until melted- I did on the 5 setting (medium heat) for 2 minutes.

Separate the egg and in one bowl, beat the egg whites with a whisk until stiff and set both whites and yolks aside. Whip the cream and set aside.

Beat the egg yolks one at a time into the chocolate mixture then fold in the beaten egg whites. Finally fold in the whipped cream.

Spoon into individual serving dishes and chill for a few hours until set; these will also keep overnight in the fridge.

The mousse was very rich but really light in texture, this is definitely something to make again!

 
I'm sharing this with CookBlogShare hosted by Everyday Healthy Recipes and We Should Cocoa hosted by Tin and Thyme

Friday, 24 November 2017

Kinder and Oreo Chocolate Pancakes


Inspired by my recent visit toMy Old Dutch where Kinder and Oreo pancakes were on the menu, I decided to recreate something similar at home when my parents were visiting, for an easy but indulgent dessert. My husband enjoyed it so much, he requested the same thing the next night, made in exactly the same way!

When I had the Kinder dessert, I had a thick stack of pancakes, but it was really too much and I only managed to eat about a quarter of the pancakes. I decided it would work well with one thin crepe, and as I was making several, and wanted the pancakes to be really thin, I decided to buy ready-made crepes and warm them through.

Here’s everything else I did and what you need – but really you can have fun decorating the pancake however you want!

Serves 4

4 ready-made crepes
60g milk chocolate, melted
4 Kinder surprise eggs
Handful of mini marshmallows
2 packets Kinder Bueno (with 2 sticks in each)
8 small scoops vanilla ice cream
4 dollops of cream or can of squirty cream
 
 
Melt the chocolate either in the microwave or a bain marie and spread over each pancake. Open out a Kinder surprise egg (you can give the toy on the side as you serve the pancakes!) and place the two halves on the pancake. Take one stick of Kinder Bueno, break in half and place in between the Kinder eggs. I then gave the pancakes a 20 second blast in the microwave at full power to slightly melt the chocolates.

Place a scoop of ice cream into each Kinder shell, sprinkle the mini marshmallows in the gaps, squirt some cream in the middle and voila! Everyone enjoyed these pancakes though I couldn’t finish mine – there probably is such a thing as too much chocolate!
 

When my husband requested a repeat performance I decided to make a pancake using Oreos – in the spirit of the Kinder vs Oreo challenge that My Old Dutch is running. I ended up making something quite similar to my Kinder pancake, with melted chocolate spread on the bottom, a sprinkling of mini marshmallows and some broken up chocolate Oreo biscuits, with a whole Oreo in the middle and a squirt of cream sitting on top.

I preferred the Kinder version because the Oreo biscuits were a bit too hard and crunchy for this kind of dessert – but if you’re feeling inspired, why not experiment with your favourite chocolates or sweets and share a picture of how you’ve decorated your pancake?
 

Thursday, 7 September 2017

American MidWest Chocolate Cream Pie


My parents came to stay over the bank holiday weekend which was perfect timing for my husband and I to share our news in person. We had my husband's parents over for lunch and told them all at the same time; for that reason I didn't want to be cooking anything where I would have to spend a lot of time in the kitchen!

I made enchiladas for lunch which I was able to prepare that morning then just put in the oven, and my mum and I made dessert the night before.

My husband loves all things chocolate, and doesn't particularly like many other kinds of dessert, so I simply googled chocolate desserts, and came across a website of Mid-West American desserts. My mother in law is a frequent visitor to the US and loves the South, so I thought she might enjoy a dessert from the Mid-West - particularly this one!

It's a chocolate cream pie with a chocolate crust, a custardy chocolate filling and cream on top. The recipe is here on MidWestLiving.com.


I would say this was easy to make but really I have to say it looked easy to make, as my mum did most of it! She made the crust, rolled it out and put it in the tin; you part bake it lined with foil, then remove the foil and finish baking.


The filling takes a bit more effort - you have to be careful not to boil the milk, whisk together the other ingredients and mix it with some of the milk then the rest of the milk. You need to have your chocolate and butter ready to pour the hot mixture over the top and then time it while you stir.

 
After that it's pretty simple -pour the filling into the pie crust and refrigerate overnight. To serve, top with whipped cream and a sprinkle of chocolate - I was going to grate some chocolate but forgot in all the excitement of our baby news and ended up serving this as it was!


I'm sharing this with the We Should Cocoa chocolate baking blog challenge hosted by Choclette at Tin and Thyme and with CookBlogShare hosted by Everyday Healthy Recipes.


Thursday, 1 June 2017

Nutella and Frangelico Pancake Bake

This Shrove Tuesday we invited my husband's mum over to dinner, and while I considered making savoury pancakes as the main course I knew I really wanted to do them as dessert. It would have involved me making several pancakes one at a time and keeping them warm and I wondered if there was an easier option - something where I could layer the pancakes together as a dessert.

This recipe for Nutella pancakes from Nigella was just the thing! I decided to make life even easier for myself and buy ready-made crepes, which I spread with Nutella and folded up and poured over some melted butter and Frangelico hazelnut liqueur. My husband doesn't like nuts (pieces of nut, anyway) so I left off the chopped hazelnuts that Nigella recommends sprinkling over the top.

They only needed ten minutes baked in the oven; serve with whipped cream for a delicious decadent dessert!

This is Frangelico, if you haven't tried it before. It's a liqueur made with Italian hazelnuts and its origins are thought to date back 300 years when hazelnuts were distilled by monks (hence the design of the label!). It tastes really nice in cocktails.


Spread the crepes with Nutella and fold and layer in a serving dish


Pour over the cream and Frangelico


Bake in the oven for ten minutes


Serve with whipped cream


Leftovers.... yum!


I'm sending this to CookBlogShare, hosted this week by Hijacked by Twins.


Sunday, 5 February 2017

Chocolate Crumble


I love apple crumble but as my husband doesn't eat apple I almost never make it - because I feel like I'd have to make him an equivalent dessert at the same time and I can never think of anything similar! My problem  was solved when I found this Tesco recipe for chocolate crumble - it has a gooey chocolate base with a delicious crumble topping.

I feel that I should echo Tesco's comment that "This pudding is very rich and indulgent so it shouldn't be eaten too often. But it's perfect for those special occasions!"

To serve 4, you need:
for the filling:
200g plain chocolate, chopped
150ml whipping cream
1 tbsp. cornflour

for the topping:
100g caster sugar
icing sugar for dusting
100g unsalted butter
150g plain flour

Preheat the oven to 190C. Bring the cream to the boil in a saucepan then remove from the heat, and stir in the chopped chocolate until it has melted. Whisk in the cornflour until smooth.


Pour into an oven proof baking or casserole dish and leave to cool for ten minutes.

Meanwhile rub the butter and flour between your fingertips to make 'breadcrumbs' then mix in the sugar. Alternatively put the butter, sugar and flour in a food processor and pulse. Spoon the crumble on top of the chocolate filling and bake for 20-25 minutes.


Allow to cool for 5-10 minutes and dust with icing sugar before serving.


I'm sharing this with We Should Cocoa, hosted by Choclette at Tin and Thyme.