Showing posts with label Simple and In Season. Show all posts

Friday, 24 April 2015

Slimming World Asparagus and Red Pepper Muffins


Now that the weather is getting nicer our thoughts are turning to al fresco eating. Whether it's a picnic in the park with your friends, high tea at the garden table with the family or even just taking your packed lunch outside the office to eat on a bench, you are going to need recipes which are easy to
throw together in a hurry, can be packed up and eaten cold - preferably without the need for cutlery!

These asparagus and red pepper 'muffins' are low calorie and fat free; they aren't muffins in the usual sense as there is no cake - instead the filling is made from egg. The recipe comes from Slimming World so it is great for anyone following a heathy eating plan. The colours are really vibrant which is another reason I like this recipe.

To make a dozen, you need:
Spray oil such as Fry Light
200g asparagus tips
1 jar roasted red peppers in brine, drained and chopped
6 eggs
2 cloves garlic, crushed
small handful fresh chopped herbs eg tarragon, parsley
salt, pepper

Preheat the oven to 180C. Blanch the asparagus in boiling water for two minutes then chop


Mix in a bowl with the chopped red pepper


Line a muffin tray with paper cupcake cases and spray the inside of each one with Fry Light. Place a spoonful of the asparagus and red pepper mixture into each one.


Beat the eggs in a bowl with the garlic, herbs, salt and pepper. Pour into each muffin case, being careful not to fill too much. Bake in the preheated oven for 20 minutes until risen.


Allow to cool before removing from the tin


These can be served warm or cold; just peel off the paper cases and enjoy.


These will keep for a few days in the fridge in a sealed container so you can make them at the weekend to take into work or make them a day or two before your picnic.


I'm sending this to Eat Your Greens, hosted by Shaheen at Allotment2Kitchen, as it contains a green vegetable.


These are also a good way to get some extra veg into your diet so I am sending this recipe to the Extra Veg challenge hosted this month by Jo's Kitchen on behalf of Helen at Fuss Free Flavours and Michelle at Utterly Scrummy.

The theme for this month's Treat Petite is hello spring, and I think these muffins are perfect for spring. The challenge is hosted by Stuart at Cakeyboi and Kat at the Baking Explorer.


Asparagus is now in season so I'm also sending this to Simple and In Season, hosted by Helen at Fuss Free Flavours on behalf of Ren Behan.

Wednesday, 18 March 2015

Salmon with Linguine and Leek Pesto


I was looking for a springtime pasta recipe and came across this recipe for salmon with linguine and ramp pesto. I'd never heard of ramp but according to Wikipedia the allium tricoccum is known as many things, including ramp, spring onion and wild leek. I don't think it's actually the American word for spring onion though as that's scallion. I had some leeks in my fridge and decided that would be close enough and I would give it a go!


I didn't have Asiago cheese (whatever that is) but did have parmesan in my fridge, and a packet of sliced almonds that needed using up. So I decided to throw the whole lot together and make my own springtime pasta!

To serve 3-4, you need:
1 leek, sliced
2 tbsp. oil
30g grated parmesan
30g flaked almonds
handful of fresh parsley
approx. 4-6 tbsp. oil
to serve: linguine
salmon fillet

Cook the pasta according to pack instructions and cook the salmon fillet in whichever manner you prefer - pan fry, poach, oven roast or even microwave. This is really just the recipe for the pesto...

Slice the leek and add to a large pan with 2 tbsp. oil. Heat until the leeks are softened but not browned.

Transfer to a food processor along with the parmesan, almonds and parsley, and pulse for a few seconds. With the motor running, slowly add the oil until it reaches your preferred consistency.


Toss through the cooked pasta and top with the salmon. Enjoy!

This had a different flavour (obviously) to pesto I'd had before but thanks to the parmesan and nuts it was still definitely a pesto, and I really enjoyed it.


I'm sending this to Credit Crunch Munch, hosted this month by Jo's Kitchen on behalf of Helen at Fuss Free Flavours and Camilla at Fab Food 4 All. Parmesan isn't cheap but I'm sure a lot of people like me have half a packet hanging around to be used up, and as this recipe only used things I already had open in my fridge, hopefully it counts!


This recipe is a good way to sneak in some veg so I am sending this to the Extra Veg challenge, hosted by Elizabeth's Kitchen Diary. The challenge was started by Helen at Fuss Free Flavours and Michelle at Utterly Scrummy.


Leeks are in season so I am sending this to Simple and In Season, hosted by Ren Behan.

The recipe uses fresh parsley so I am sending it to Cooking with Herbs, hosted by Karen at Lavender and Lovage.

 
Finally I am sending this to Pasta Please, hosted by Family Friends Food on behalf of Jacqueline at Tinned Tomatoes as the challenge this month is for springtime pasta recipes.

Friday, 22 August 2014

Physalis Cake


 Have you ever eaten physalis before? You've probably seen it as a garnish on a dessert - I once had a heated debate with a work colleague who was more than ten years my junior, who had never seen one before and insisted I was making up the name until I googled it on my phone. However, I'd never actually tried the fruit - I'm pretty fussy and mistrustful of food I haven't had before so when I have had it as a garnish on a dessert in a restaurant, I've picked it off!

When I saw a whole bag of physalis in the supermarket for only £1 I decided to try it, but rather than use the fruit as a garnish I decided I wanted it to take centre stage - and that I would incorporate it into a cake.


The fruit resembles mini orange tomatoes and they come encased in tall, papery leaves. It has a sweet yet slightly tart taste; it's also known as a cape gooseberry, but doesn't taste like a gooseberry; in the US it is sold under the name Pichuberry (which sounds like something out of Pokemon to me), due to the origins of one variety in Machu Pichu.

I was going to use a recipe I found online, but hit a few stumbling blocks. As regular readers will know, my boyfriend and I are staying with his mum for a few weeks until the purchase of our new houes goes through (we completed on the sale of my house already due to pressure from the buyer). As I started to get out my baking ingredients, I asked if I could borrow her loaf tin and found she didn't have one. I also looked for brown sugar and could only find golden caster sugar; the recipe I found online used grapes as well as physalis and I don't like grapes. So in the end I pretty much invented my own recipe - but if you want to halve the quantity and use a loaf tin, be my guest.

Physalis Yogurt Cake - an original recipe by Caroline Makes

You need
250g butter
250g golden caster sugar
3 eggs
250g self-raising flour plus a sprinkling for the fruit
3 tbsp low fat Greek-style yogurt or fromage frais
a large handful of physalis, chopped (leaves removed). Reserve a few whole ones (with leaves) for decoration.

For the frosting
100g cream cheese
200g icing sugar

Preheat oven to 175C. Grease and line either a loaf tin or, for my method, a square cake tin.

Cream the butter and sugar and add the eggs. Fold in the flour then mix in the yogurt. Toss the physalis in a little flour (this prevents it from sinking in the cake) and gently stir in to the cake mixture.


Spoon the mixture into the prepared tin and bake in the oven for about 35-40 minutes.

While the cake is cooling, make the frosting - carefully mix the cream cheese with the icing sugar. If you've made the cake in a loaf tin, slice it through the middle; if you've made it in a square tin as I had to, slice the cake in half and place one half on top of the other. This means one side of the cake will be the 'cut' side but I actually think this looks quite nice. Spread 2/3 of the cream cheese frosting inside the cake and the other 1/3 on top and decorate with a few physalis.


I'm sending this to Alphabakes, the blog challenge I co-host with Ros of The More Than Occasional Baker. The letter I have chosen this month is P so physalis is my Alphabakes ingredient.


I'm also sending this to Simple and In Season, hosted by Elizabeth's Kitchen Diary on behalf of Ren Behan.


I'm also sending this to the Vegetable Palette, hosted by Shaheen at Allotment2Kitchen. This challenge chooses a different colour for fruit or vegetables each month and this time it's yellow and orange.


Saturday, 26 July 2014

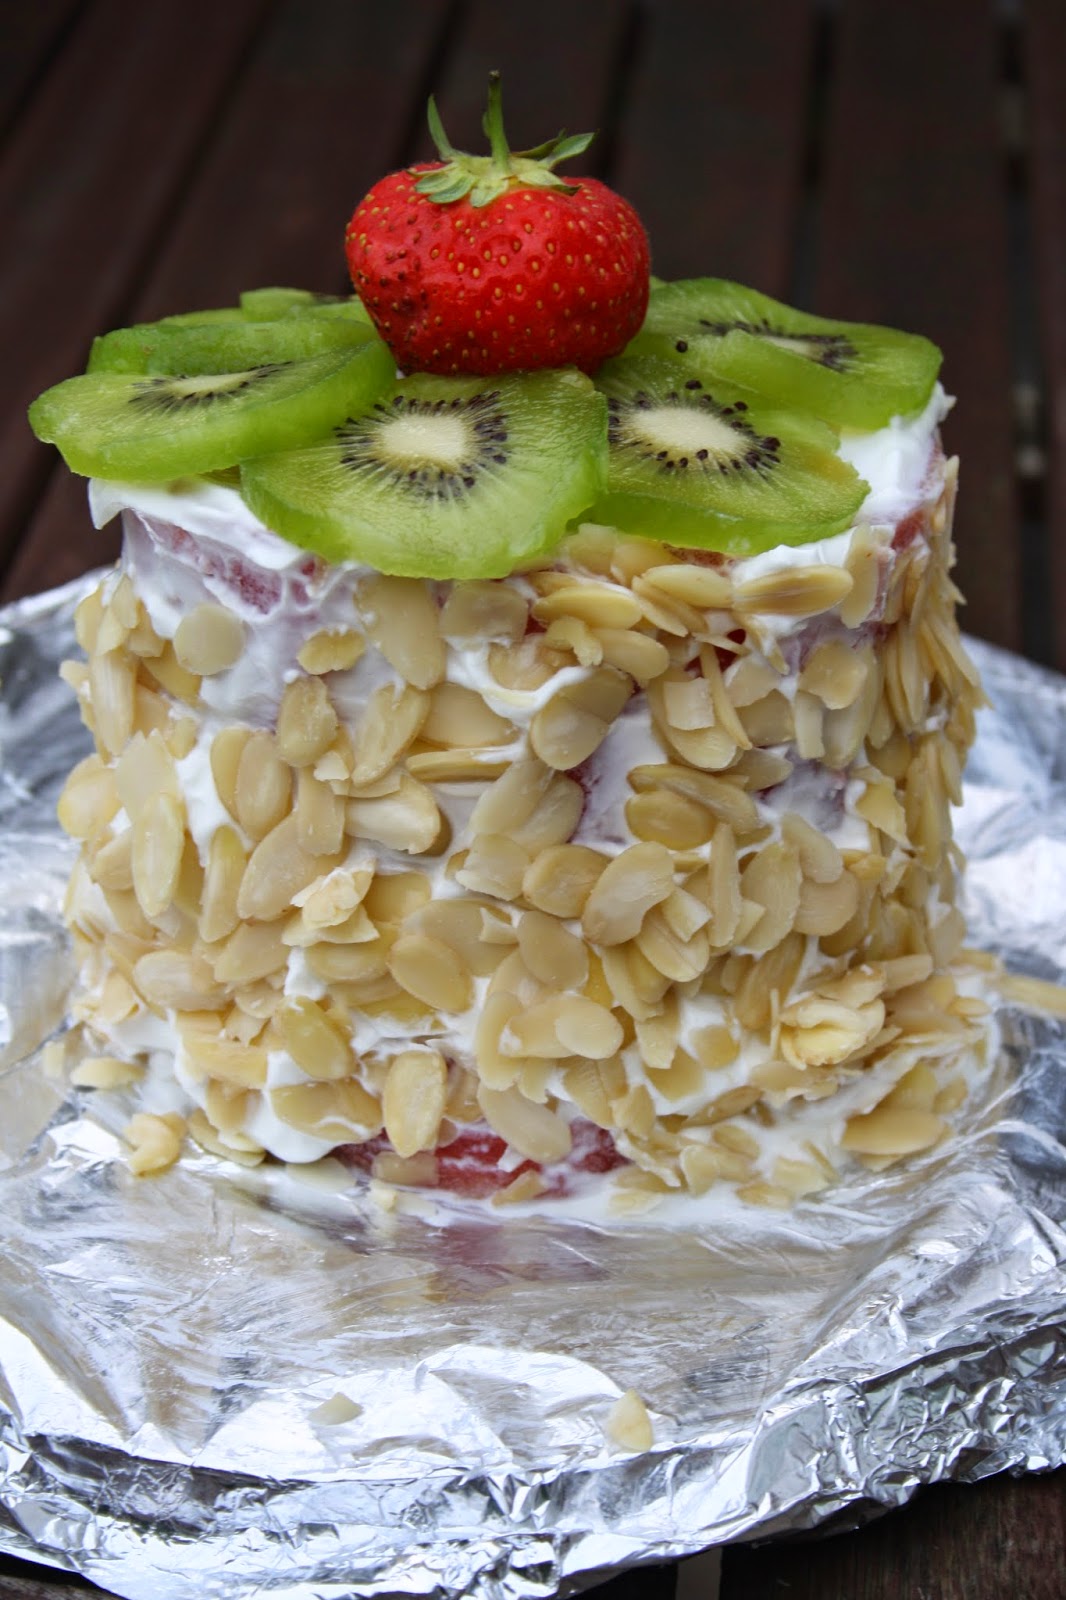
Watermelon Fake Cake


 This is a wonderful alternative to cake - and quite fun to serve to people who think it is a cake, until you cut inside, and reveal it is actually watermelon!

I got the idea from something I saw on a Slimming World Facebook page; if you left off the nuts around the outside the whole thing would be completely syn free.

All you need is a watermelon, a tub of Quark, sweetener (optional), flaked almonds or chopped mixed nuts (optional) and any fruit you like to decorate the top.

I've had a bit of an obsession with watermelon recently, as regular readers will notice!


Slice the top and bottom off the watermelon so it will sit flat and then use a sharp knife to remove the rind by cutting down from the top, turning it over and doing the same from the other side.


Mix the tub of Quark with a little sweetener (such as Splenda) if desired. Pat dry the watermelon with some kitchen towel and spread the Quark around the outside and on the top. I've already put it on a cake board at this point.


Take handfuls of flaked almonds or chopped mixed nuts and stick around the outside.


Top with fruit to decorate.


And here is the finished 'cake'!


I took this into work and my colleagues were surprised when they realised what was inside - and I think happy that I made something healthy! This is great for a summer party when it is too hot to eat cake but you want to make something.


Stuck In The Tree is a bingo review site that is about having fun online and off; they are running a 'bakespiration' competition so I am sending them my cake in the hope they will include it in their gallery.

I'm also sending this to Ren Behan's Simple and In Season, hosted this month by Sally at My Custard Pie.

Shaheen at Allotment 2 Kitchen is hosting a blog challenge called the Vegetable Palette, and this month is asking for entries using red fruits or vegetables. Watermelons are a kind of reddish pink so that will do!


Friday, 4 July 2014

Giant Cupcake - Raspberry Flavour


Here is a giant raspberry cupcake I made for my mum's birthday, using candy melts to make a cupcake case - a great technique that I will explain below.

I created the recipe myself though it is fairly straightforward.
Giant Raspberry Cupcake - an original recipe by Caroline Makes

225g caster sugar
225g butter, softened
200g self-raising flour
3 eggs
150g fresh raspberries

For the buttercream:
100g butter, softened
200g icing sugar
pink food colouring

For the cupcake case:
200g candy melts in red or pink - I used Renshaw

 It's a good idea to make the candy melt shell first as it needs time to set in the fridge. Melt the candy melts in the microwave according to pack instructions. Use a spoon to spread around the inside of the bottom part of the giant cupcake mould - this is why a silicon mould is much better than a metal tin for this recipe. When you have an even layer around the inside of the mould, making sure you have not left any gaps, place in the fridge for 30 mins- 1 hour to set. Remove from the fridge, melt the rest of the candy melts in the microwave again and spread another layer inside the cake mould and return to the fridge. When that layer has set, carefully peel off the silicon cake mould by turning it slowly inside out until you are left with the candy melt shell (see further down for a photo).

Preheat the oven to 175C. Cream the butter and the sugar then beat in the eggs. Fold in the flour, then the raspberries. I used my Kitchenaid so the raspberries were broken up but not completely blended.


I bought this giant cupcake pan ages ago but hadn't gotten around to using it, after an earlier not particularly successful attempt at a giant cupcake in a metal Wilton tin (which was down to the recipe that I used). I decided to give it a go, so sprayed both parts of the pan with Cake Release, stood it in a roasting tin and poured in the cake batter. I left plenty of room for the cake to rise.


Bake in the preheated oven for 35-40 minutes; test the cake with a skewer or cake tester to make sure it is cooked in the middle. Allow to cool in the silicon mould then turn out onto a wire rack.


You will need to trim the bottom part of the cake a little to fit inside the candy melt shell, as you can see below. You can also see the raspberries in the cake!


Place the trimmed cake inside the candy melt shell. It looks great!


To make the icing, cream the softened butter and icing sugar and add the food colouring. My butter was a bit too soft which meant my icing wasn't stiff enough to pipe, meaning I couldn't pipe the swirls that I wanted to (and I was in a bit of a hurry).


Instead I spread the icing on with a palette knife; I think it looks fine like this.


Dr. Oetker sent me some wafer butterflies recently, and they have also sent me wafer daisies in the past. I think these are brilliant - when you don't have time for fancy decorations on a cake, you can just pop on a couple of these and they will totally transform your cake. The butterflies are particularly pretty in my opinion, though I have to admit I haven't been able to find them in any of the supermarkets I shop at yet!


Here's the finished giant cupcake, decorated with butterflies and wafer flowers.
 The cake tasted very nice but most of all I was pleased by how it looked.


 The letter we have chosen for this month's Alphabakes is R so I am including this raspberry cake. The challenge is hosted by Ros at The More Than Occasional Baker this month.


Raspberries are in season so I am sending this to Simple and In Season, hosted by Ren Behan.

Shaheen at Allotment2Kitchen has launched a new blog challenge, the Vegetable Palette. This month she is asking for recipes made with any red fruit or vegetable.


I am also entering this in the Bakespiration challenge run by Stuck In The Tree, click on the link to check it out - their site is all about having fun online and off.