Showing posts with label biscuit. Show all posts

Saturday, 6 May 2023

Coronation Cookies

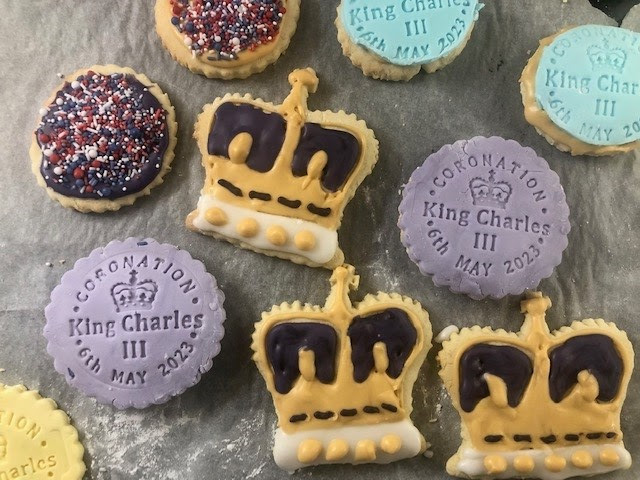
I couldn't miss the opportunity/excuse to do some baking for the coronation of King Charles III - it's certainly a momentous occasion no matter what you think of the royal family, and we are merrily joining in with the celebrations, with a street party and parties at school and Rainbows for my daughter.

My husband 3D printed me a crown-shaped cookie cutter, and I bought a cookie stamp from Etsy - not having realised this is something he could have 3D printed me as well so I will remember that for next time! I also had some red, white and blue sprinkles left over from last year's Jubilee which came in handy.

My icing technique is far from perfect but I'm quite pleased with these compared to my usual fairly messy icing. It is a bit fiddly to keep switching colour and icing bags but I think worth it!

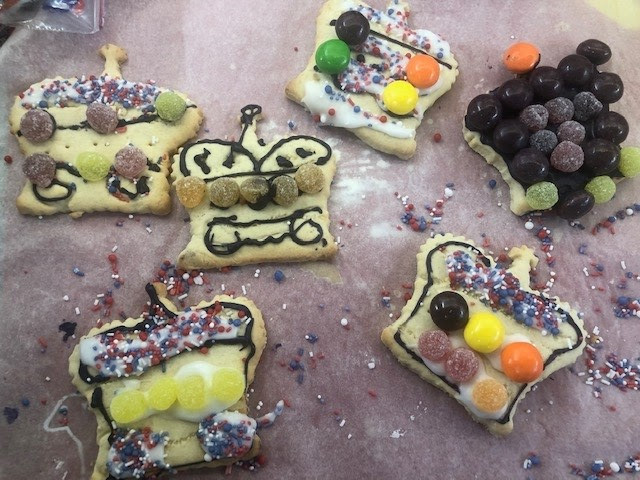
I used a standard sugar cookie recipe, from BBC Good Food. My cookie cutter was quite large so I didn't get that many cookies out of it - about 9 crowns and 5 circles. My daughter had most of them to decorate as you can see below!


For the ones I did, I copied the shape and colours of the actual coronation crown and added what is supposed to be some gems along the bottom. I definitely need more practice with icing though but it's all just for fun - and my daughter had a great time making hers!


Wednesday, 22 August 2018

Peach Melba Cheesecake for a summer party


Cheesecake seems to be my default dessert in the summer as it's light and creamy, and you can add all sorts of flavours - my husband prefers chocolate desserts but I don't want to cook with chocolate that much when the weather is hot!

Last weekend we went to his aunt and uncle's house for a family party and I was asked if I could make a dessert. Cheesecake is usually popular and easy to make, so I chose a peach melba cheesecake recipe from a book called Cheesecake by Hannah Miles.

I was buying the ingredients several days in advance and have found fresh raspberries go mouldy very quickly before, so decided to use tinned; I also had tinned peaches in the cupboard so decided to use those instead of fresh. Finally I decided not to make the glaze to go on top - so here's what I did.

for the base
300g malted milk biscuits
150g butter, melted
300g tin of raspberries in syrup, drained - reserve a few for the decoration

for the filling
4 sheets leaf gelatine
410g tin of peach slices in juice or syrup, drained
100g caster sugar
200g cream cheese
250g ricotta
150ml double cream

for the topping
half a 410g tin of peach slices in juice or syrup, drained
a few raspberries to decorate

I didn't make the glaze to go on the top partly due to lack of time but partly as I didn't think I fancied it - it looked like a thin layer of jelly essentially. If you want to find out how to do that part have a look at the book.

Crush the biscuits in a blender in a few batches.

Melt the butter in a small pan or in a microwave-proof bowl in the microwave and stir in the biscuits.

Press into the bottom of a loose-bottomed cake or tart tin, pressing some of the biscuit up the sides to form a crust. Spread the raspberries over the biscuit base.


Soften the gelatine leaves in a bowl of water for 5 minutes or according to pack instructions.

Meanwhile puree the peaches in a food processor and set aside.

Mix the sugar, cream cheese and ricotta in a large bowl until creamy.

Heat the cream in a small pan until it is just warm. Squeeze the water out of the gelatine leaves and stir into the cream, mixing until all the gelatine has dissolved. Whisk into the cheese mixture in the bowl and then fold in the peach puree.

Pour onto the prepared base and leave overnight in the fridge to set.


Just before you want to serve, decorate the top of the cheesecake with the peach slices and reserved raspberries.

This cheesecake was really light and creamy, with a nice flavour from the peaches and a burst of raspberry on the base. It disappeared quite quickly at our family lunch!


I'm sending this to Baking Crumbs hosted by Only Crumbs Remain
 and  CookBlogShare hosted by Glutarama

Only Crumbs RemainCook Blog Share

Wednesday, 23 August 2017

Scrabble Letter Cookie Cutters and Biscuits

 
These scrabble cookie cutters are a fun way to send a message to a loved one or decorate a cake. I got a set for my birthday this year – they come in a sturdy metal tin and are the same size as actual scrabble letters. Made of plastic, they let you cut out a square of dough with one side, then turn the cutter over and use the letter to imprint in the dough.
 

Since you use these to stamp the letters and don’t actually use the letters in the oven to shape the cookies, it means you can make as many of the same letter as you like, and bake them all at once.
 
You could also use these to stamp letters into fondant but personally I’d prefer to do that with standard letters rather than ones with scrabble numbers on them, unless the cake was specifically for someone who liked scrabble.
 
 
As cookies though, these are really fun – I baked some for a friend’s birthday (actually the same friend who had given me the kit) and jumbled up the letters into a box and got her to work out what the message spelled. It didn’t take her long to figure out it said Happy Birthday and her name!
 
A standard sugar cookie recipe is probably best for this, which you could also flavour with something like lemon, but to mimic scrabble letters you want the cookies to be quite pale. I actually used a vegan recipe I found online as I knew a vegan friend would be there as well and I wanted her to be able to eat them too but as we’d actually been out for afternoon tea, these cookies didn’t get eaten until another time!
 
These are available for sale on loads of websites including Amazon.


Saturday, 11 February 2017

Spiced Biscuit Bundt Cake

You know the little packets of biscuits you get in cafes with a cup of coffee? Often they are Lotus biscuits  - and they are so popular you can actually buy the lovely caramelised biscuit taste in a spread! I had some at home which all got eaten with a spoon used up before I could do any baking with it, and then I was in Lidl and saw they had an equivalent spread so bought some of that.

I had a look on the internet to see if I could find any suitable recipes - there are plenty on the Lotus website - but ended up making this one from Rachel McGrath aka Dollybakes.

Her cake looks amazing with a glossy icing made from the Lotus biscuit spread - but as you can see, mine doesn't look so good! I have the exact same Nordicware tin as Rachel but my cake stuck in the tin - I guess I didn't grease it enough, even though I thought I had used plenty of PME Cake Release.

It started out so well....


This is the tin I baked the mixture in - the Nordicware Heritage bundt pan


It smelt so good while it was baking in the oven, but I had too much mixture and it spilled over the top.


Here's the cake that I eventually managed to get out of the pan. The swirls on top should be sharply defined with neat crisp edges, and you can see the shape of it but a fair amount stuck in the pan!

Here's what I couldn't get out - next time I will use more grease. Has anyone else had this problem with a tin like this?


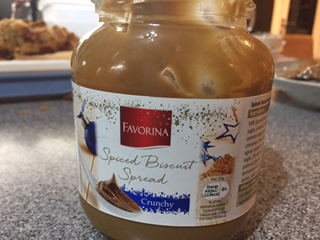
But all was not lost. Here's the spiced biscuit spread from Lidl:


I heated the jar in the microwave and poured it over the cake. It didn't look great initially...


But once the whole thing was covered it did look better.


When the cake is warm and the icing is runny it's lovely - a bit like eating a sticky toffee pudding with sauce. When the icing has cooled and set, the cake is still really moist and it tastes delicious.


This is a really good cake and recipe which is why I'm posting about it even though mine looks a bit of a disaster - hopefully you will have better luck making it than I did, and I advise trying a silicon bundt pan rather than a metal one!

Saturday, 29 October 2016

Rocky Road Halloween Graveyard Cake


If you haven't got much time for Halloween baking but want to make something as a treat, then look no further than this recipe. It would make a great centrepiece for a children's party - and goes down pretty well with adults too!

The recipe comes from the Konditor & Cook recipe book 'Deservedly Legendary Baking'. It's basically a rocky road, arranged to look like a grave site, with some bones and skeleton hands coming out of the grave!

 
You can find the recipe online here. I left out the glace cherries as I don't like them, and used large marshmallows cut in half rather than mini marshmallows. I didn't bother making the grass around the edge of the grave either.

The recipe states to use white marzipan to make the bones and gravestone but I don't even know where to get white marzipan and didn't have time to try making it myself. Instead I used white fondant.

 
It was very easy to make the bones - I just rolled some sausage shapes and used my thumb to press in the ends. I used black food colouring and a cocktail stick to write R.I.P. on the gravestone.

 
I hadn't really thought about the recipe in advance as I'd had an incredibly busy week at work but did manage to make the rocky road on Friday night so it could set overnight in the fridge. When I came to arrange and decorate it on Saturday I realised I should have made the tombstone from rice krispies. You can make a giant rice krispie cake by mixing the cereal with melted butter and melted marshmallows, and pressing it down tightly into a pan. Once it has set you can carve it into different shapes and cover it with fondant; this would be a great way of making an edible tombstone to go at the top of the grave. Of course the fondant I used is edible but I'm not sure I want to eat a giant block of icing!
 
I'm sharing this with the Food Calendar challenge, hosted by Charlotte's Lively Kitchen.

I'm also sending it to this month's Food 'n' Flix; Deb at Kahakai Kitchen has chosen Beetlejuice - the story of a couple who (spoiler alert!) wake up after an accident and find they didn't survive.


Wednesday, 2 March 2016

Butterscotch Cow Cookies with an engraved rolling pin

Browsing Etsy before Christmas I came across this awesome rolling pin:


 There’s a shop on Etsy selling rolling pins with all kinds of patterns; you can also ask for a custom design to be made for you. As regular readers might know, when I get married in June I will be Mrs Cowe – and I am already embracing my inner cow!

 
This rolling pin lets you make very simple cookies and then imprint the design on them which is so cute. I decided to make sugar cookies flavoured with butterscotch to try the rolling pin out.
 
The basic sugar cookie recipe is:
225g butter, softened
110g caster sugar
275g plain flour
And I added 1 tsp of butterscotch flavouring
 
Preheat oven to 180C. Cream the butter and sugar, fold in the flour and add the flavouring. You should have a pliable dough – roll out on a lightly floured surface.

 
You can’t use the textured rolling pin for the initial rolling as you can’t go backwards and forwards over the dough or the pattern won’t work. So instead I used a regular rolling pin – but remember to roll out the dough to slightly thicker than you actually want it, as you are going to roll it again with the textured rolling pin.

 
I found I needed to press quite hard with the textured rolling pin to get enough of an indent that would still show up properly when the cookies were in the oven.

 
I then cut out circles with a cutter, and re-rolled the remaining dough until it was all used.

 
Line a baking sheet with greaseproof paper. The easiest way to move the cookies onto your baking sheet is with a palette knife which is a handy tool to have for decorating cakes as well.

 
Bake in the oven for about 15 minutes until golden brown and leave to cool. It’s a little hard to see the cow pattern on the cookies from certain angles but it is very visible – I gave these to my fiancé and he didn’t spot the pattern straight away but when he did, he thought it was really cool!


I’m considering giving these out at my wedding which we have nicknamed Cowefest!

 
I'm sending these to Alphabakes, the blog challenge I co-host with Ros of The More Than Occasional Baker. She has chosen the letter C this month.


Friday, 15 February 2013

A romantic Valentine's Day dessert - chocolate mousse in a chocolate cup with a biscuit spoon

My boyfriend and I decided to stay home for Valentine's Day for the first time this year (which isn't as extravagant as it sounds, this is only our third Valentine's Day together!). I knew immediately that I wanted to try to recreate an amazing dessert we had at a hotel in Amsterdam, so I give you....


A chocolate cup, filled with chocolate mousse, sprinkled with candy hearts, accompanied by a biscuit spoon. All homemade, apart from the candy hearts. For our main course, we had beef Wellington (or possibly horse Wellington, who knows these days?). 

I started by making the biscuits the night before, using a recipe I adapted from Jen at Blue Kitchen Bakes.
I halved the recipe and made five spoons; for that you need:
50g caster sugar, or ideally a packet of Dr Oetker vanilla sugar (though I bought this in Germany) with the rest of the weight made up with caster sugar. Though according to Jen, it's easy enough to make your own vanilla sugar by infusing a vanilla pod in a pot of caster sugar for a couple of weeks.
50g butter
100g self-raising flour
A silicon spoon mould from Lakeland comes in quite handy too!

Mix the sugar and vanilla sugar if you are using it


Add the butter and cream together


Mix in the flour to make a dough


Here's my Lakeland mould - it was only a couple of pounds in their sale.


I pressed the mixture into the mould, which wasn't that easy - this mould would probably be better for something you could pour, like chocolate or candy melts, or even cake mixture. But I got there in the end...


Bake in the oven for about 15 minutes until the biscuits are turning golden. Unfortunately they spread quite a lot over the sides of the moulds...


Here it is the other way up - it came out of the mould in one piece.
 

However, using a small, sharp knife I was able to cut between the spoons and trim off the excess, leaving me with five cute little biscuit spoons.


 Now for my next trick... to make the chocolate cups to contain the mousse. I also bought a set of six silicon moulds recently - I wasn't entirely sure what else I could use them for but had this recipe in mind.


Melt some chocolate - about 50g should be enough


Using a silicon pastry brush, brush the melted chocolate around the inside of the mould. You need to make sure there aren't any gaps.


Leave to set in the fridge. I left these overnight, but they seemed to set within an hour or so. Now for the tricky part - carefully peel off the silicon mould (I found I could roll it down), leaving you with a chocolate cup. I was actually quite surprised this worked, and admittedly only one of them came out this well -the other one broke up quite a bit!


I made chocolate mousse from this recipe I have already blogged. I made the whole quantity as milk chocolate mousse rather than doing half white chocolate, and left out the pomegranate seeds. This is up there with the nicest chocolate mousse I've ever had, and is now my go-to recipe whenever I want to make it. I left this overnight in the fridge but again it did seem to have set within a couple of hours.


Fill your chocolate cup with mousse


As it was Valentine's Day, I sprinkled some candy hearts on the top


Serve with the biscuit spoon. This worked incredibly well and we managed to eat about half the mousse before eating the spoons! Luckily I had made spare spoons :-)
My boyfriend was very impressed with this dessert and I was very happy with it too.


I am sending this to Tea Time Treats, hosted by Kate at What Kate Baked and Karen at Lavender and Lovage, as their theme is perfect puddings - and this is to me the perfect pudding!


I am also sending this to Calendar Cakes, hosted by Rachel at DollyBakes and Laura at Laura Loves Cakes, as their theme is Valentine's Day.