Showing posts with label novelty. Show all posts

Sunday, 22 May 2022

3D Dinosaur Cake - Children's Birthday Cakes


The lockdown in 2020 meant I didn’t post anything on my blog for several months, as I tried to juggle a full-time job with a toddler at home every day for nearly three months while nursery was shut. So I’ve only just realised that I never posted anything about her birthday cake in spring of 2020 – better late than never!

Sophie is a big fan of dinosaurs, and from a young age has been able to correctly identify dinosaurs to the extent that I think she already knows more types than I do! We have encouraged her love of dinosaurs through toys and books and also a green dinosaur-patterned beanbag for her room to counteract some of the pink! If I recall correctly, she actually asked for a dinosaur cake for her second birthday, and I was happy to oblige!

We held her birthday party at My Gym, where we go to a class every week – it’s a cross between gymnastics, exercise, games and play, and they do brilliant birthday parties where you get an hour of gym-based games and half an hour in the party room with food and drink, and of course cake. I had the option of providing my own cake so of course that’s what I did.

I wanted a cake that would actually look like a dinosaur – I saw some lovely ideas online of round cakes with dinosaurs on top (either made from icing or plastic toys), where the cake itself was decorated to look like the dinosaur habitat. But I wanted instant recognition and wow factor, and decided it had to be a three-dimensional dinosaur. Luckily, it was easier to make one than I thought, thanks to this brilliant tutorial on WikiHow!

I baked a round vanilla sponge cake and then cut it up according to the tutorial instructions, then covered it in green roll-out fondant. I used yellow fondant to add some spots, and a darker green modelling paste – a kind of icing that is stiffer, so better to use when you are making something that needs to stand up – to make the spines along the dinosaur back. It wasn’t difficult or even massively time-consuming at all and I was really pleased with the finished cake, and I think the kids at the party all enjoyed it!


Wednesday, 5 May 2021

How to make an Amazon parcel cake


We fall squarely in the camp of ‘how on earth did people manage before Amazon Prime?’. A combination of not wanting to go to shops during lockdown, working full time and not really wanting to spend my free time trawling the high street and a toddler who often needs stuff at short notice means we probably get more Amazon parcels than most. Then there is the fact that my husband actually works for a branch of the company so it’s not far from the truth to say that his bank statement looks quite funny.... money comes in from Amazon... money goes out to Amazon!
 
So when it came to his birthday there was really only one cake I was ever going to make. I'd seen a few pictures on the internet of cakes that look exactly like Amazon parcels, complete with shipping labels - which are all edible. The cake itself looked fairly simple, but the question was, where do you get edible Amazon labels to go on cakes?

 
It turns out that these are actually made of icing sheets, printed using edible ink. You can buy your own icing printer and edible ink and they aren't quite as expensive as I imagined - they seem to start at around £200. Which is a lot, but not prohibitively expensive if you were going to use it a lot. However, I knew I wasn't going to get much use out of one so couldn't justify buying one, and instead found someone selling what I needed on Etsy.

When I bought this in March I could only find one UK seller on Etsy making these, but now there seem to be quite a few, and I've found the same thing on Ebay as well. I paid £9 which was quite a bit for a cake decoration but I was happy to pay it for something this unique!
 
Making the cake itself is relatively easy - you need a square or rectangular cake tin, some roll-out fondant icing, some food colouring and that's about it - as well as your cake and icing ingredients.

My husband loves chocolate cake so I browsed the internet for a recipe that looked nice - I didn't want to use any of the really fudgy chocolate cake recipes I've made before that use a lot of melted chocolate in the cake batter, as our three-year-old daughter would be eating it too. So I wanted it to be delicious but not too rich, and used this recipe from Charlotte's Lively Kitchen, which was really good.
 
If you don't have a rectangular cake tin you can bake two square cakes and join them together, but you might have a bit of a dip in the icing where there is a join.
 
To cover the cake I mixed some fondant icing with a little gel paste in teddy bear brown. You can buy ready made icing by Renshaw in this colour but it's cheaper to add your own colour to white icing, at least if you will be using gel colours regularly (they tend to last a long time). I think the shade looks very similar to Amazon packaging!
 
As well as filling the cake with chocolate buttercream I spread a thin layer over the top and around the sides, then rolled out the fondant to cover it. All I then had to do was add the labels.


They came on an A4 sheet with instructions that said if I had difficulty in peeling the icing off the backing (which I did - it was impossible) to put the sheet in the oven at a particular temperature, and it would harden and come off the backing sheet easily. It worked perfectly, and I only needed to moisten the fondant on the cake a little to get the labels to stick. I was able to get them personalised, with my husband's name and birthday date.
 
My icing isn't perfect - I live in envy of people who can make perfectly sharp corners - but from a distance this looked very realistic, and my husband thought it was brilliant as he hadn't seen these cakes before!


Sunday, 27 March 2016

Floating Anti-Gravity Mini Egg White Chocolate and Lemon Cake


I was really pleased with this Easter cake apart from one thing - I ran out of Mini Eggs!

I had this cake in mind for a long time after I got Lakeland's pouring cake kit for Christmas. I made a white chocolate and lemon cake, filled it with buttercream and lemon curd, and stuck Cadbury's white chocolate fingers around the outside. I used the Lakeland kit to make it look as if a packet of Cadbury Mini Eggs was pouring onto the cake, and I filled the top of the cake with buttercream and Mini Eggs - or tried to until I ran out, and added a few Cadbury's Oreo mini eggs to fill in some gaps.


It would have looked better with more Mini Eggs - I bought a couple of packets in the run-up to Easter and hid them in the garage (last year my boyfriend kept finding them in the larder and eating them!) but right before the Easter weekend wondered if I might actually need some more Mini Eggs. I ordered some from Tesco along with my online grocery delivery but they ran out, and when my dad went to buy a newspaper he had a look in the corner shop he had a look but they didn't have any either. So I had to make do with what I had, but it would definitely have looked better with more Mini Eggs.

I used a recipe from Lemony Loves Baking for the white chocolate and lemon mud cake but as the quantities were for a 6 layer cake I decided it was too big, so used two thirds of the quantities for all the ingredients.


I realised I didn't have any cream so just made a standard buttercream and used it with lemon curd in the cake. The cake was really moist and you could taste both the white chocolate and the lemon which was brilliant. So a big hat tip to Anna at Lemony Loves Baking for the recipe!


As for the Lakeland pouring kit - have you come across these before? I was a bit dubious that it was really necessary to spend £9.99 on a kit which is little more than a plastic base and a couple of rods, when I made this floating Malteser cake last year just using a plastic straw.

While the equipment cost pennies, it was a bit tricky to stick the Maltesers to the straw and they kept sliding off, so I had to do just a couple at a time and then put the whole cake in the fridge to set, and then do a few more, so the whole thing took hours and I needed a lot of space in the fridge - which I had at the time as we had not long before got a new American style fridge freezer and not yet gotten rid of our built-in larder fridge.

This year however the larder fridge has been removed and turned into an actual larder with pull-out shelving and my other fridge wouldn't have the space for a large and tall cake so I was a bit worried about what I would do if I needed to put the cake in the fridge. But I needn't have worried as it worked perfectly.


To start with, you decide if you want your floating element off to one side or in the middle, and screw the base rod into the appropriate hole and cover the other holes with blanking plates. Place the cake over the rod so it goes through the cake - it worked fine but it would probably have been more sensible to do this before I filled the cake, ie put one layer of cake over the rod, then spread over the filling and put the other cake on top, rather than put the entire cake over the rod!


Then screw the other part of the rod on top - you can either have it taller or longer depending on where you put the 'joint'.


I melted some milk chocolate in the microwave and put it in the fridge until it was very thick but still spreadable. I covered the top of the cake with buttercream and added the Mini Eggs, and then put the empty packet over the top of the bent part of the rod. Then all I had to do was put a dot of chocolate onto a Mini Egg and stick it to the rod and repeat. The eggs stuck fast right away and I didn't need to put it in the fridge at all.


As the final touch I spread the remaining buttercream around the edge of the cake and stuck white chocolate fingers around the sides, and then stuck a yellow polka dot ribbon around the base. A very nice Easter cake!


I'm sharing this as yet another entry with Alphabakes, the challenge I co-host with Ros of The More Than Occasional Baker, as the letter she has chosen this month is C and this cake has plenty of white chocolate.


I'm also sharing this with Simply Eggcellent, hosted by Dom at Belleau Kitchen.


I'm sending this as well to Tea Time Treats, hosted by Jane at the Hedgecombers and Karen at Lavender and Lovage, as their theme is Easter and spring.


And finally I'm sending this to the Food Year Linkup, hosted by Charlotte's Lively Kitchen.

Food Year Linkup March 2016

Friday, 25 March 2016

Easter Chick Cupcakes

These are from the same recipe as these chocolate Easter cupcakes which I blogged about yesterday, but I couldn't resist decorating a few as Easter chicks.


Ages ago I was given a set of Easter silicon cupcake cases from Lakeland - they look like the bottom half of Easter chicks with legs and everything!


I made the cupcakes according to the recipe in the link above and baked them in the silicon moulds, which I stood in a baking tray in case they fell over.


When they were cool, I cut out circles of yellow Renshaw roll-out icing and put them over the cupcake. I cut out thicker triangles to use as wings, and coloured a little bit orange to shape a beak. I also had some Renshaw black icing that I'd opened and used for something else, so used a tiny amount of that plus a tiny amount of white fondant icing (which I also had open already) to make the eyes. Do you think they look cute?


I'm sharing these with Alphabakes, hosted by myself and Ros of The More Than Occasional Baker, as the letter she has chosen this month is C.
 
I'm also sending this to Treat Petite, hosted by Kat the Baking Explorer and Stuart at Cakeyboi, as their theme is Easter and spring.
 

The theme for We Should Cocoa, hosted this month by Linzi at Lancashire Food on behalf of Choclette at Tin and Thyme, is eggs so these cupcakes fit in well.
 
Easter and spring is also the theme for Tea Time Treats, hosted by Jane at the Hedgecombers and Karen at Lavender and Lovage.
 
And finally because it's Easter I'm sending this to the Food Year Linkup hosted by Charlotte's Lively Kitchen.
 
Food Year Linkup March 2016

Sunday, 13 March 2016

Easter Mini Egg Ombre Pinata Cake

Easter showstopper mini egg ombre pinata cake

Making something very elaborate for a bake off at work is hard when you have to finish it on a weeknight after work and transport it by train and bus into the office. I thought about making essentially the same cake as last year's winning entry again, but with mini eggs – I still intend to do this, but thought it was a bit of a cop-out for the bake off as it was really just the same thing I’d done last time. As I won last time I also thought the judges wouldn’t award first prize to the same cake again – forgetting that last time the bake off was a departmental one, and this time was sort of company-wide (being held in 4 of our largest offices at the same time), with different judges who wouldn’t have seen my malteser cake!
 
By the time I’d remembered that I’d already decided to make something else though, that didn’t actually take that long to make and wouldn’t be too fragile to transport. I came across a brilliant Easter ombre piñata cake on Taming Twins, and essentially just copied that. So I’m not going to reproduce Sarah’s recipe and instead suggest you hop on over to her site; she’s even done a video showing you just how you get the mini eggs inside.
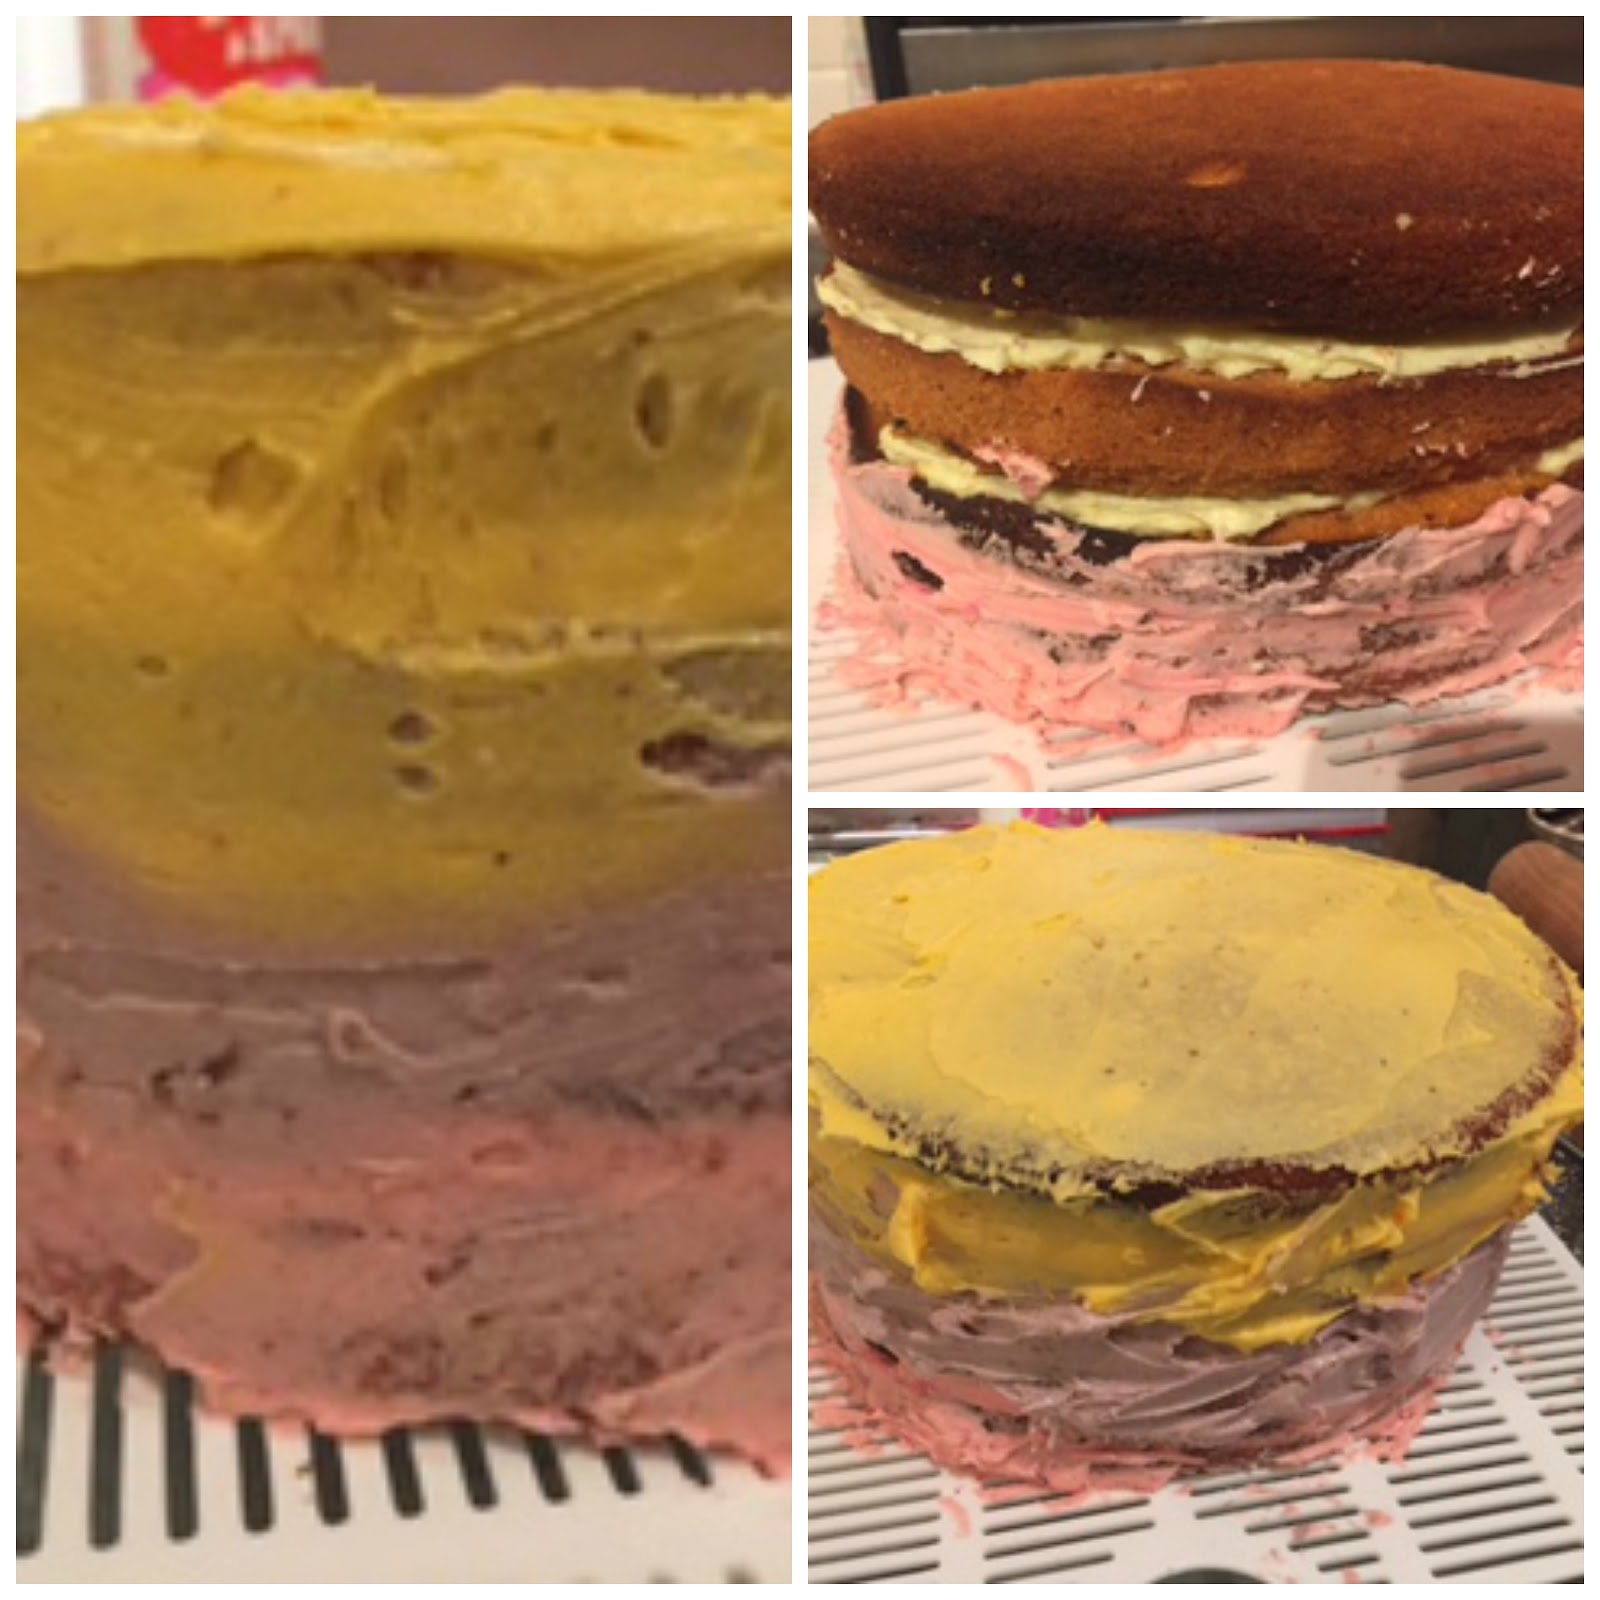
I did take a few photos as I went along the way, so you can see how the cake came together and how I coloured each layer.

Adding food colouring to the cake batter and baking each layer:


Make a hole in two layers of cake cutting around something like a glass or an egg cup

Place a complete layer of cake on the bottom, spread with buttercream, then do the same with the two layers with holes in, and pour Cadbury Mini Eggs into the hole until the top is level. Then place the fourth complete layer of cake on top, with more buttercream in between each layer.
I mixed the same three colours (as one layer of the sponge is its natural colour) with some buttercream and spread it around the side of the cake, one colour at a time. It doesn't matter if the layers of icing are that neat, because you then take a spatula and spread the buttercream so it's even, blending the edges into each other.
Finally I put the cake on a board I had covered with fondant, where I'd stuck a yellow polka-dot ribbon around the edge which I bought from Fantastic Ribbons, which I thought was quite appropriate for Easter. I then spooned my remaining buttercream on top and fixed on a little heap of Mini Eggs.
I didn't know what the inside was going to look like until the judges at the bake off cut it open, so it was quite nerve-racking. It looked great the Mini Eggs spilled out and the other bakers were very impressed. However, the judges said I hadn't used enough buttercream between each layer which made the cake a bit dry, so I didn't win this time. I will have to come up with something better for the bake-off next year….

I'm sharing this with Love Cake, hosted by Ness at JibberJabber UK, as her theme this month is Sport Relief and this cake was made for a Sport Relief bake sale.
I'm also sending it to Simply Eggcellent, hosted by Dom at Belleau Kitchen; the cake uses quite a lot of eggs and of course the Mini Eggs are the star!
Another challenge I can enter this in is Tea Time Treats, hosted by Jane at the Hedgecombers and Karen at Lavender and Lovage, as their theme this month is Easter and Spring.
And finally because it's Easter, I'm sending this to the Food Year Linkup, hosted by Charlotte's Lively Kitchen.
Food Year Linkup March 2016

Sunday, 20 December 2015

Christmas Chocolate Gingerbread House


My fiancé bought me a gingerbread house kit a couple of months ago as he knew I wanted to make a gingerbread house at Christmas, so giving me the set as a Christmas gift was too late. I used it to make a haunted Halloween gingerbread house but of course was going to make a Christmas one as well, and here it is!

I used the recipe on the back of the box again to make the gingerbread:
180g butter
125g brown sugar
300g golden syrup
500g plain flour
1/4 tsp salt
1 tbsp. ground ginger
1/2 tsp bicarb of soda

Melt the butter in a pan and add the sugar and syrup. Remove from the heat, add the dry ingredients and mix to a thick dough. Roll out on a floured surface and cut out the shapes on top of pieces of baking paper.


I found it impossible to lift the shapes without distorting them after they had been rolled and cut out which is why I did it directly on to the baking paper.


Bake in the oven for about 20 minutes and leave to cool - I had to do this in several batches.

I ran out of golden syrup though and had to use Tate & Lyle's chocolate syrup to make up the quantity, which worked fine and it gave the gingerbread a slightly chocolately flavour which was ideal because I was planning to decorate it with quite a lot of chocolate!


I covered a cake board in white fondant and stuck the walls of the house together while the fondant was still soft, which helped anchor the walls. I stuck each piece together with royal icing (icing sugar mixed with egg white) and for some reason it was easier than last time to keep it stuck together; it didn't take long until the house was dry.


I spread more of the icing on the walls and the roof to fix on the decorations, and put Cadbury's chocolate fingers on the side walls to give a log cabin effect. The thatched roof effect comes from using Nestle's Matchmakers.


I wanted to keep the rest of the decorations fairly plain for a rustic log cabin effect so just made a door for the front from some more chocolate fingers.


I also baked a gingerbread snowman and Christmas tree; I decorated the snowman with some of the white royal icing and used a cocktail stick dipped in gel food colouring to draw on the nose and scarf. I then tinted the rest of the royal icing green and decorated the Christmas tree, and stood them both up in front of the house.


I'm sending this to the Food Year Linkup, hosted by Charlotte's Lively Kitchen, as Christmas is the perfect time of year for a gingerbread house!

Food Year Linkup December 2015