Showing posts with label craft. Show all posts

Friday, 4 February 2022

Making your own wooden story spoons

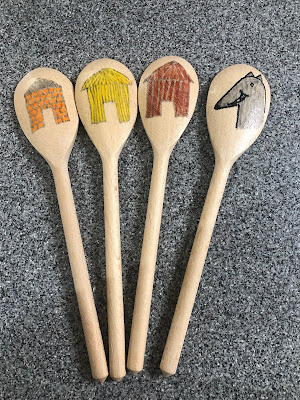
If you have children in your life and are a little bit artistic, these story spoons are a great idea. They are wooden spoons, featuring characters from whatever story you like - you can draw or paint or even cut out pictures and glue them on.
I drew these freehand using coloured marker pens (Promarkers) and then Mod Podge, which is a craft sealant, over the top. I bought a set of five wooden spoons on Amazon for just a few pounds and did the Three Little Pigs story and Red Riding Hood. I drew the three pigs on the first three spoons, and then on the back drew the house that each one built, so when you tell the story and hold up the spoon you can flip it over to show the other side.

The wolf spoon plays a role in both stories- so I drew a plain wolf on one side and the wolf in grandmother’s clothing from Red Riding Hood on the other, so again the spoon can be flipped around during the story. I then drew Red Riding Hood herself on the final spoon and the woodcutter on the other side.
I used these spoons with my daughter who had just turned three at the time (I actually made these nearly a year ago!) and she loved holding up the spoons and telling me the story. They act as prompts but also as characters and can help make storytelling easier for younger children and even more fun!


Friday, 16 April 2021

How to make your own bunting

Last year we decided to redecorate our daughter’s bedroom and I immediately knew I wanted to add some homemade touches. Bunting looks really pretty when strung across a wall, between shelves or across the top of a reading nook - and best of all it’s really easy to make.

You need:

Fabric - you can use anything, a thin cotton material is easiest to sew and you can buy packs of ‘fat quarters’ which are squares of fabric in complementary colours or patterns fairly cheaply.

Binding tape - this is the special type of ribbon that you will sew the triangles on to.

Pinking shears - scissors that cut with a zig zag design. For some reason cutting out your triangles with these scissors means the edges won’t fray.

Needle and cotton - I also found a needle threader really useful

Paper or card to make a template

And that’s it!

To begin, decide how big your want the flags in your bunting to be - bearing in mind that you will lose a centimetre or so when you sew along the top. Draw a triangle shape on paper or card and cut out to use as a template.

Next cut out your triangles - you may find it easier to pin or tape your template onto the fabric.

Lay your binding tape across the top of the triangle and fold the fabric over. Sew along the strip to sew the binding tape into the triangle. Lay the next triangle on the binding tape - I found a gap of a few centimetres between each one was good - and repeat until you have done them all.

We used drawing pins to fix the bunting to the wall - our daughter really liked it!


Saturday, 13 February 2021

Some simple Valentine's crafts for children and toddlers

My two year old and I have had fun making some Valentine's day decorations! Some of the ideas are based on things I saw online and some are my own design. All we used were some cardboard heart shapes, two heart-shape hole punches, some wool, a toilet roll tube, paint and some heart stickers, and some ribbon to hang what we made.

You can find out how to make all of these and more on my parenting blog Mini Moo Life!


Sunday, 6 September 2020

Floral letter decoration for girl's bedroom


My daughter is now two and a half and during lockdown we decided to redecorate her bedroom. She has a lovely mural on one wall (a giant decal sticker) and a bookcase full of books but other than that we hadn’t much much effort in, as she doesn’t really play in her bedroom yet apart from a few minutes after going up to bed. We decided it was about time we made the room nicer and somewhere she might want to play, plus she needed more toy storage as she has so many toys!

 I had been browsing photos of girls’ bedroom styles on Pinterest etc for inspiration and decided to put up a couple of shelves with pretty decorative items on them. I’d seen a few things I liked, in particular the child’s initial either in a picture frame or three dimensional and covered with flowers. It looked easy to make so I thought I’d have a go, and got everything I needed from Hobbycraft.

They sell wooden fillable letters (£4.40 each) many of which seemed to be out of stock online so I signed up to be emailed when they were back in stock. The first time I had such an email the letter I wanted was already sold out again by the time I went online so second time I was ready and made my purchase while I was getting up in the morning!

The flowers are fabric wired rose heads, I used three packs at £3 each - each pack is one colour. I used most of the packs to fill the letter and only had a couple of flowers left over. I cut and shaped pieces of florist oasis to put into the wooden letter and stick the flowers into, alternating colours and making sure there was no gap.


The oasis seemed firmly in place so I didn’t glue it in as I had intended but this would make it more secure. Hobbycraft also sells a small wooden stand (50p) which will help if you want the letter to stand up on a shelf.

I’m really pleased with how this turned out and how simple it was to make - once everything turned up from Hobbycraft it took about ten minutes!

Wednesday, 23 January 2019

Baby Hand Print Get Well Card - A little bird told me you're not feeling so chirpy


My mum has been in hospital for nearly four weeks after being suddenly struck by a serious illness but she is recovering really well and will hopefully be back home soon - a huge relief for all of us.
 
I live a couple of hours away so in between visits I’ve sent her a few things in the post, including a get well card that I made in haste and forgot to take a photo of.
 
This is the second get well card I made, or rather that my ten month old daughter made. We go to a class occasionally called ‘Baby Picasso’ that is basically hand and foot painting with some messy play as well. There is a theme each week and we have the opportunity to make one picture or card or other item (before Christmas for instance we did tree decorations) using hand prints and one using foot prints.
 
It gets quite messy - you have to put paint on your baby’s hand or foot and then stop them wiping it on themselves or you before you are able to get them to place it flat on a piece of paper! Then the other details and embellishments are added by the parent, as this particular class is for pre-walkers so the babies are too young to do it themselves.
 
The theme this week was birds, and my little girl made a picture of two robins sitting on branches with handprints in paint.
 
I decided to turn it into a card so when we got home I glued the picture onto a blank card and had a think about a suitable sentiment. The phrase ‘a little bird told me’ sprang to mind straight away then the rest followed and seemed perfect for a get well card - ‘you’re not feeling so chirpy’!  I wrote the sentiments on the computer and stuck them on the front of the card and inside printed ‘get well soon’.
 
I gave my mum the card when I went to visit a couple of days later addressed to granny from my daughter - she really liked it and hopefully it helped cheer her up a little bit!
 
I'm sharing this with the following craft blog challenges: The Male Room - nature (this card would work for a man easily!)
Paper Funday - anything goes
Everybody art challenge - anything goes
Unicorn challenge - things with wings
Heart 2 Heart challenges - creative cards


Tuesday, 27 November 2018

How to make a Felt Christmas Stocking Advent Calendar


I'm really looking forward to my baby's first Christmas and thinking of all sorts of ways I can make it special. I wanted to have a handmade keepsake of some sort that would hopefully be in our family for years, and I hit upon the idea of an advent calendar - consisting of little stockings, each numbered 1 to 24, that I can fill with all sorts of things year after year.

Given that I haven't done any sewing in years and can't think of any time I've ever sewed for fun, I found this surprisingly easy to make. It was a little time consuming but only because I don't get a lot of free time as I have an eight month old baby, and would sew a couple of bits in the evening here and there, over the course of several weeks. If you have a sewing machine that would speed up the process as well.


The design is my own - I know there are plenty of advent calendars like this out there but I didn't copy any of them and just thought about how I wanted it to look:


To make them is very easy:
Cut out the stocking shapes from felt - you will need 48
Draw and cut out the numbers from 1 to 24
Sew the numbers onto what will be the front facing stockings first
Then sew on the ric rac edging onto the front facing stocking
Sew both parts of the stocking together along the edges
Attach the stockings  to some string with the pegs; you could also sew loops into the stockings instead if you want.

I'm really pleased with the way they turned out even though the stitching and numbers are slightly different on each; my husband says that just adds to the homemade effect and he thinks they will make a lovely Christmas keepsake.

My daughter will be nearly ten months old at Christmas so won't understand advent calendars and I had considered just filling it with chocolates for us this year, but I saw a set of finger puppets on a site called Once Upon a Time that are designed for a baby's advent calendar, at a very reasonable price, so I ordered them back in September. They were supposed to be with me by early November but with only a few days to go until the start of December they still haven't arrived and the site owner hasn't responded to my messages, so I'm hoping they will still come in time - she has a few days yet!

Wednesday, 20 December 2017

Personalised Hand-Decorated Ceramics: Father's Day Plate and Egg Cups

I love crafts and making homemade and personalised gifts and this year I kept seeing decorated plates and bowls that I thought looked really cool. I’d seen them on various sites including the local Facebook selling group and could tell they were homemade, so had a look online to figure out how to make them so I could do something myself!
 
You can buy pens that let you draw or almost paint on ceramic crockery; they are not that expensive and you can buy a basic set with a selection of colours for less than £10 on Amazon; they are also available in craft shops. It’s important to make sure that the pens are non-toxic! I bought these ones from Amazon:  Fine Paint Oil Based Art Marker Pen Permanent Chalk Pens Boxed for Metal Rubber Glass Waterproof 12 Pack Colors
 
Some of what I’d read online suggested you need to put the ceramics in the oven after you have decorated them, to fire and set them so the design won’t wash off. I baked the plate at 150C for 30 minutes; I followed the advice to put the plate in a cold oven so it would warm up gradually to prevent cracking.

I'd be interested to know what other people have done because my parents told me even after a few washes it looks like the colour was starting to come off a bit.

 
I created this plate for my dad for Father’s Day but it's also a good idea for gifts at Christmas or any time of year. I bought various bits of ceramic very cheaply at Ikea and decided a plate was the most likely thing my dad would use.
 
He likes a fry-up on the weekend so I decided that would be a good theme for the plate. I like Emma Bridgewater’s style with words around the edge of the plate so I decided to do something similar and started with the words ‘Dad’s big breakfast’, then a star in a different colour, then ‘fry-up’ and another star, then as I still had space, the word ‘yum’ – which makes the plate a bit fun and irreverent I think. There’s plenty of white space in the middle to put the food on, which I think looks better than if there was a design across the whole plate.
 
It was very quick and pretty cheap to do if you intend to use the marker pens again.
 
 
I used them again almost straight away on these two egg cups, which again were very cheap from Ikea. I had a personalised egg cup as part of a set (with a mug as well) as a young child, I remember having it when I was about 8, and I’ve still got them today! I simply wrote the names of my friend’s two daughters on the egg cups and decorated them with polka dots – I think I will give them to the girls at Christmas. 

Thursday, 6 April 2017

Mums Are Like Buttons Box Frame with Buttons - Mother's Day Gift


I've been seeing the phrase 'mums are like buttons' everywhere recently - or at least in the run up to Mothers' Day, which in the UK was March 26 this year (it falls later in the year in other countries including the US).

The whole of that phrase is 'Mums are like buttons - they hold everything together'. I thought that sounded lovely and wanted to make my mum a Mothers' Day card with it on. In fact it started out as a card and turned into a gift!

I tracked down a rubber stamp with that exact sentiment which I stamped onto a square white card blank, and using glue dots stuck buttons in various shades of red and pink around it. I realised afterwards the quote was slightly off centre which was a shame but I'm sure my mum didn't mind too much.

The card looked too heavy with the buttons and I wanted it to be more of a keepsake, so I decided to make it into a framed picture instead.

The box frames sold in Hobbycraft are brilliant for this sort of thing and they are often in half price sales where you can get the smallest size for as little as 2 pounds, so I tend to stock up on a couple every now and then.

The frame made the perfect setting for my Mothers' Day gift.


I'm sharing this with the Addicted to Stamps challenge and Fab Funky Challenges

Sunday, 25 September 2016

Sailing Family Scrabble Name Picture

 
There’s something special about handmade gifts as you know that extra attention has gone into them – all the more so if it was handmade by the person giving the gift.
 
Several years ago I made a scrabble name picture for my now-husband’s brother and his family. I think it’s a lovely thing to have, and when it was my friend’s birthday this summer and I was struggling to think of a gift, I remembered this and thought she would like it. (Luckily, she did!)
 
 
I found it much easier to purchase a frame this time, that was both a better size and price; Hobbycraft had these white box frames for £8 – which are currently only £4 in the sale, in fact I think I might buy a few more.
 
 
I bought the scrabble letters from Amazon; they are not real scrabble pieces with the little legs on the back to fit into the holes on a scrabble board, but instead are flat, which makes them much easier to glue.


My friend and her husband are really into sailing so I bought some sailing patterned paper from Ebay to use as the backing paper and used my Silhouette die cutter to cut out a sailing boat.
 
 
I used the letters to spell out their names and that of their son, and the words ‘family’ and ‘love’ and placed the sailing boat at the bottom. I was really pleased with this and my friend said she loved it.


Saturday, 20 August 2016

DIY Wedding: Giant Decopatch Decorative Letters

 
Are you familiar with Decoupage? It’s simply the art of decorating objects with paper cut-outs. In card making, it usually means layering the same picture with slightly less of the image each time, so you get certain details raised off the card more than others – here’s one example and here’s another.
 
In crafts however, there’s a new take on decoupage called decopatch. It’s described as being like papier mache. Hobbycraft sells decoupatch papers which are very thin, almost tissue-like printed papers, that you cut or tear up and stick onto wooden or cardboard objects, which they also sell. They have words, letters and animals – all sorts of things including photo frames and pretty little trays which you could decorate to match someone’s bedroom or living room décor.
 
Some time ago in the sale I bought my initial and that of my now-husband and an ampersand sign. I realised a few months back that these were still untouched in my craft cupboard and I thought they would look really nice at our wedding. You can buy large decorative letters of your initials or Mr & Mrs, or even hire 6ft-high illuminated letters – which look great but the latter cost a couple of hundred of pounds to hire and we’ve decided to spend our money on other things.
 
We decided not to decorate the room where we are having the band (and a few other things – we spent our ‘frivolous’ money on something else!) with flowers, as it will be late and dark when everyone is in that room. But there are a couple of mantelpieces where I realised these letters would look really good.


I bought some cowprint decopatch paper at the same time as the letters which is particularly appropriate for the wedding as we had a bit of a cow theme (as my last name is now Cowe!). I didn’t realise though that you are supposed to use a special glue to stick on the paper, which dries clear and gives a sort of varnish effect. I used Pritt-Stick which worked fine but gives the letters a matt rather than gloss effect. It took a bit of time but was quite simple as I just cut strips of the paper and stuck it over the letters – some of the curves were a bit harder to do but overall I was quite pleased with it.


Tuesday, 16 August 2016

DIY Wedding: Homemade Table Confetti

All the weddings I can remember recently have decorated the dining tables with confetti – not the same kind that you throw over the bride and groom, but shiny metallic pieces shaped like hearts or bottles of champagne and so on. It is a relatively inexpensive way to brighten up a plain tablecloth and add some interest and colour to the table settings – even better if you can get it to match your colour scheme or theme.
 
Places like the Card Factory sell cheap table confetti at 99p per bag – one bag is enough per table. But if you want something specific – a more unusual colour or shape – it can get expensive. Even just spending £3 per table when you have 12 tables will cost almost £40, which seems a lot for something so tiny that most guests won’t even pay close attention to.
 
We had a bit of a cow theme for our wedding – as our last name is Cowe. We didn’t go over the top – at least I don’t think we did, other people may disagree! We had a cow-print wedding cake, and each table was named after a different breed of cow, and the wedding stationery – which I made myself-  had cow print hearts and mini cows which were actually table confetti.
 
I had some of the cow confetti left but it was £2.25 for a small bag so I used what I had left, along with some purple hearts – again this was a little more expensive as most places had pink, red and silver, but I really wanted purple to match our colour scheme.
 
 
I decided we needed more and found a mini hole punch for crafts in the shape of a cow on Ebay, so bought some purple paper and made my own! It did take a little while but I left it in the kitchen and every time I went past, punched out a row of little cows, so it didn’t take much effort at all. Then I was able to combine the black and white cows, purple hearts and purple cows into little bags which I sealed for our venue coordinator to sprinkle one on each table. I think it was worth the effort!


Sunday, 31 July 2016

DIY Wedding: Personalised M&M Favours and Placecards


Traditionally at weddings, guests are given little packets of sugared almonds. Apparently there's a reason for this: almonds are slightly bitter but with the sugary coating, they represent the hope that married life will be more sweet than bitter. It's also traditional to give five almonds exactly, as the number five can't be divided so symbolises a strong bond between the couple.

Having said that, I've been to enough weddings where the sugared almonds get left behind - I'm not sure how many people actually like eating them. We weren't on a tight budget for our wedding but I didn't want to spend money on things that we didn't feel were worthwhile, so we considered not giving out wedding favours at all.

We also considered charity wedding favours, as we wanted to support the Young Epilepsy charity and I knew that some charities sell kits where you can make placecards for the table and each one has a little pin badge, like the pink ribbon breast cancer logo. At the time Young Epilepsy only had plastic wristbands and we weren't sure if they would be suitable so we decided instead to make a donation to Young Epilepsy which we put on our gift list and wedding website, as this would raise awareness and we could give more money this way.

I decided that I wanted to combine the guest placecard  with a little gift or wedding favour, and for it to be homemade, at least partly. I came across a website where you could personalise M&Ms and they had a 25% discount and when I explained to my fiancé, he loved the idea.


We could get M&Ms in our wedding colours, printed with pretty much whatever we wanted. We wanted to go for a cow theme so decided to have a little clipart cow printed on half the M&Ms and our names printed on the other. They can't print on black so we had white and purple (as the bridesmaids dresses were purple) and then separately went to the M&M World shop in Leicester Square (easy enough as we both work in London) to buy a big bag of black M&Ms. They have sweets in every colour imaginable and you can mix your own combination and we couldn't find anywhere online selling just black ones so my fiancé went and did it himself.

I bought clear plastic 'pillow' gift boxes for about £12 for 100 on Ebay, so we weighed the M&Ms and worked out how many we could have in each packet, and spent an evening filling the packets. We used my die cutting machine to cut out gift tags from purple card and my mother-in-law, who does beautiful calligraphy, kindly agreed to write the name of each guest on the label. I then took some purple ribbon, which I already had in my craft cupboard, and tied it around each M&M packet, attached the name label and used a pair of scissors to curl the ends.


 We bought the M&Ms as a bulk bag of 1.5kg which cost £85 before the 25% discount; you can also buy a bulk bag of 1.5kg and 100 pillow boxes for £105 but I don't think they offered this at the time and in any case it was cheaper to get the boxes from Ebay.  You can also buy plastic hearts which are £119 along with the 1.5kg of M&Ms and we might have considered this had they been available at the time. 

I costed them out and we made each one for about £1 which is really good - if you look at websites selling wedding favours you can easily pay £2-£3 for nice ones, which doesn't sound a lot but when you multiply that by 75 guests - we ended up spending around £75 rather than £225 which is good!


 Each packet was left on the dining table on each place setting so guests knew which was their seat. I think some people ate the M&Ms at the table and other people took them home - I hope they liked them, I think these were a bit quirky and fit really well with the theme of our wedding - if you want to read more about it, click here!


Saturday, 16 July 2016

Hobbycraft Christmas in July new product launch

The Hobbycraft press show - another Christmas in July event - was much smaller than some of the others I've been to, but much more fun - as there were things to make and do.

In between admiring the Halloween and Christmas ranges, I had a chance to decorate a snowflake cookie with a Wilton piping set and also to decorate a Christmas tree bauble with some Swarovski plastic beads and some ribbon. What do you think?


Some Halloween craft ideas:

 
Hobbycraft has launched some new products with craft queen Kirstie Alsopp, who was at the event earlier in the day but unfortunately I missed her as I was only able to go along after work. They also announced a partnership with 'sewing expert and fashion designer' Patrick Grant (no, me neither) to launch a range of sewing products.

I was also pleased to see Hobbycraft is stocking Sugar & Crumbs flavoured icing; this is something I came across at Cake International a few years ago and have bought from their website a few times.


There were lots of ideas for Christmas card making; I love the idea of this hole punch with a little hanging cut out shape in the middle.


Outside was a pink bus run by Libby Rose, who runs sewing classes, workshops and events and can sometimes be found at Hobbycraft stores. Follow her on Twitter for updates as to where she will be next.

 
Libby was showing people how to make little zip pouches so I had a go. I've got a sewing machine but have barely used it and I can't remember how to thread it and get started. Luckily Libby had done all that so after I chose my fabric I cut around her template and then she showed me how to sew in a zip and sew up the sides to make this. It literally only took a few minutes but I really felt I had achieved something and definitely want to get started using my own sewing machine!


Since I can't really sew, I'm quite pleased with this!