Showing posts with label handbag. Show all posts

Sunday, 7 June 2015

How to Make a Louis Vuitton handbag cake


I’ve seen pictures of amazing cakes which look just like designer handbags and always fancied having a go at making one. I was considering signing up for a one-day course but they cost £100 and I couldn’t really justify it, particularly because I reckon I could work out how to do the cake myself if I put my mind to it. So I was really pleased when I started a new cake decorating evening course at South Thames College and the first cake we made was a Louis Vuitton handbag cake!
 
For quick reference here's a list of what you need, then read on for how to make it:
 
Square madeira cake, or 4x madeira loaf cakes from the supermarket like these
About 1kg dark brown sugarpaste such as Renshaw 250gr Chocolate Flavour Regalice / Sugarpaste Cake Covering
about 200g caramel sugarpaste such as Renshaw Professional Regalice - Teddy Bear Brown 250g
about 200g buttercream
Louis Vuitton cutters/embossers, currently £9.99 on Amazon or available from good sugarcraft stores: Louis Vuitton Sugarcraft Cutters set of 5
zip embosser - I don't know where our tutor got hers from but you can buy a silicon mould on Amazon: Zip / Zipper Cake Decoration Silicone Mould for Cake Decorating Icing
edible gold paint - I used this one Rainbow Dust Metallic Paint Light Gold
paintbrush - I've actually got this five-piece set which is really handy Wilton Five-Piece Decorating Brush Set
sharp knife to carve cake and cut sugarpaste
scissors to cut wire
Optional:
cake board
about 300g white sugarpaste to cover the cake board
brown ribbon and glue to stick around the edge of the cake board
 
The course is quite mixed and aimed at all levels (I actually transferred onto it at the last minute as the course I had been signed up for was unfortunately cancelled due to lack of interest). It also doesn’t assume any ability to bake, as it is purely about cake decorating – so we were told that we could bake a madeira cake if we wanted, or we could buy four of these from Asda or Sainsburys. I usually buy Sainsbury's though I just realised from looking at this photo that the ones the tutor provided were from Asda.

 
However, when the tutor Bridgette also asked us to keep the cakes in the freezer and take them out just before the class as they would be easier to carve – and some of the group immediately pointed out we were coming straight from work, where there was no freezer, Bridgette took pity on us and purchased all the cakes herself, froze them and then defrosted them just in time for the class.

 
She also provided buttercream, which we used to stick all four cakes together in a block, and then carved away to create a handbag shape – roughly a triangle with a flat section on the top, and the bottom much wider. The best thing to do is study a picture of the bag (or the real thing, if you are lucky enough to have one) and copy the shape. We then added a thin layer of buttercream all around the outside of the cake.

 
We had been asked to bring brown-coloured/ chocolate flavour sugarpaste; you can colour your own but as I had to buy some other supplies as well, and time was of the essence in the class, I decided to buy some. Everyone else bought Renshaw while I went for a different brand I’d never heard of (and can’t even remember the name of now) and mine was more of a biscuit brown whereas the others were a darker chocolate brown, which I think would have been better for this bag. Even so I’m quite pleased with how it came out! You will also need some sugarpaste to make the handles and trim; Bridgette coloured some white fondant for us and I’m not 100% sure of the colour she used but I would say caramel or teddy bear brown (which you can buy from Sugarflair and other brands) would work.
 
We rolled out the fondant and cut pieces that were roughly the same size as each side; we didn’t cover the whole cake in one but instead did the front, back and sides as four separate sections. You can get away with this because you will hide the joins later.

 
Once the fondant was on and smoothed over, we used these cutters – this is the secret to a perfect-looking cake. Did you know you can actually buy cutters shaped like the Louis Vuitton logo? I also have the Chanel logo at home – you can do the designs by hand but it would be quite difficult and take a lot longer.


We used the cutters as embossers, pressing them gently into the sugarpaste. I followed a picture so I would get the different logos in the right order; you need something to follow to make sure you are doing them in a straight line, and I would also recommend a ruler to make sure they are spaced evenly apart- I didn’t have one unfortunately so I did the best I could.


Take a very fine paintbrush – sable ones are best – and using edible gold paint, go over the outline of the logos you have embossed. You can get powders which you mix with a little vodka or lemon juice (vodka is best and you don’t end up tasting it, though there are alternatives for people who can’t consume alcohol or children; water is too runny). However you can also buy edible paints that are already liquid and I find these easier to use; if you mix your own and have to keep making more, you may get different consistencies.


One useful tip for making the handles is to take a ball of sugarpaste and weigh it out, so you have exactly the same for both handles. I think we used 60g for each but it depends on the size of the bag – even though we were using the same madeira cake, some people in the group carved a lot more off and had smaller cakes.
 
Roll both pieces out into sausage shapes of the same length. Take a piece of florists wire and carefully push the wire through the handle, leaving about 2 inches of wire sticking out at each end. Bend the handles to make a curve and use the wires at each end to insert it into the cake. One of my handles fell over but I thought that looked more realistic.


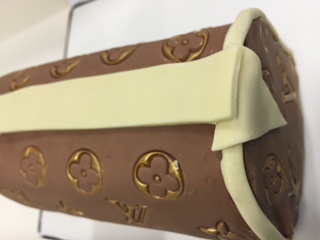
Using the same caramel-coloured fondant, roll out a long sausage shape that will run along the joins of the cake. We used a cutter I hadn’t seen before to mark out equal strips; you can also use a ribbon cutter or a pizza wheel and a ruler. Using either edible glue or a little water, stick the strips along the parts of the cake where your brown fondant pieces join.


We also used a zip embosser to make a zip pattern on another piece of caramel sugarpaste, which we stuck along the top, and then cut out some larger shapes to make the leather tags that go next to the handles on the actual bag.


Cover a square cake board in white fondant and ideally stick a brown ribbon around the edge. We positioned the cake towards the back of the board as we were supposed to be leaving room to write a message but didn’t have time to do it in the class. That actually worked out quite well for me as I had been asked to give a cake as a raffle prize at work and so didn’t really want to have to write ‘happy birthday’ on it.


I was really pleased with the finished cake – the logos aren’t spaced quite right or in completely straight lines as I didn’t have a ruler, but I think the cake looks pretty good. I will be doing another one along these lines soon!


Friday, 8 May 2015

Fashion Mannequin Birthday Card


This card would be great for a girl who loves fashion. I bought the black die-cut mannequins in a pack from Ebay and the dress and handbag stickers are from a sheet of stickers I got in a craft shop (I forget the brand - they are with the outline stickers). I chose a bright and bubbly background to contrast with the black but also to match the pink dress, and simply added a few bags and a dress. There is also a pair of shoes from the same sticker pack on the bottom right of the card, though you can't see it that well in the photo.

Sunday, 10 June 2012

Handbag birthday card


I went a bit crazy buying shaped cards recently and got these cute handbag-shaped cards as well. There is a small tab on the back so when you fold the card in half you fix the front and the back together at the top, so the card actually stands up by itself. It can easily be opened again to write a message inside.

As I wanted this to look like a bag I covered the handle in brown paper and the main part of the bag in pink patterned paper, and added a die-cut bow and some stick-on gems. Simples!

Tuesday, 15 May 2012

Filled chocolate shapes - handbags and shoes

My birthday party at the end of April had a shoe theme, and I asked the guests to come in their favourite, most fabulous shoes (though in the end not many complied!) and I made a shoe-themed cake. I also wanted to make use of a Wilton candy melts mould I had only used once before and thought it would easily double as a chocolate mould. The shapes include a boot, some lips, a lipstick, a handbag, a pair of sunglasses and other girly accessories.

This was pretty quick to make: I simply melted some chocolate, poured it into the mould and left to set, which didn't take very long at all.


Then I had a better idea. I melted some more chocolate, poured a thin layer into each mould and spread it around with a brush and put it in the fridge to set. Then I added a spoonful of Betty Crocker's chocolate fudge frosting - I could have made something myself but time was quite limited - and poured more melted chocolate over the top. Once that was set, I had some cute chocolate shapes with a soft chocolate filling!

Tuesday, 8 May 2012

Handbag cakes - cake decorating class #5

My latest cake decorating class was something I was really looking forward to - handbag cakes!


Edit: As I have explained further down in this post, the cakes were damaged on the walk home from the class (you try carrying a box of cakes and a bag of equipment including a giant rolling pin...) and in any case these weren't my best work as I was a novice learning the technique. I put the post up anyway in the hope that it would help people learn what to do (and what not to do). However I am getting fed up with the number of rude comments I have received recently and if this continues, will take this post down entirely.
 
 
It was an opportunity to learn how to carve cakes and also practice my fondant skills. Which as you can see from the picture above are far from perfect, but we'll come to that later!

Apparently the best type of cake for carving or shaping is a madeira cake, as it is less crumbly and more solid than something like a Victoria sponge. However I didn't have a recipe for madeira cake to hand and decided to use a recipe from a cake decorating book I've got called Planet Cake. A lot of the cakes in the book involve carving or sculpting so I figured if they recommended a particular kind of cake, then that ought to work.


I made their chocolate mud cake on p.23. The method is a little unusual but it worked really well. First melt the butter in a pan


Add instant coffee powder, pieces of chocolate and water.

Heat until the chocolate is melted and the other ingredients are combined
Sift flour and cocoa powder, make a well in the middle  and add eggs, oil and buttermilk - which was handy as I had some buttermilk left from a previous recipe I needed to use up.


Add the melted chocolate mixture and stir


Pour into a cake tin and bake for 1 hour 40 mins - that seemed like a long time but it turned out perfectly.

A lovely square cake!

So for the cake decorating class itself, I decided to colour some fondant in two different colours - pink and caramel, which I hoped would look like a pale brown leather colour and also go well with the pink.


So all of the above was done before the class. In the lesson, the first thing Lorna told us to do was cut our cake into four squares.

Then take one square and shape it slightly to make the bag. This involved cutting down diagonally from the top to make the slanting sides so the piece of cake is now narrower at the top than the bottom.

When making a handbag cake this size, you could cover the whole thing with one piece of fondant. However, Lorna wanted to show us a technique we could use if we were making one big handbag cake and couldn't cover the whole thing in one piece of fondant. As you can see below, you simply need to cut a piece of fondant the right size and shape for each side of the bag. It's easier if you make it slightly bigger and trim off the excess with a sharp knife once it is on the cake (stuck on with buttercream).


As you can see, the joins are quite visible.

Putting the top on last

So this is the trick to covering the joins - roll a thin piece of fondant in a contrasting colour (you could also do it in the same colour) and use edible glue to stick along the seams.

We also created a flap to go over the top from another piece of fondant

We made a handle and I decided to make a small Chanel-style logo to stick on the front. It didn't look quite as professional as I'd hoped, but it was quite cute.


Lorna then showed us how to make a different syle of bag, which is more like a clutch. Getting the curved top was actually very easy - we used a circle cutter to draw round but you could also use a cup to give you the curved shape, then cut along the line using a sharp knife.

I covered two sides of this bag in fondant but unfortunately that was all we had time to do in the class. So I decided to finish them off when I got home...


I was making this up as I went along so I'm not really sure what's going on with the handbag flap here...

I decorated it using edible coloured balls


I decided to tackle the third square of cake... I shaped it in the same way as the first one

I rolled out some chocolate sugarpaste as I decided the caramel colour I used on the first cake was a little too pale.

Covering the cake - this one looks much neater than the one I did in the class! I like the colour too.

Repeating the technique of hiding the seams


Lorna had also told us that to make the handle more stable we could use florists' wire. I happened to have some at home I had bought on a whim from a cake decorating website but had never used, so I threaded a small piece through a cylinder of sugarpaste.

When you bend it, it holds its shape - and the ends of the wire are useful for sticking into the cake to anchor the handle.

Ta da! I'm quite pleased with this one.

Even though it was getting late I decided to make a fourth handbag as I didn't want to waste a big chunk of cake. I was going to see my family at the weekend as it was my sister's birthday - it was actually the weekend in between my birthday and her birthday. She's a big fan of all things zebra, so I simply had to make her a zebra handbag cake!

First I shaped the cake as before and covered it with white fondant.


I used a pizza cutter to cut out some randomly-shaped slices of black fondant...

...and simply stuck them onto the cake using edible glue.

I made a handle using florists' wire as before and added an edible silver heart as a clasp. I like the way this one turned out!

So here's the cluch bag again.. probably my least favourite.

The zebra bag

The brown and pink bag

The original bag I made in the class. I think this one the least, as the colours don't work together as well as I'd hoped, and as it was my first attempt I definitely improved on the later bags. Also this bag unfortunately fell over inside my cake carry case while I was walking home from the class, and it landed in the chocolate cake crumbs from the remaining pieces of cake. As this cake was covered in a fairly pale fondant, which was still quite soft, I did my best to brush the cake crumbs off but to no avail!

All four bags together

I am entering my handbag cakes into this month's Alphabakes challenge as the magic letter is H.