Showing posts with label piping. Show all posts

Saturday, 6 May 2023

Coronation Cookies

I couldn't miss the opportunity/excuse to do some baking for the coronation of King Charles III - it's certainly a momentous occasion no matter what you think of the royal family, and we are merrily joining in with the celebrations, with a street party and parties at school and Rainbows for my daughter.

My husband 3D printed me a crown-shaped cookie cutter, and I bought a cookie stamp from Etsy - not having realised this is something he could have 3D printed me as well so I will remember that for next time! I also had some red, white and blue sprinkles left over from last year's Jubilee which came in handy.

My icing technique is far from perfect but I'm quite pleased with these compared to my usual fairly messy icing. It is a bit fiddly to keep switching colour and icing bags but I think worth it!

I used a standard sugar cookie recipe, from BBC Good Food. My cookie cutter was quite large so I didn't get that many cookies out of it - about 9 crowns and 5 circles. My daughter had most of them to decorate as you can see below!


For the ones I did, I copied the shape and colours of the actual coronation crown and added what is supposed to be some gems along the bottom. I definitely need more practice with icing though but it's all just for fun - and my daughter had a great time making hers!


Sunday, 28 May 2017

Orange and White Chocolate Cake with Flower Nozzles Piped Buttercream Flowers


This is the cake I made for Mother's Day this year and finally tried out my set of flower piping nozzles which I got I think for my birthday last year - I hadn't gotten around to using them as I hadn't really made anything that I wanted to decorate with buttercream, but now I've seen how good they are I will definitely use them again!

The nozzles have different patterns of dots and swirls and allow you to pipe different types of flowers that look amazingly realistic and detailed. You just squeeze the buttercream out and pull up, which cuts off the flower -you pipe one at a time. These would work really well on cupcakes, or as I've done with different types and colours of flower covering a large cake, or you could do all the same type of flower on the top of the cake.

You use regular buttercream for this - it needs to be stiff enough to hold its shape but not too stiff that you can't pipe comfortably.


The cake itself is a recipe from the Clandestine Cake Club Cookbook, edited by Lynn Hill. This is one of Lynn's own recipes which I adapted a little; I didn't make the orange syrup and I used more milk as I prefer a looser batter.

You need:
225g butter
225g caster sugar
4 large eggs, beaten
225g self-raising flour
zest of 1 large orange
1/2 tsp baking powder
4 tbsp. milk

For the filling:
150g white chocolate
grated zest of 2 large oranges plus 4 tbsp. juice
200g butter, softened
75g icing sugar

Preheat oven to 190C / 170C fan. Cream the butter and the sugar and beat in the eggs. Fold in the flour, orange zest and baking powder and beat in the milk.
 

Spoon into two greased round cake tins and bake for 20-25 mins

When cooked, allow to cool in the tins then turn out onto a wire rack.


To make the filling, melt the white chocolate in a microwave or bain marie and allow to cool until it is still a consistency that you can stir. Cream together the butter and icing sugar and stir in the melted chocolate and the orange zest and juice.


Mix the buttercream (about 500g icing sugar to 250g butter) and separate into different bowls and add a couple of drops of food colouring to each one. Use the different flower piping nozzles in piping bags with each colour buttercream and pipe groups of a few flowers all around the cake. I filled in the gaps afterwards with green buttercream and a leaf nozzle, at least I think it was a leaf nozzle as it doesn't look quite right, but I still think the overall effect of the cake was good - and it tasted really nice too!

Below are some close-ups of the different flowers I piped:


I'm sharing this with Cook Blog Share
 
Hijacked By Twins

Sunday, 8 February 2015

Purple Lilac Flowers Three-Tier Wedding Cake


Wedding cakes are the pinnacle of cake decorating- time consuming, difficult, but the most impressive and elaborate of cakes. And apparently the only area of cake decorating where people can make any sort of decent money!

 
I’ve taken quite a few lessons and courses over the last couple of years so wanted to build on my skills with something new – and wedding cakes seemed the obvious next step, as it would cover a range of techniques including piping, sugar flowers, stacking cakes with dowelling and other things I’ve never done before. And then I was asked to make a cake for a friend’s wedding in October so it seemed like fate!
 
I found a wedding cake decorating evening course at a college about five minutes’ drive from my house which was perfect, and signed up a few months before the course was due to begin. About two weeks before, I rang to check what I needed to bring – as I have history with this college. I did a novelty cake course there two years ago which was great, then last year I had been set to take another course which they cancelled at the last minute, and forgot to contact me – I only found out because I rang the day before to ask what to bring. Surely that can’t happen again, I thought… only to be told that not enough people had booked onto the course so it wasn’t going to go ahead.


They were running other cake decorating courses starting in January but said they were all full and they couldn’t squeeze even one more person in, which I thought was a bit unfair as their late cancellation meant I probably wouldn’t be able to get on to a course at another college. Luckily, I did find a course that still had places and wasn’t too far away – South Thames College’s Tooting branch, which is right next to Tooting Broadway tube. I can get there quite easily from work but unlike my local college, where I would have been able to go home, get the car, and then drive back with my cake – I had to get a very bumpy bus home.
 
Though despite that, had I known how good the course at Tooting was going to be, I’d have signed up for it immediately.
 
The course is taught by Anna Murphy, who went through the syllabus on the first session but also asked us what kind of decorations we would like to do. She also gave us a printed list of everything we would need for the course – which is much more helpful than other courses I’ve done, where you are told each week what you need next time. If like me you can’t get to a cake decorating shop and have to order online, you then have to pay over the odds for express delivery every week to make sure it arrives in time for the next class. Anna gave us the full list from the outset but also said she would often be able to provide equipment which we could pay for, as it’s sometimes cheaper for her to order in bulk. She also took a small contribution for sundried which meant that rather than bring all our sugarpaste colours every week or decide in advance which colour we wanted to use, we could help ourselves to hers.
 
We covered a lot in each session, which ran for two and a half hours, and are working on three projects over the ten weeks. I thought I’d share with you the first project and how we went about it.
 
We started off by making flowers from flowerpaste. We simply used different sized flower cutters, and a balling tool to rub the petals to make them curve inwards. We left them in a drying tray which is a really useful (and cheap) piece of equipment, as it ensures your flowers hold the curl as they set hard.
 
In the following session we used royal icing and a number 1.5 or 2 nozzle to pipe a few dots into the centre of each flower. Some people did theirs in black but I decided to use the same colour as the flower as I thought the black might look a bit strong.


We covered two cake dummies in sugarpaste – one useful tip I learnt if you are using dummies is to rub them with a very fine layer of Trex. This means if you need to remove the sugarpaste and start again, it comes off easily and cleanly (you can’t do this on a real cake though!).


I’ve often had problems covering cakes with sugarpaste and I think not using sugarpaste that is brand new does cause a problem; no matter how tightly you wrap it, an open packet will dry out – even if it’s just because the sugarpaste dried out when you were initially kneading it and rolling it out. So it’s fine to keep offcuts for later and use them in modelling or smaller projects but to cover a whole cake I would advise always using a new packet. Especially if it’s a wedding cake!
 
We were quite robust when it came to smoothing the fondant on the sides and top of the cake; again this is something you can only really do with a dummy. You do need to smooth the cake as best you can when you are using a real cake, but if it’s a sponge cake and you have crumb coated it with buttercream you will have to be very careful.
 
Anna advised always having a two-inch difference (at least) between the sizes of tiers in a cake and also a 2 inch wider cake board, which we also covered in sugarpaste. I admit this is something I don’t usually bother doing and just leave the board silver but it does look very pretty covered in white with a matching ribbon around it.


We then left those cakes until the following week in a large box, so the fondant was very hard when we came to piping.
 
To begin, we traced over a design on tracing paper and made some piping bags out of the same paper.
 
 
We made up some royal icing and first piped in the centre of the flowers we had made previously. Anna wanted us to do the centres in black, which everyone else did, but I thought it looked too stark and did mine in purple instead (though I know that wasn't realistic).
 
 
We put the design into a clear A4 file pocket and piped the design over the top. This is a really good way of practising before you do it on the cake!
 
 
When we were ready to do it for real, we put the tracing paper around the cake and traced over the reverse, which meant a faint line appeared on the cake. If you were doing this with a real cake rather than a dummy then you wouldn't want to use pencil; instead you use a pricking tool. Anna said you would need good light to see the marks though so it was easier for us to do in pencil.


Finally I was ready to pipe onto the cake; by now I was already exhausted and aching! My piping wasn't perfect but it was better than I have ever done before so I was pleased with it. I also realised that when I make royal icing at home I don't do it properly and it does need to be really thick!


That same week we did the top layer as well; we were asked to buy or make a cake and as I was a bit short of time, and Anna had specifically recommended a Sainsbury's Taste the Difference chocolate sponge - and the college is right above a Sainsbury's - I decided to do that. We actually needed two cakes, to stack on top of each other, though we didn't need the whole cake - we used a large circle cutter to cut out the middle of the cake. And took the rest home to eat!

We then covered the two cakes in chocolate ganache and left them in the fridge to set; I think Anna transferred them to the freezer and then defrosted them for the following week.


We covered it in fondant in the third class of our 10-week course - and then had to do the painstakingly slow piped design on the even-bigger bottom layer of the cake. I knew the finished cake would look great but it would have been nice to actually try out a different technique on the bottom layer rather than doing the same thing all over again. The next cake we are making does have a different design on each layer though so that will be good - and I can't deny this one does look great.


We stacked the three cakes on top of each other, on the cake board and then stuck on the flowers with some royal icing.


And here's the finished cake! It took about 7 hours over the three weeks, which is a long time when you consider that didn't involve baking any cakes! I am really pleased with the finished cake - by far the most beautiful and elaborate cake I've ever decorated - and I can't wait to start on our next project!

 
While I didn't actually bake this cake, I think decorating it counts as eligible for a blog challenge. I'm hosting Alphabakes this month and the theme is V which includes Valentine's - and how much more romantic can you get than a wedding cake?
 
 
I'm also sending this to Cake of the Week hosted by Casa Costello as she doesn't insist it's something you've actually baked from scratch!


Saturday, 8 December 2012

Piping skills and cookie decorating class


Even though I was slightly disappointed with the painting on cakes class I took recently, I booked myself into another course - again using a Livingsocial voucher - shortly after. I now had slightly reduced expectations and, as this class was only £19- about half the price of the last one - I anticipated that it would be quite short and probably quite basic. Even so, I was attracted by the opportunity to learn piping skills - I can just about pipe buttercream onto cupcakes, though the roses on this neapolitan cake left a little to be desired. I've piped onto cookies before but with limited success (you can see a few at the end of this blog post here) so I was looking forward to learning how to do it properly.

The class was held at Deelicious Nazish's Kitchen in Tooting; it was very easy to find (right next to the tube) and the class was in a room behind the cafe - I had a quick look at their menu and it looked like a really nice place, so if you're ever in the area, I recommend it!

The tutor, Janet, started by showing us how to make our own piping bags or cartouches (I learnt a new word!). These are good because you can make them very small - if you are doing fine piping work, a full-size piping bag is a bit big and unwieldy. Janet also pointed out how expensive disposable piping bags are if you need several for the same project (e.g. you are using different colours of icing) and I've long since given up on reusable ones that you have to wash. There's a particular technique to rolling and folding a piece of greasproof paper, which is very simple when you know how - Janet could make these in seconds. Unfortunately I had a bit more trouble, and even after she showed me a couple of times I still found it quite tricky. I eventually got the hang of it but I think I might still end up using bags from Lakeland!

Here you can see a piping bag Janet made, my attempt that I gave up on, and a few of the piping nozzles that we used.


We started by trying to pipe straight lines with royal icing- not as easy as it sounds! I always thought you needed to keep the nozzle on the cake or cookie - or in this case the circle of greaseproof paper that I was piping on to. But in actual fact, you need to touch the tip of the nozzle to the paper as you start squeezing, then lift it up and pull it away so you create almost a long string of icing, several inches in the air above your surface, and then touch down at the end. If that explanation makes no sense, there are probably good YouTube videos you can watch!

While this method sounded instinctively wrong, I discovered that it is actually very hard to pipe in a straight line if you keep the nozzle on the paper, as for some reason you have much less control over it. Bringing the nozzle up allows you to make a smooth movement that gives you a straight line - or almost straight, I obviously need a bit more practice!


We then moved on to piping circles and wavy lines....


... I had a go at combining the two with some musical notes


We then switched to a star nozzle and Janet showed us how to do the pattern you see around the edge of this cake board. It's very easy to do, but looks very effective!


I amused myself for a few minutes by piping pretty patterns onto my cake board!


I even managed to write "Merry Xmas" at the top and pipe some mini Christmas trees


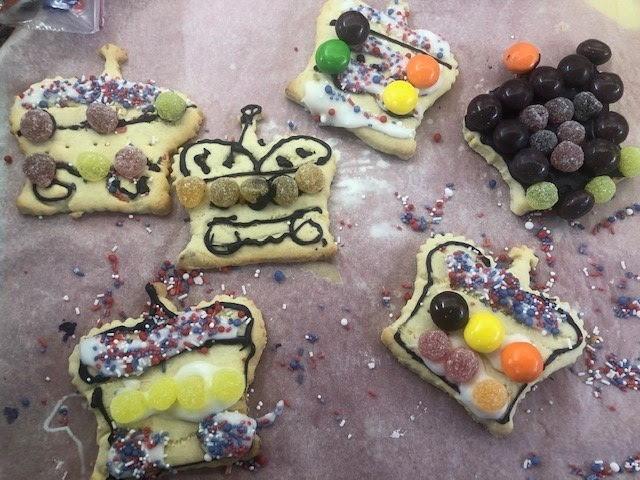
So moving on to the cookies themselves.... these are Janet's creation, don't they look good?


She had baked the cookies before the start of our lesson, so there were plenty of plain cookies for us to help ourselves to and decorate. They were mostly in the shape of Christmas decorations which was great, though we were encouraged to decorate them however we liked.


I started off with some red royal icing and tried to make these both look like the sort of decorations you would see hanging on your tree. I wouldn't have had the confidence to try such detailed piping before this class.

I also sprinkled some of my cookies with edible glitter.


This one is intended to look like a snowflake - it's one of my favourites. Unfortunately I was only able to make one of these as there weren't enough round cookies!


More Christmas decoration designs


Here is my finished selection of cookies!


I then started thinking about what I would do with my cookies, as I didn't want to eat them myself. I decided they would make a nice gift, and would probably hold up fairly well in the post (better than sending cake, anyway). I immediately thought of a friend who lives a couple of hundred miles away, so I don't get to see him very often. He had recently joked that my cakes look so nice, he wished I could send him a slice - so I thought I would go one better and send him his very own box of Christmas cookies! So as a final touch I decorated one with the word Xmas and one with his name - it's lucky he has a short name!


One of the other girls in the class was really creative and had the idea of sandwiching a round cookie together with two of the Christmas decoration shapes, to make the face and antlers of a reindeer. I asked her if I could take a photo - isn't this cute?


As we left, Janet gave us two different sized cake boxes for our cookies and also a small bag, which has a flat bottom big enough for the larger cake box to sit completely flat. This meant I had no problems getting my creations home on the tube and bus, and I really appreciated it. In fact, I just want to say what a brilliant class this was, and if you get the chance to take a lesson at Deelicious Nazish's Kitchen in Tooting then I highly recommend it (this is not a sponsored post and I paid for my own class). The class was scheduled to last 2 hours but we were there for 2 hours 45 mins, so I really felt like I had got my money's worth; as well as the cake box and bag we were also offered tea, coffee or a bottle of water, and were given a mini cupcake to eat as we arrived. All that for £19 (on the Livingsocial deal) was great! My only small complaint would be that we were standing at a table the entire class, so after nearly three hours of standing in one spot piping my legs really ached. It would have been nice to have a chair!

It was a shame too that we didn't get to try flooding, as this is a technique I wanted to learn, but Janet pointed out there wouldn't be enough time for the cookies to dry and us to take them home. Instead she demonstrated the technique, but as I was trying to finish my cookies at the same time I'm not sure I fully took it in!

This is the cool bag we got to take our boxes of cookies home:


When I got home I transferred my cookies to the smaller of two boxes (I could stack the cookies now they were dry) and added some tissue paper, wrote in a homemade Christmas card, and packaged them off to send to my friend Guy. He sent me a nice message after he received the cookies, saying how nice they were and how pleased he was to receive them.


I think it's lovely being able to send someone a little surprise in the post so I will have to start thinking if there are any other edible gifts that will travel well! Let me know if you have baked anything and successfully sent it in the post.....