Showing posts with label baby. Show all posts

Wednesday, 13 October 2021

Easy Veggie Nuggets


These veggie nuggets are aimed at children but I think would be just as good for adults - and I wonder if instead of shaping into individual nuggets or patties, it would work made into a log and sliced - a bit like a nut roast for Sunday dinner.

The recipe came from an Instagram account called @zaynesplate - it’s really easy to make and you can adapt it with your own vegetables. You can see the recipe here.

I used broccoli, carrots, chickpeas, rolled oats and cheese as the recipe suggests. I think if you were making this for adults or older children I wouldn’t blend it and would leave the texture more varied, and perhaps add sweet corn as well. My daughter enjoyed these and there was plenty left to go into the freezer for next time.

Tuesday, 29 September 2020

Congratulations - It's a Girl! New baby handmade card

Sometimes I feel like a Womble (there’s a sentence I never thought I’d write) – making good use of the things that I find, things that the everyday folk leave behind. (Is it strange that I remember those lyrics despite not having seen the television show for over 30 years?). When it comes to card making, I like to use every last scrap, as some things seem too good to waste.

Take the It’s a Girl paper pad by First Edition – I received this as a gift along with some other card making goodies from my husband not long after our daughter was born. The front cover had come detached from the pad but it was too nice to throw away – so even though I had plenty of paper left in the pack itself, I decided to use the cover to make this card.

 I liked how the cover had overlapping designs – intended to show the range of papers inside the pack. I used it to cover a small blank card but it didn’t quite cover the whole card, as I’d had to cut around the wording saying ‘12x12 paper pad’ or something along those lines. To cover the gap I stuck a line of paper flowers down the edge of the card, and added a couple of gem and leaf embellishments to give it a bit of a three-dimensional lift. Finally I added a nice pastel pink ‘congratulations’ banner from another sticker pack, as this is intended for a couple who are expecting their third child – a girl.

Saturday, 21 December 2019

Personalised Christmas Cards with Paperless Post

This is a sponsored post
  
Every year we seem to get fewer and fewer Christmas cards - actual Christmas cards, that is. With an increasing focus on climate change and the environment, it just doesn’t seem right any more to be sending out dozens and dozens of cards - not to mention the cost of the stamps.
That’s not to say I am against the idea of sending cards at all, for one thing I love to make greetings cards so of course I like to send them! But with a very active toddler I hardly have any time any more and the idea of sitting down to write a pile of Christmas cards seemed a bit overwhelming.
Instead, I sent cards to family and a few others but for the most part, decided to send e-cards this year. I’ve used Paperless Post before so went straight back there this time to make our Christmas card.
We had a Christmas themed photo shoot for my daughter in November - we’d done the same the year before when I was on maternity leave via a ‘bumps and babies’ group and as it was really good value, we did the same again this year.

The photos aren’t particularly Christmassy - my daughter is wearing a pretty red velvet dress but there were no props or Christmas images in the photo. Even so, I thought it would be nice for a Christmas card.
Paperless Post has sections for all sorts of greeting cards ranging from birthday cards to event invitations and also business flyers. I went to the Christmas section and looked at cards where you could add your own photos - there were well over 200 designs.
I chose one that I liked and uploaded the photo just by a couple of clicks, then added wording, selected whether I wanted a coloured background and the envelope. It’s really easy to add multiple recipients’ email addresses, and if you have used Paperless Post before, it remembers addresses, so you just have to start typing in the person’s name. That made it so quick to set up a list and to send the card out.
As I ended up doing it quite late at night - as is often the case when you have a toddler - I was also able to schedule the card to be sent at a suitable time, which was a function I liked.
The site uses ‘coins’ to pay for the cards, which you buy in blocks, with the price per unit decreasing the more coins you buy at once. You can get a card for just a couple of coins which as far as I can tell works out at less than sending a card in the post given the price of stamps these days.
My family and friends seemed to like receiving a personalised card and I think the pictures of my daughter were particularly appreciated by family even though I was giving people a print out of some of the photos anyway - and using Paperless Post made doing my Christmas cards a lot easier this year!
Thanks to Paperless Post who gave me coins to use on their site in return for this post. All opinions are my own.

Saturday, 29 June 2019

1st Birthday Cakes - giraffe cake with giraffe pattern inside

My daughter got to have two birthday cakes for her first birthday, as had a party with her dad’s family one weekend and a celebration with my family (who live a few hours away and weren’t able to come to the first party) a week later. So of course I had to make her two cakes!
 

The first cake was decorated as a tribute to her favourite You Tube channel, Cocomelon. The channel consists of short animations of nursery rhymes, all a couple of minutes long, with the same characters – a family of five and various animals – cropping up regularly. Until she was about a year old this was pretty much all my daughter watched on TV – I wasn’t sure she would follow programmes that had episodes or dialogue, and she seemed to really like the songs. The channel’s logo looks a bit like a watermelon with a television screen face so I did my own version as a tribute, covering a cake in pale green fondant and adding dark green stripes and using flesh coloured fondant for the face. I bought a ‘1st birthday’ cake topper on two long sticks to go in the top, and of course a number 1 candle.
 

Baby S is allergic to egg and I wanted her to be able to try a little bit of the cake, so I used a vegan recipe for lemon cake that I’ve used before. I was careful not to let her try the icing as I thought it contained too much sugar, but I didn’t worry about reducing the sugar content of the cake itself as I thought she wouldn’t have more than a couple of mouthfuls. As it was, she wasn’t really interested in eating the cake at all! (Since then five months later she had some of her granny’s birthday cake and really liked it).


I can’t seem to find the recipe anywhere now but it’s quite easy to search for vegan lemon cake recipes online.


For her second cake, I didn’t make it egg-free since I correctly assumed baby S wouldn’t want to eat any. In the end when we had the cake at her grandparents’ house I think she was getting ready for a nap.


I wanted the cake to represent something else that my daughter liked and remembered she was really attached to her Sophie the giraffe – she has two in fact. She seems to have lost interest in the giraffe over the past few months and prefers to play with other toys but there was a time when she was happiest clutching the giraffe in her little fist and waving it aloft.


It’s fun to make cakes with a surprise inside – particularly in this case because my two-year-old niece would be there and I thought she might enjoy it. It’s a lot easier than you might think to make a polka dot effect inside a cake – or in this case, giraffe print.


So how do you make a cake with a giraffe pattern inside? I used a standard vanilla cake recipe, and split the batter into two bowls, adding cocoa powder to one to turn it chocolatey. For this cake, you want to have about two thirds of your batter yellow vanilla and a third chocolate – I also added a bit of yellow food colouring to the vanilla batter.


If you want a perfectly even pattern – almost a chequerboard effect – inside, then you pipe concentric rings of alternative colours around your prepared (greased) cake tin. As I wanted the giraffe print to be a more natural random pattern, I put a layer of vanilla cake in the bottom, piped some very uneven circles of chocolate cake batter and then a layer of vanilla over the top. You can see what this looks like when it has baked, and here it is after I sliced the top off the cake to make it flat – and then the inside when it was sliced.


I covered the cake in white fondant and decided to turn the giraffe itself into the number 1, so I cut a 1 out of yellow fondant and added brown spots as well as ears, a face and hair. I don’t think giraffes have hair quite like that down their backs but never mind! I decided the rest of the cake looked a bit plain but I hadn’t left enough room for my daughter’s name (if you have a one year old, you will understand the rush things have to be done in while they nap!). So I used some of the leftover green fondant from her other birthday cake to make some trees and used a butterfly plunger cutter to do some little pink butterflies at the top. I was quite pleased with how it looks overall and have printed out some photos for my daughter’s baby book so when she is older she can look back and see what cake and presents she had for her first birthday!

Wednesday, 23 January 2019

Baby Hand Print Get Well Card - A little bird told me you're not feeling so chirpy


My mum has been in hospital for nearly four weeks after being suddenly struck by a serious illness but she is recovering really well and will hopefully be back home soon - a huge relief for all of us.
 
I live a couple of hours away so in between visits I’ve sent her a few things in the post, including a get well card that I made in haste and forgot to take a photo of.
 
This is the second get well card I made, or rather that my ten month old daughter made. We go to a class occasionally called ‘Baby Picasso’ that is basically hand and foot painting with some messy play as well. There is a theme each week and we have the opportunity to make one picture or card or other item (before Christmas for instance we did tree decorations) using hand prints and one using foot prints.
 
It gets quite messy - you have to put paint on your baby’s hand or foot and then stop them wiping it on themselves or you before you are able to get them to place it flat on a piece of paper! Then the other details and embellishments are added by the parent, as this particular class is for pre-walkers so the babies are too young to do it themselves.
 
The theme this week was birds, and my little girl made a picture of two robins sitting on branches with handprints in paint.
 
I decided to turn it into a card so when we got home I glued the picture onto a blank card and had a think about a suitable sentiment. The phrase ‘a little bird told me’ sprang to mind straight away then the rest followed and seemed perfect for a get well card - ‘you’re not feeling so chirpy’!  I wrote the sentiments on the computer and stuck them on the front of the card and inside printed ‘get well soon’.
 
I gave my mum the card when I went to visit a couple of days later addressed to granny from my daughter - she really liked it and hopefully it helped cheer her up a little bit!
 
I'm sharing this with the following craft blog challenges: The Male Room - nature (this card would work for a man easily!)
Paper Funday - anything goes
Everybody art challenge - anything goes
Unicorn challenge - things with wings
Heart 2 Heart challenges - creative cards


Monday, 24 September 2018

Babyled Spreads - baby food review

 
If you've been reading my other blog Mini Moo Life you might have read that I started weaning my little girl at the beginning of this month. I’ve been making my own vegetable purees, and then introduced protein, and am about to start making some proper meals for her.

I’ve also tried out a few ready made packets and jars, as these are often more convenient when out and about – for instance we are about to go to my parents’ for the weekend and I don’t want to take a frozen puree for day two as it will defrost in the car on day one which I don’t think is a good idea. Also, there are times when you don’t have time to cook up a new batch of meals or are not sure about trying out new ingredients and don’t want to buy a whole pack of something you are not going to use (particularly if like me and my husband you are fussy eaters but want your baby to try all sorts of things).
 
I was sent two packs of Babyled Spreads to review, including six jars in total. These are little 34g jars which look pretty small but for my six month old did two meals, and a little does go a long way as you can incorporate them into other recipes or meals.
 
The consistency is a thick paste, thicker than a lot of the jars of baby food I’d tried from other brands. I’ve was using the traditional weaning method rather than baby-led for the first couple of weeks then moving to a combination of the two. So I fed my daughter a couple of mouthfuls of the spread to see what she thought of the flavour, and also mixed them with other things.
 
You can also use them as a sandwich filling, a dip, to mix with pasta or as a pizza topping, and many more besides.
 
It’s a good way for your baby to explore different flavours, as in my relatively limited experience of baby food so far, these have more unusual flavour combinations than other brands.
We tried ricotta and bean; avocado, red pepper and tomato; carrot apple and hummus, and were also sent to try green pea rocket and dill; red lentil and sweet potato, and spicy pumpkin and chickpea, though the latter is only suitable for 12 months and older (the others are all for 6 months+) so we will have to wait a little while for that one.
 
I mixed the ricotta and bean flavour together with some cooked flaked cod, and mixed the avocado, red pepper and tomato with baby rice. The carrot, apple and hummus would go well as a dip with breadsticks and as my daughter starts to get a bit more confident at putting things in her mouth I’m going to try the spreads on toast.
You can buy Babyled Spreads direct from their website; a pack of nine jars costs £6.50 with free postage, making each jar 72p each –  or 18 jars for £12 making them 67p each, so roughly on a par with other ready made baby food and though these jars are smaller than others, they go a long way as they wouldn’t usually be served as a meal in themselves.
The company even donates money from the sale of every pot to Bliss, the charity for babies born premature or sick.


Even though I haven’t been following the baby-led weaning approach I do want my daughter to learn to feed herself and experiment with pieces of food and I think having these spreads would help liven up things like breadsticks and toast. In the meantime I’ll continue using them mixed in with pasta or protein to create a tasty sauce to introduce my daughter to new flavours and textures.
Thanks to Babyled Spreads for the product to review.

Tuesday, 28 August 2018

Vegan Chocolate Baby Shower Cake

 
One of my friends has just had her second baby, another boy, the day before her own birthday. We - my group of school friends - all went to see her a couple of weeks ago for a combined birthday and baby shower celebration.

I wasn’t sure if I was going to be able to go until the last minute as we already had two other things on that weekend - a relative visiting and my father in law’s birthday - but we were able to arrange things so that we were able to go.

Making cakes for celebrations when we get together is usually my thing so I couldn’t turn up empty handed, but I didn’t have the confidence I would have enough time in between taking care of my five month old to make anything really elaborate so I decided to keep it simple.

One of my friends is vegan and I remembered seeing a recipe for a vegan chocolate cake in Tea with Bea, the recipe book from the Bea's of Bloomsbury café.

I'm also publishing this recipe on my new parenting blog, Mini Moo Life - if you're interested in all things baby, parenting and family related, hop on over and have a look! Or follow the blog on Twitter @MiniMoo_Life or Instagram @mini_moo_life.


I used white wine vinegar instead of the red wine vinegar given in the recipe as I had a bottle in the cupboard already (and white wine vinegar is often used in vegan baking so I knew it would be ok). I made a simple vegan buttercream from Pure dairy-free spread, icing sugar and cocoa powder.

The guideline cooking time was given as 40-55 minutes with an extra 5-10 minutes if necessary, which is quite a large range. I found the cake needed the full 65 minutes, in fact I think I left it in even for slightly longer and it was still really light and moist.

I bought a gold cake pick with the word 'baby' from my local party store to go in the top and sprinkled the top with edible gold lustre dust. The cake tasted really good - if you are new to vegan baking and need reassuring, this cake tastes even better than a lot of non-vegan chocolate cakes!

Here's what I did
To make one 8 or 9 inch cake you need:

275g plain flour
100g cocoa powder
2 tsp bicarbonate of soda
1 tsp baking powder
pinch of salt
450ml soya milk
2 tsp red wine vinegar (I used white wine vinegar)
320g caster sugar
320ml sunflower oil (I used vegetable oil)
2 tbsp. vanilla extract

For the buttercream
200g vegan spread eg Pure
400g icing sugar

Here's what I did


Preheat oven to 160C. Mix the flour, cocoa powder, bicarb of soda, baking powder and salt in a large bowl.

In another bowl, mix the soya milk, vinegar, sugar, oil and vanilla, whisking until combined.

Fold into the dry ingredients and mix well.

Grease an 8 or 9 inch cake tin and spoon in the prepared mixture and bake for 45 minutes to 1 hour (I've increased the cooking time slightly from the original recipe). Test the middle with a skewer and bake for another 5-10 minutes if needed.

Allow to cool in the tin then turn out onto a baking rack.

When cool, make the buttercream - cream together the marg and icing sugar. Carefully slice the cake through the middle and spread with the buttercream.

You can spread buttercream over the top and around the sides as well if you wish; I left mine plain and decorated the top with edible gold lustre powder.


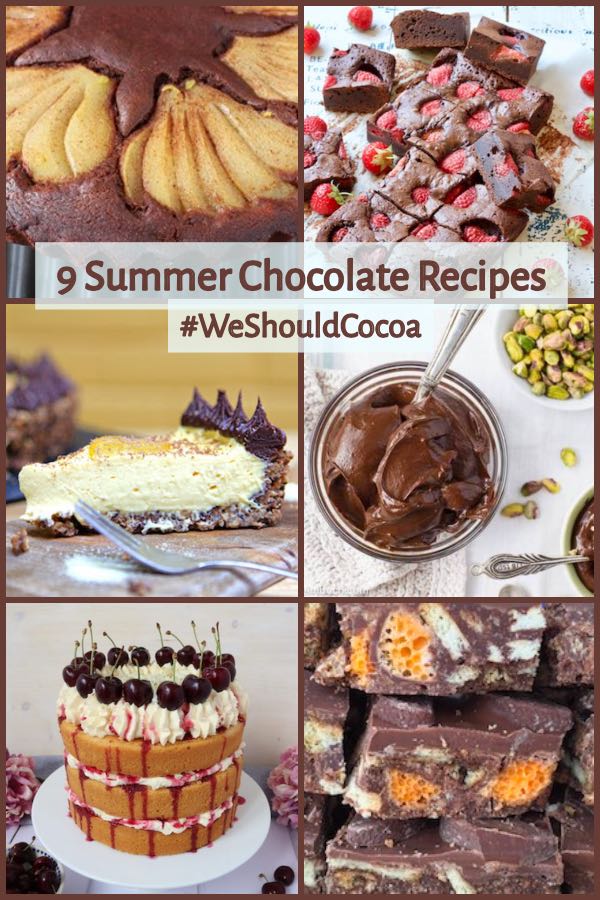
I'm sharing this with the final We Should Cocoa linkup over at Tin and Thyme and also with CookBlogShare over at Easy Peasy Foodie.

9 Summer Chocolate Recipes for We Should Cocoa #WeShouldCocoa #chocolate #recipesCook Blog Share Linky

Wednesday, 2 May 2018

Stork Delivering Baby Card


I have quite a lot of silver and gold outline stickers, and the sentiments and borders are great but I never really got on with using the shapes, as the fine gold outline often doesn't show up that well and looks a bit bare. That is, until I realised I could colour them in! I used Promarkers pens which are really good for this sort of thing (see link below to purchase on Amazon).

To make the card I matted a square of white paper onto a piece of blue card and coloured in the outline sticker, and used a 'congratulations' outline sticker at the bottom.


I'm sending this to Craftaholics R Us where the theme is baby cards and I Love Promarkers which has an optional theme of clean and simple (CAS).

Tuesday, 20 March 2018

Sugar-free Flourless Chocolate Brownies for a Gestational Diabetes-Friendly Dessert

If you've been diagnosed with gestational diabetes - a particular form of diabetes you can develop in pregnancy, even if you have no previous history of the disease - you'll probably wonder at some point if you can ever enjoy a cake or dessert or piece of chocolate again - or at least until your baby is born when gestational diabetes disappears.

The answer, luckily, is yes - there are plenty of desserts you can enjoy. And I don't just mean sugar-free jelly or no added sugar Angel Delight, which seem to be staples of the gestational diabetes (GD) diet for a lot of people- if you enjoy baking, or eating things that other people have baked, there are still options out there, even though you should be avoiding sugar and refined white carbs, which unfortunately includes the flour usually used in cakes and biscuits.

There are alternatives - for instance sweetener instead of sugar, and ground almonds to replace flour - and I'm going to point you in the direction of a website that has some great recipes.

Very soon after being diagnosed with gestational diabetes I found a Facebook support group that was linked to a website called GestationalDiabetes UK.

It’s full of incredibly helpful information, birth stories, meal plans and recipes. It was set up by a  mum who had gestational diabetes and couldn’t find enough information or support. She’s done a lot of research and has worked with various organisations including BabyCentre UK which advertises her site as somewhere to go for support with GD – so while she’s not a medical professional, I felt like I could trust the info on her site.

The main reason I used the site itself – rather than the Facebook group, where I often posted questions or comments for advice or support – was for recipes. I found it relatively easy to design my own meal plans but when it came to something sweet, I really struggled. Diabetic cakes often use sweetener instead of sugar but with GD, as I mentioned above, I was advised to cut down on carbs and particularly refined white carbs – meaning cakes or desserts made with plain or standard self-raising flour were out.

Members of the GD UK Mums Facebook group were raving about the chocolate brownies so I had to give them a go. The website has a lot of free recipes but to get this particular one you'd need to sign up as a member, which costs £7 a month (there is a cheaper option but that doesn't include access to the recipes) - you can cancel any time so I was a member for a couple of months while I was pregnant.

So obviously I'm not going to give you the recipe for the brownies and advise you to sign up for the site even if just for a month, but like many other diabetic friendly bakes, you won't be surprised to find that the flour is largely replaced by ground almonds. I found this gave the brownies a slightly grainy texture; they don't taste of almonds and just taste of chocolate. The ultimate test was my husband who loves chocolate brownies and doesn't like nuts, and he enjoyed these! I did find them a little more dry than I would have liked, with a more cake-like texture than other homemade chocolate brownies which are usually more gooey, but they were a really nice treat if you are missing chocolate cake and brownies!

Thursday, 15 March 2018

The best thing I’ve ever made

Since this is a blog about things I’ve made I thought I’d share what is undoubtedly the best thing I’ve ever made- though I can’t take all the credit as it was 50% my husband’s work too:

Introducing our beautiful daughter Sophie Elizabeth:


I almost can't believe how much I adore this little girl already - she's two weeks old today and my husband has gone back to work today for the first time after his paternity leave finished. I've spent today feeding, cuddling, changing (several) nappies, sterilising bottles, expressing milk, and generally attending to her every need - it felt something of an achievement today that I also managed to get dressed, eat breakfast and lunch, sign up to the childcare voucher scheme and add her to my medical insurance plan and write a birthday card to a friend - and now a blog post as well! Still, it's a far cry from my busy 'previous life' working in communications at an investment bank - though I'm loving every minute of being Sophie's mum, even when she does one of 'those' nappies!

So regular readers should expect lower frequency of blog posts from now on, though I do have plenty of recipes I want to share from when I had gestational diabetes during pregnancy and a few other things I made a while ago - I can't see myself doing any baking any time soon, and even the dinners I'm making at the moment are either frozen food (things with chips), ready meals or from the batch cooking I did while I was pregnant!

I do intend to continue this blog and it will probably take on a more child-oriented stance but I also plan to continue my normal sort of posts.... when I can find the time!


Tuesday, 7 November 2017

Baby Cow Gender Reveal Cake - For My Own Baby!


There’s a big trend at the moment for gender reveal parties, in the US at least. I’m seeing more and more posts and pictures on the internet where couples expecting a baby reveal whether it’s a boy or a girl in front of their family and friends – often in quite creative ways. For instance, when the gender is discovered at the antenatal scan, rather than tell the parent(s), the sonographer places the result into a sealed envelope. The parents give the envelope to a bakery, which makes a cake that has either neutral or both pink and blue decorations on the outside, but the cake inside is dyed either pink or blue, and often has sweets in the centre that tumble out. It’s only when the couple actually cut into the cake and see what colour is inside that they find out whether they are having a boy or a girl.


Another reveal method is for the couple or mum to stand surrounded by family and friends (usually outside) holding a large helium balloon that is opaque – often black or patterned. They burst the balloon and are showered with either pink or blue confetti – again having had no idea themselves what the gender would be.

Those seem really fun if you want to make a thing of revealing the gender in front of your loved ones, but the idea of not knowing ourselves was a bit strange to me – and gender reveal parties aren’t really a thing in the UK. Nonetheless, I decided I wanted to make a gender reveal cake – but rather than give a sealed envelope to a bakery, my husband and I would find out at our 21-week scan and I’d bake a cake that evening.

I wanted to fill the cake with sweets that would tumble out when it was cut, and I found getting hold of pink sweets was easy but blue surprisingly hard! As I was making the cake in the evening I wanted to have both colour sweets already to hand, so a few weeks before the scan started having a look on the internet and online in supermarkets. There are loads of pink sweets available, from strawberry bonbons to a giant tube of purely pink Smarties, but there didn’t seem to be a blue equivalent – at one point the closest I thought I was going to get was mint tic-tacs! Of course, I could have gone to M&M World in Leicester Square – where you can buy M&Ms by weight in any colour you like – and I do work in London but getting to Leicester Square is a bit of a pain and the shop is busy, full of tourists and generally not somewhere I want to go if I can help it.

Luckily I spotted an old fashioned-style sweet shop called Hardy’s near my office – there are a few of these around. They had giant jars of all kinds of sweets against one wall, including pink strawberry bonbons and blue raspberry bonbons, so I bought a bag of each.

I also wanted to plan the cake and buy the ingredients in advance – it might have been nice to have the option of baking both a pink strawberry cake and a blue raspberry-flavour cake but I decided to take the easy option and make a lemon cake.

I used this recipe from Good to Know, though I didn’t do the lemon syrup due to lack of time, and realised the lemon curd in my fridge was out of date and I didn’t have time to make more, so I made a simple lemon buttercream for the filling.

 
I made up the batter, adding lemon zest and a bit of lemon juice, and then added some gel food colouring before the mixture went into two cake pans.

 
When it was baked and cooled, I used a glass to cut a circle out from both layers of cake, going right through the top layer and part way through the bottom layer. I spread lemon buttercream icing on the bottom layer and sandwiched the other cake on top, then filled the hole I’d cut with the sweets, replacing a thin slice of the disc I had removed so the cake would be flat on top.
 

The rest of the buttercream went on the top and around the sides of the cake so I could cover it with a large piece of rolled white fondant. As my surname is Cowe – pronounced cow – this had to be a cow-print cake, like my wedding cake last year! But instead of black and white I made the patches a mixture of pink and blue. I used the same cutters from the Lakeland ‘make your own cookie cutter’ set that my sister and I used on the wedding cake last year – lovely to think that the cutters were coming out again for such a special reason!

 
It was already 9pm and I was watching the Apprentice when I decided the cake did need a baby cow topper as well, so I moulded the animal – complete with baby bottle – while sitting in front of the TV. It’s not my best creation but given it wasn’t even going to be seen very long (I was taking the cake into work, not having a gender reveal party) I didn’t think it mattered much. I also made four alphabet blocks spelling ‘baby’- I thought the cake looked quite pretty and it didn’t actually take that long.

So here’s what you’ve no doubt been waiting for…. when the cake was cut the first slice revealed the colour inside was…. Pink!  We are having a little girl.


The cake tasted really nice and it was fun to see people’s reactions and to be able to share our news!

I'm sharing this with CookBlogShare hosted by EasyPeasyFoodie.

Tuesday, 12 September 2017

Meal Planning Monday 2017 - Week 37

So it's week 37 of the year in meal planning terms but for me, it's also weeks 13 and 14! In case you missed my announcement last week, my husband and I are expecting a baby, which is very exciting and also a little daunting! There's a lot to prepare for and learn - I have almost no idea about babies! One thing I do know about though is food and meal planning - I've read up on all the extra vitamins and so on that I need during pregnancy, and for the past several weeks have actually been using and adapting meal plans from babycentre.co.uk.

These are brilliant - there are plans for each trimester and week by week, though they do repeat themselves several times. As there are some things on there I don't like, I've made a list for the first trimester and now the second, of breakfasts, lunches, dinners and snacks, and have been putting my own meal plans together from that.

Here's this week's. At the moment I don't have any evening/ weekend/ social plans (I've been so tired for the last few weeks, I need a nap during the day - not helpful when I'm at work) and fall asleep very early in the evening!) but that might change.

Monday
Breakfast early start on a Monday for a pre-working hours meeting, so will take yogurt and fruit with me
Lunch tuna sandwich
Dinner: chicken and butternut squash risotto

Tuesday working from home
Breakfast porridge
Lunch sardines on toast
Dinner: slow cooked beef ragu from this recipe

Wednesday
Breakfast yogurt and fruit
Lunch  leftover chicken and butternut squash risotto
Dinner: apple and lamb mince with cous cous I was going to make last week but didn't

Thursday
Breakfast wholemeal toast and peanut butter
Lunch carrot and coriander soup with a bread roll
Dinner: salmon with pine nuts, broccoli and sweet potato mash or possibly out at the theatre

Friday
Breakfast yogurt and fruit
Lunch tuna sandwich
Dinner: jacket potato as I need a very quick meal as I am trying out a pregnancy yoga class tonight! Not really how I imagined spending my Friday nights but it's very local and the only night they do it.

Saturday
Breakfast Scotch pancakes
Lunch soup, for want of a better idea
Dinner: mozzarella chicken

Sunday
Breakfast Scotch pancakes
Lunch ham and cheese quesadillas
Dinner: roast beef

Share what's on your meal plan this week - join in the blog hop!

Wednesday, 6 September 2017

Something else I made....

This blog is all about things I've made - food, drink, cake, crafts - so here is something else I've made that I want to share with you all....


My husband and I are having a baby! He or she is due in March - one reason I haven't been blogging much lately is because I've been exhausted, falling asleep after dinner and even having naps during the day sometimes. Apparently you do get very tired in the first trimester and then get a lot more energy in the next three months, I hope so!

So you can expect to see more blog posts around eating healthily in pregnancy, and cooking food for babies (though that will be some way off!) and possibly even some baby related product reviews - but I'm still going to be blogging about eating out, recipes and cake decorating!

Saturday, 20 May 2017

Blue Baby Bottle Congratulations Card

I spotted a blogger challenge on Ooh La La Creations Challenges for a card on the theme 'something beginning with B', which has given me the perfect opportunity to share this new baby card.
 

It's actually using a card topper I bought years ago from Ebay - I bought a small packet of them and thought I had used them all long ago and came across one left! You could make it quite easily by matting a piece of pattered paper onto a white card rectangle and then another smaller rectangle on top. The baby bottle is probably a die cut but wouldn't be hard to cut out yourself following a template or a picture - or even the real thing!

I used a rubber stamp saying 'congratulations' from a new collection that I think I got free with a card making magazine, on a blue card.

Thursday, 16 March 2017

Congratulations Baby Girl Card


A friend of mine was getting close to her due date and I realised I had a new baby card suitable for a boy but didn't have one for a girl. I didn't want to buy one, but I also didn't have a lot of time to make one.

I still had a box of pre-printed card blanks, if that's not a contradiction in terms - these are cards with different patterns but no pictures or wording that you can add a few embellishments to and personalise how you like.

I used one with a yellow and pink flower pattern as I thought this fit the new baby theme. Taking a pack of silver outline stickers, I stuck a bear and a rocking horse outline onto bright pink paper and cut around them, and stuck them onto the card. I used a 'congratulations' sentiment from the same sticker sheet on pale pink paper which I then mounted onto the bright pink paper and stuck on the top of the card.

Finally as I happened to have a small packet of brads to hand from another project and I spotted a couple of pink flowers in there, and decided they would add the perfect finishing touch. All ready now for my friend to have her baby!

I'm sharing this with Path of Positivity for this week's blog challenge which has the theme 'birth of new beginnings'.

Saturday, 22 October 2016

Pink Elephant Baby Shower Cake - Almond, Apricot & Mascarpone


My sister is having a baby! I’m really excited that I’m going to have a niece and I expect my parents can’t wait to be grandparents. It’s amazing how many things you need to think about when you are expecting a baby so it’s nice that in the UK we are increasingly adopting the tradition of baby showers. We have always given gifts when babies are born, but I like the American tradition of everyone (well, the women) getting together before the baby is born to shower the mother-to-be with love. It’s also helpful to receive any gifts you might have been given anyway before the baby comes, because otherwise you will probably have bought everything you need by the time it’s born!
 
It’s also a nice way for the mum-to-be to feel spoiled so I was happy to help organise a baby shower for my sister. It was held at the house of one of her friends, as they all live in the same area whereas I live further away, so the host arranged for everyone to bring something different to the shower, such as food, drink and decorations. I brought a few decorations, some games, and of course the cake!
 
You can see and download the games I did at a previous baby shower for a friend.
 
I started thinking about how I would design and decorate the cake before I put any thought into flavour. I wanted the cake to look the part – I had to carry it on a train and it didn’t need to feed hordes of people so much as I loved some of the two and even three-tier cakes I’d seen online, I decided one tier was enough – but I still wanted it to look special.
 
I also didn’t want to use a design I’d done before – partly as I wanted a new challenge but mainly because as it’s my sister, I thought it needed to be unique.
 
I’d made cakes with baby shoes, teddy bears and ABC blocks on before, which seemed the most obvious ideas. I browsed online for quite some time to get ideas for other themes – I wanted the cake to have pink elements as my sister is having a girl, but not for the entire cake to be pink. One motif that kept coming up was elephants, and when I found some baby shower napkins with elephants on, I decided this would be perfect. I also had my eye on the Fmm Easy Bunting Cutters, Set of 3
which I’d bought and wanted to try out. Bunting can be used for all sorts of occasions and themes and it reminded me of both garden parties and also the circus, which worked really well with the elephant idea.
 
 I decided to make the elephant the week before and let the fondant set hard; I knew I wouldn't have much time when I was baking the cake for the baby shower and this would give me extra time to deal with any problems like if the elephant's trunk fell off!

I added a little bit of black food colouring to a ball of white fondant -usually I complain that it's too hard to colour your own black and you have to buy it, as black food colouring only makes the fondant grey. In this case that was exactly what I needed! I had a look at a few pictures of elephants online and moulded the fondant freehand, using a knife to slice into the piece at the bottom to separate it into two legs.


I had these baby girl wafer decorations left from a previous baby shower and didn't want to use them on the cake itself but had an idea after seeing a picture of an elephant holding a balloon - I stuck it onto a cocktail stick and put that in the elephant's trunk.
 

I then used a small heart cutter to cut out a shape from fondant that I had coloured pink and used this for the elephant ears, and cut the tops off two more hearts for the feet. I made an eye from a tiny ball of white fondant and dipped a cocktail stick into black food colouring to dot on the pupil.
 

I had a plaque cutter I picked up ages ago like this one:

PME Plain and Fluted Double Sided Oval Cutter, Medium, 50 mm, 2-Inch
 
that I used to make a plaque from pink fondant and put another 'it's a girl' wafer onto it using edible glue.

I also covered a cake board in white fondant and let it go hard in time for next week.
 

So on to the cake itself. I wanted something light but not lemon as I've made a lot of lemon cakes before. The Baking Book: The Ultimate Baker's Companion (Good Housekeeping) had a recipe for almond and apricot cake and I decided to do this, but I scaled up the recipe by 50% once I found that the quantities given baked two quite thin layers of cake.

 
By the time I'd made three and piled the apricot and mascarpone filling in the middle it was quite a tall stack; it would have looked nice just dusted with icing sugar as the recipe suggested, but I decided to cover it in fondant so I could decorate the cake how I wanted.


You can find the full recipe on the Good Housekeeping website.

I spread the apricot compote onto the cake and topped with mascarpone mixed with icing sugar, between each layer


I spread some of the extra around the sides and on the top of the cake


When it came to decorating the cake, I covered the whole cake in white fondant and placed it on the cake board I had previously covered, with a ribbon around the edge. I stuck another piece of ribbon around the bottom of the cake, and mixed up some royal icing which I tinted pink, to pipe strings for the bunting around the cake.


I used the bunting cutter to cut out the shapes - it just gives you a lot of triangles (joined together which you have to separate) but this does mean that they are exactly the same size and shape.


I used a cocktail stick in pink food colouring to make a polka dot pattern on alternate bits of bunting then stuck each piece on to the cake with edible glue. It was hard to make it as neat as I wanted though.

I put the 'it's a girl' plaque onto the front of the cake, and the elephant on top standing on a circle of pink fondant. I switched the ribbon around the cake for a paler one as I thought the other one was too bright.
 
 
My sister seemed really pleased with the cake and it tasted absolutely delicious - really light and creamy. The decoration isn't as neat as I would have liked but I do think the elephant on top is quite sweet.