Showing posts with label Dr Oetker. Show all posts

Tuesday, 20 June 2017

Dr. Oetker Popcorn Fudge Brownies

These treats are really good at this time of year if you want something chocolately that isn't going to melt! I made them for Father's Day and was meaning to post this beforehand but ran out of time as we were away for the weekend celebrating our first wedding anniversary, which this year fell on Father's Day.

The recipe is one by Dr. Oetker, who sent me a selection of the ingredients to try out. Their salted caramel easy-fill cake centre is brilliant - it comes in a pouch with a handy nozzle that you can stick into a cupcake to pipe caramel filling right into the cupcake. In this case I used it to mix with popcorn and also to spread on top of the brownies; as well as being easy to use it tasted really nice.

The popcorn does go soft quite quickly so if you can, I would make these as close to when you want to eat them as possible.

Dr. Oetker's recipe is gluten free but I used ordinary plain flour. The recipe below is Dr. Oetker's; the photos and opinions are my own.
 

Gluten Free Popcorn Fudge Brownies
Preparation time: 40 minutes plus cooling, chilling and setting
Cooking time: 55 minutes  (including chocolate melting time)
Makes: 16

Ingredients
For the brownie layer:
150g bar Dr. Oetker Fine Cooks’ 54% Dark Chocolate
100g (3 ½ oz) Unsalted butter, softened
100g (3 ½ oz) Dark brown sugar
2 Medium eggs, beaten
100g (3 ½ oz) Gluten free plain flour

For the blondie layer
150g bar Dr. Oetker Fine Cooks’ White Chocolate
100g (3 ½ oz) Lightly salted butter
100g (3 ½ oz) Caster sugar
2 Medium eggs, beaten
2.5ml(1/2 tsp) Dr. Oetker Caramel Flavour
100g (3 ½ oz) Gluten free plain flour

For the topping:
1 sachet Dr. Oetker Salted Caramel Easy Fill Cake Centre
25g (1oz) Lightly salted popcorn
 
Method
1. Grease and line a 20cm (8inch) square cake tin.

2. First make the brownie layer. Break up 100g (3 ½ oz) Dark Chocolate into pieces and place in a saucepan with the butter and sugar. Heat very gently, stirring occasionally until melted. Remove from the heat and cool for 10 minutes. 


3. Whisk the eggs into the melted mixture to make a thick glossy batter. Sift the flour on top and carefully mix all the ingredients together. Pour into the prepared tin, smooth to the edges and chill in the fridge for 1 hour.

4. Meanwhile, preheat the oven to 180˚C (160˚C fan oven, 350˚F, gas 4


5. To make the blondie layer, follow the same instructions for making the brownie batter as above, using 100g (3 ½ oz) White Chocolate -  you will find that the melted mixture separates during melting, but once the eggs and flour are added, the mixture will blend together again. Stir in the Caramel Flavour. Carefully spread the White Chocolate batter over the brownie layer, trying not to press too heavily as you spread - there is no need to chill this layer

 
6. Bake for about 35 minutes until slightly risen, lightly golden and lightly crusty on top – the mixture should be slightly soft underneath. Leave to cool in the tin completely then remove from the tin, peel away the tin lining parchment and place the cake on a board.

 
7. For the topping, melt the remaining White Chocolate as above. Put the popcorn in a bowl and squeeze in 50g (2oz) Dr. Oetker Salted Caramel Easy Fill Cake Centre and add the melted chocolate. Mix well to make sure that all the popcorn is coated


8. Squeeze the remaining Dr. Oetker Salted Caramel Easy Fill Cake Centre over the top of the cake and spread right to the edge. Spoon over the caramel popcorn mix, and spread it out so that the whole top is thickly covered. Pat it down a little using the back of a spoon


9. Melt the remaining Dark Chocolate as above. Using a teaspoon, drizzle the top all over with melted chocolate. Leave in a cool place for a few minutes to set. Using a large bladed knife, cut into 16 chunky pieces. Your brownies are now ready to serve and enjoy!


Replace the gluten-free flour with plain white flour if preferred – this will give a slightly less dense texture. 
 
Thanks to Dr Oetker for the recipe and ingredients

Saturday, 22 April 2017

Chocolate Marbled Easter Meringue Nests


Dr. Oetker came up with some great new recipes this Easter, which you can see on their website here. I liked the look of the tear and share hot cross buns but I didn't really have the time. Instead I made this - I actually thought I'd shared this post over Easter, oops!


Dr. Oetker sent me a selection of their products to try and I was intrigued by the powdered egg white as I don't think I have used that before. It replaces fresh egg white and saves you from ending up with a lot of unused egg yolks if you are making meringue.

I decided to make their chocolate marbled meringues; you can find the recipe on this link. Instead of filling them with fruit I gave them an Easter twist by filling with chopped marshmallows, a couple of Cadbury mini eggs and some whipped cream, and drizzling them with some melted Dr. Oetker Cooks' 72% Extra Dark Chocolate.

The egg white powder was really easy to use - I was worried when I mixed the powder with water as directed that I had left it a little lumpy but the lumps disappeared and it cooked perfectly, and I mean perfectly. The meringues were crispy and chewy in the middle and lifted off the baking paper without problem. They are very sweet so I think the original recipe suggestion of filling them with fresh fruit is a good idea, and I recommend dark chocolate rather than milk chocolate which is sweeter.

I'll definitely use powdered egg white again as I often end up with yolks I don't know what to do with - it costs £1.15 for a pack of 4 sachets from most supermarkets.

Don't you just love glossy meringue?


Marbling with melted chocolate


Ready to go in the oven


And after two hours of baking


 Decorated with marshmallows, mini eggs and topped with whipped cream and melted chocolate
 

Saturday, 19 July 2014

Chocolate Chequerboard Cake


This cake has a wonderful surprise in the middle - it looks like a plain chocolate cake on the outside but has a chequerboard design inside! You can buy special tins to make this but it is actually very easy to make in a regular cake tin. 

I made this to take into work on my birthday; I had seen these cakes in recipe books but never tried to make one before so I thought it would be a great opportunity to try to impress my colleagues!

The recipe comes from the Great British Bake Off book, Showstoppers. I did adapt it as their recipe makes a three-layer cake and I made four layers, but from the same quantity of ingredients.

You need:
350g butter, softened
350g caster sugar
3 tsp vanilla flavouring
6 eggs
350g self-raising flour
pinch of salt
4 tbsp milk
50g cocoa powder 

for the chocolate ganache
300g plain chocolate
300g double cream

Preheat the oven to 175C. In a large bowl, cream the butter and the sugar, add the vanilla then alternate adding one egg and 1 tbsp flour, mixing after each addition. Then fold in the rest of the flour and the salt and finally the milk. Now at this stage stop and transfer half the cake mixture to another bowl, and mix the cocoa powder into half the mixture.

Grease two equal-sized round cake tins (I used 9 inch). You need two piping bags with wide plain nozzles; alternatively you can use freezer bags and snip the corner off, turning them into makeshift piping bags. Put the chocolate mixture into one and the vanilla mixture into another.

Starting with the vanilla mixture, pipe a thick circle around the outside of one cake tin, then take the chocolate mixture and pipe a circle inside the first one. Continue piping ever-decreasing circles alternating colours until you have reached the centre of the tin. Do the same on the other tin, but importantly, start with the other colour - so you have one tin with a vanilla ring on the outside and one tin with a chocolate ring on the outside.

I had enough mixture to do this four times, so I had two cakes with vanilla on the outside and two with chocolate on the outside.

 Bake in the oven for 25-30 minutes until cooked then allow to cool first in the tins then on a cooling rack.


Make the chocolate ganache by melting the chocolate with the cream in a saucepan; do not allow to boil. Stir until the chocolate has melted, remove from the heat and allow to cool. When the ganache has cooled it will thicken; use half of it to sandwich the layers together. What you must remember is to alternate the layers so if you have one on the top with a vanilla ring on the outside, as you see here, the next layer must have the chocolate ring on the outside and so on.


Use the rest of the ganache to cover the top and sides of the cake. I decorated it with Dr. Oetker giant chocolate stars, which are brilliant - my only complaint is you don't get that many in the pack!


 Here's the finished cake, from the outside....


And when you cut into it, you see the chequerboard pattern. It's very impressive and most of my colleagues thought it must have been very difficult to make- I ended up drawing them a diagram explaining how I'd done it!


Stuck In The Tree is a bingo review site that is about having fun online and off; they are running a 'bakespiration' competition so I am sending them my cake in the hope they will include it in their gallery.

Friday, 7 February 2014

Rosewater Mini Rose Bundt Cakes


These rosewater cakes were made in a mini bundt tin but you could also make them as cupcakes with rosewater buttercream frosting. The cakes have a surprise on the inside - they are bright pink! I made them for a colleague's birthday as I knew she wouldn't want a big cake and a lot of fuss but I wanted to make something. I received the Nordicware mini rose bundt tin for Christmas and wanted to try it out as well!

I thought rosewater would be the perfect flavour to go with the rose cake tin. When I want to find a recipe using a specific ingredient I am more likely to turn to the internet than a recipe book- books are great for browsing but it can take a long time to find a specific recipe if you don't know where to look! I found this recipe on the Australian website Taste.com.au but did not include the frosting, and I used vegetable oil instead of canola oil.

You need:
1 cup vegetable oil (250ml)
1 and 1/2 cups caster sugar (330g)
2 eggs
1 cup plain yogurt (280g)
2 cups self-raising flour (300g)
2 tbsp rosewater
pink food colouring

Preheat the oven to 180C. Mix the oil, sugar and eggs in a large bowl.


Gently mix in the yogurt then the flour.


I then added the pink food colouring.


Here's a close-up of the Nordicware bundt tin I got for Christmas, it's very pretty!


And here you can see the side view


I sprayed each indent in the tin with Dr. Oetker Cake Release:


Bake in the oven for 20-25 minutes. The cakes came out of the tin perfectly thanks to the Cake Release, and you can clearly see the rose shape - I was really pleased with these.


I had enough mixture for a second batch but had run out of Cake Release so instead I used Fry-Light. I thought a spray oil would work better than greasing the tin with butter as it would get in all the nooks and crannies. I also thought that using Fry-Light would probably be no different to Cake Release, but I was very wrong! Fry-Light is obviously an oil for cooking and you can see from the picture below how dark the cakes using Fry-Light came out. They still came out of the tin easily, but they cooked for the same length of time - of course, the oven would have been hotter for the second batch, but I think using oil instead of Cake Release meant they were overdone. I'll go back to using Cake Release in future!


Despite everyone thinking the darker cakes were chocolate, they went down well at work. I sprinkled the tops with edible red glitter for a little extra pizazz. Unfortunately I forgot to take a photo of the inside as they were bright pink from the food colouring! The rosewater taste was quite subtle but I think definitely there, and the shape of the cakes was a real talking point.


There are several blog challenges this month that this recipe is perfect for. Firstly, Calendar Cakes, hosted by Rachel at Dollybakes and Laura at Laura Loves Cakes, as their theme is l'amour. (That's love, for non-French speakers!)


Secondly, I'm sharing this with Cakeyboi for Treat Petite, as the theme is Valentine's treats for your loved ones.


Four Seasons Food is focusing on "food from the heart" this month so I think these mini rose cakes fit nicely with the theme. The challenge is hosted by Anneli at Delicieux and Louisa at Eat Your Veg.

fsf-winter


Finally a new challenge, Love Cake, hosted by Jibber Jabber. Rose-shaped cakes are certainly evocative of love and passion - the theme this month is baking with passion.


Sunday, 24 November 2013

Doctor Who Party Food - Recipes

Doctor Who party food

Last week I wrote a blog post about throwing a Doctor Who themed party ahead of the 50th anniversary episode of Doctor Who. I included ideas for food, costumes, decorations and games, though I wasn't planning to do all of them myself. Last night was the Day of the Doctor and I gathered with my parents, my boyfriend and his mum to watch; I didn't throw a full themed party but planned a Doctor Who-inspired menu. I'll go through each dish that I made and give the recipes below.


For the party I made:

Fishfingers in custard (an Amy Pond favourite - and don't worry, it wasn't actually custard)
K9 dogs - hot dogs
Potato wedges
Adipose (mini marshmallow men)
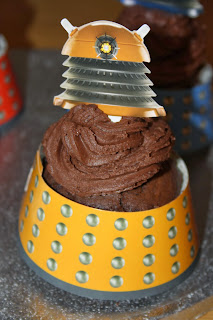
Dalek cupcakes (Devil's food cake with Lakeland decorations)
Cybermen and K9 ginger cookies (as the Doctor has had several ginger companions)
Sonic Screwdrivers (screwdriver cocktail served in a flashing glass).


First I began by making the cupcakes, and decided that a Devil's food cake recipe was the most appropriate for the evil Daleks. This recipe is adapted from a little book called "Easy Cupcakes" from Marks & Spencer.

To make a dozen large cupcakes, you need:

100g margarine
225g caster sugar
4 eggs
225g plain flour
1 tsp bicarb of soda
50g cocoa powder
250ml sour cream

For the buttercream
200g butter, softened
400g icing sugar (adapt the quantity depending on how stiff the icing is, which will partly depend on how soft your butter is)
50g cocoa powder

For the filling: Nutella chocolate spread (optional)

To decorate I used these Dalek cupcake wraps and toppers from Lakeland 

Preheat the oven to 180C. Cream the marg, sugar and cocoa powder in a large bowl,


Mix in the eggs and the soured cream until you have a smooth mixture.


This is the Dalek cupcake set. It costs £9.99 for not an awful lot - you get 24 cardboard cupcake wraps in four colours, and four matching heads which are also made of cardboard, with a pick you insert into the top of the cake. They are well made and really easy to use. The cupcake wrappers can fasten on three notches as well so you can adapt them to the size of your cupcake.


So here I have the cake batter


Spoon into cupcake or muffin cases

Bake in the preheaten oven for 15-20 minutes until the cupcakes have risen and a skewer comes out clean. Leave the cupcakes to cool on a wire rack.


I decided to fill the cupcakes by scooping out the top and adding a spoonful of Nutella, and then replacing the lid. I then piped chocolate buttercream in a swirl on top of the cupcake. Place the cupcake wrappers around the cake and put the Dalek head on top. I think these look great!

 Dalek cupcakesDalek cupcakes


Next I made ginger cookies, to reflect the Doctor Who's companions Amy Pond, Donna Noble and Mel (Bonnie Langford) - were there any other ginger companions?

I used a simple sugar cookie recipe
100g butter, softened
100g caster sugar
200g plain flour
1 egg
2 tsp ground ginger

I actually ended up making two batches of this.

Preheat the oven to 180C. Mix the butter and caster sugar then mix in the flour until you have a breadcrumb-like consistency.


Mix in the ginger and the egg and knead into a dough


I use this cookie cutter set from Lakeland. You get a cybermen and a K9 cookie cutter for £4.99 which I think is good value. They are plunger cutters so leave an indentation on the cookie of the design, that looks really good.


Here are the cookies before they go in the oven


And after they came out


 I like how the cookies are decorated in the picture on the Lakeland website; you can use the same cutter on a piece of rolled out fondant to imprint the same design, then decorate it with silver balls and piping icing. I didn't have a huge amount of time so I decided to leave some of the cookies plain, and sandwich some of them together with leftover buttercream from my cupcakes.


I also used a tube of Dr. Oetker writing icing to pipe along the lines of the cookie. I was a little wobbly but it was very easy to follow the design so I think these look OK.


Setting out the cakes and cookies on the table


I didn't go to great lengths to decorate the house but I did buy this Tardis door poster from Ebay which I hung on the entrance to the living room.


I also couldn't resist making Adipose - from an episode of Doctor Who were diet pills make people's fat cells turn into little creatures that scurry away. I thought they were really cute! This is what they look like in Doctor Who on the left, and on the right is what they look like made out of marshmallow! I used a normal marshmallow for the body and two mini marshmallows for the legs, and a mini marshmallow cut in half for the arms - they are stuck on with a little buttercream but you could also use edible glue. I drew on the face with an edible ink pen which you can get from Amazon or cake decorating suppliers.

marshmallow adipose

I bought some Doctor Who paper plates and napkins; here you can see a group of Adipose on a Tardis plate.

marshmallow adipose

I made a screwdriver cocktail (which is just vodka and orange) and to make it sonic, I used a glass I got from Bubba Gump's restaurant in America - when you press the button on the bottom, the base and rim of the glass light up and flash! Now if that isn't a sonic screwdriver, I don't know what is...


The main courses were then cooked in the oven. There's an episode of Doctor Who I haven't actually seen yet as I am playing catch up, where a young Amy Pond gives the Doctor fish fingers dipped in custard. I added some yellow food colouring to a small bowl of mayonnaise which gave the desired effect!


And finally K9 (hot) dogs with onions. Did you watch the Doctor Who 50th anniversary episode, and did you do anything like this?