Showing posts with label Cheese Please. Show all posts

Saturday, 22 February 2014

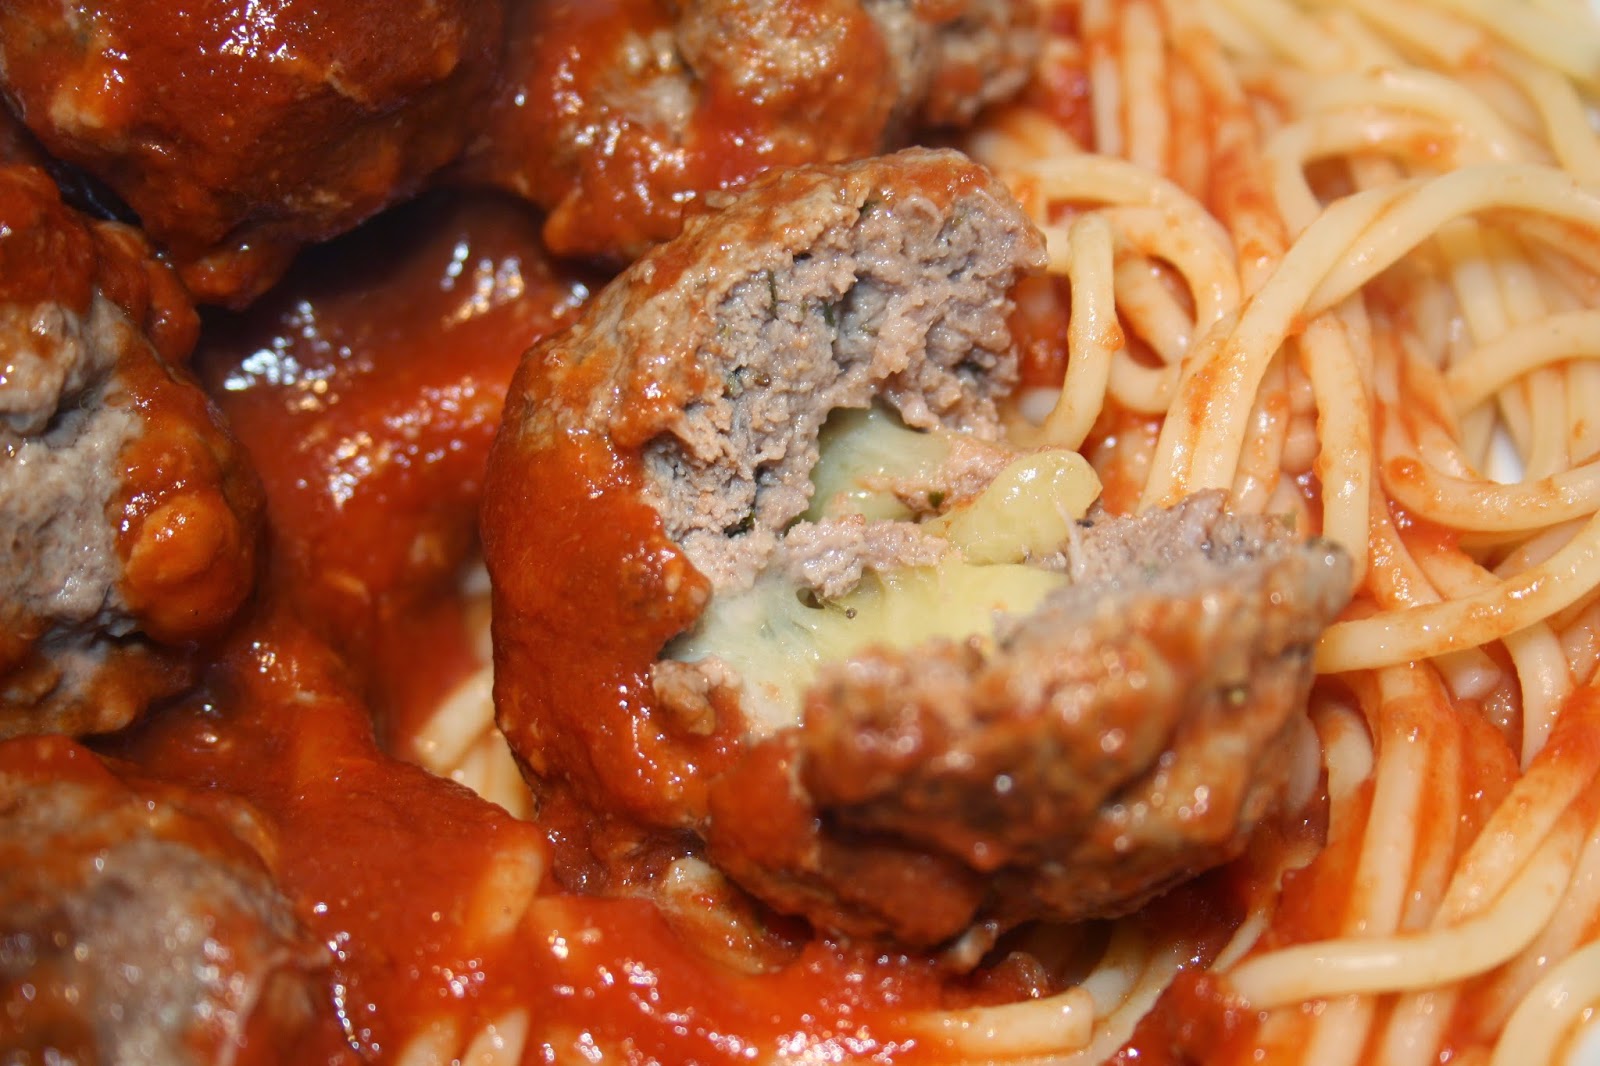
Cheese-stuffed meatballs


cheese stuffed meatballs

These cheese-stuffed meatballs are really simple and tasty and are a good way of jazzing up spaghetti bolognese if it's a dish you make a lot or you have someone who isn't that keen on pasta (strangely enough there are people like that out there!). Somehow the idea of a cheese-stuffed meatball is so much better than spaghetti bolognese even though there's not all that much difference!

I made these to use up some freshly minced beef I made after buying chuck steak from the local butcher and trying out my Kitchenaid mincer attachment. You can mix the mince with whatever you like such as finely diced onion, garlic, oregano and other herbs and a little salt. Then cut cubes of hard cheese - I've used cheddar here, but you could also try halloumi. Form the mince into a ball around the cheese.


Roll into balls and place in the fridge for about half an hour to firm up.


When ready to cook, heat a frying pan and spray with Fry Light or a little oil and fry the meatballs on all sides until browned.


In the meantime cook some spaghetti according to the packet instructions. You can also make a tomato sauce from scratch if you have time, but here I just used passata as I didn't want to compete too much with the flavour of the meatballs.


As you can see, when you cut into the meatballs, the cheese is softened but still intact; it hasn't oozed out or melted into the meat. These went down very well with my boyfriend!


In fact because I made these for my boyfriend as I knew he would love it (more than spag bol) and because I love him (awww)  I'm sending this to Cheese Please, hosted by Fromage Homage, which has a theme this month of cheesy romance.


I'm also sending this to Pasta Please, as the challenge this month focuses on spaghetti and these meatballs go perfectly with spaghetti. The challenge is hosted this month by a blogger I haven't come across before, called Feeding Boys and a Firefighter, on behalf of Jacqueline at Tinned Tomatoes.
Tuesday, 21 January 2014

Spinach, Cottage Cheese and Roasted Garlic Cannelloni


 I was trying to find ways to eat more vegetables and decided that spinach and ricotta cannelloni would be nice. I was browsing for recipes on the Slimming World website to see if there was a lower fat version and indeed I came across a recipe for spinach and cottage cheese cannelloni. It wasn't quite as nice but it works out as only one syn on Extra Easy so to me it's well worth making this instead of the full fat version.

To serve two, you need:
8-12 cannelloni tubes (the ones I used were quite small)
1 tbsp parmesan cheese
100g spinach leaves
125g fat-free natural cottage cheese
1/2 tsp grated nutmeg
1 egg yolk
250 ml passata
pinch of sweetener
1 garlic clove, roasted and the filling scooped out; or raw and crushed
salt, pepper

Preheat the oven to 180C. Bring a pan of water to the boil and cook the spinach leaves for a few minutes until they have wilted.


Drain the spinach in a colander and finely chop. I was amazed at how much it reduced down!


Mix the cottage cheese with a little seasoning, the nutmeg, garlic, egg yolk and the spinach.


Spoon into the cannelloni tubes and place them in a small baking tin lined with tin foil. The cannelloni tube on the right is meat, for my boyfriend (I'm not vegetarian so don't mind cooking the two together) - that's why it's a different colour!


Mix the sweetner and passata and pour over the cannelloni, making sure the pasta is completely covered.


Bake in the oven for 20-25 minutes until the pasta is soft.


Sprinkle over parmesan cheese if desired to serve.


I'm sending this to the One Ingredient Challenge, hosted by Nazima at Franglais Kitchen, and Laura at How To Cook Good Food, as the theme for January is "healthy".


Similarly the theme for Four Seasons Food this month is "virtuous". The challenge is hosted by Louisa at Eat Your Veg and Anneli at Delicieux.


 The theme for this month's Cheese Please is winter warmers - baked cannelloni is a great dish for a chilly winter's evening. The challenge is hosted by Fromage Homage.


Fromage Homage

Pasta Please is asking for recipes using garlic this month and I've used garlic in my cannelloni (though I forgot to take a photo of it!). The challenge is hosted this month by The Spicy Pear on behalf of  Jacqueline at Tinned Tomatoes.


I am also sending this to Simply Food's Let's Cook... with green vegetables as I've used spinach here.


Wednesday, 8 January 2014

Broccoli, Courgette and Stilton Soup


I'm trying to eat more veg this month, and I also wanted to use up some cheese from Christmas, so I decided broccoli and stilton soup would be a great idea. I am a pretty fussy eater and don't like a lot of veg, so had an idea of sneaking some hidden veg... into my own food! My theory was that if I couldn't see it, and hopefully couldn't taste it, I wouldn't mind eating it. Courgette (zucchini) seemed a good option!

I can only give rough quantities for this recipe as it depends how thick you like your soup. To serve 3/4 you need:
1 head broccoli
about 100g stilton or 6 Laughing Cow Light blue cheese triangles
about 1 pint vegetable stock
half a courgette (zucchini)
salt, pepper
crispy bacon pieces to serve (optional)

Chop the broccoli into florets


And slice the courgette

You can either use leftover Stilton...


... or if you want to make this soup low fat and Slimming World friendly, use Laughing Cow Light Blue Cheese.


Bring the vegetable stock to the boil in a pan and simmer the broccoli and courgette until tender. Add the cheese and stir until melted.


Blend to a smooth soup either using a hand blender in the saucepan or by transferring the soup to a standalone blender.


I had some leftover bits of crispy bacon I decided to serve on top of the soup, the different texture and taste complemented the flavour of the soup really well.


Most importantly, I couldn't taste the courgette - so I successfully squeezed an extra portion of veg into this meal. The soup lasted me three days and I took it into work for lunch so it was both healthy and thrifty, which is a great combination for January!

First I am sending this to Family Foodies, the blog challenge hosted by Vanesther at Bangers and Mash and Louisa at Eat Your Veg, as the theme this month is hidden goodies (that is, hidden fruit and veg).


The theme for this month's No Croutons Required, hosted by Lisa's Kitchen and Jacqueline at Tinned Tomatoes, is a vegetarian soup or salad. Obviously if you were making this for vegetarians, leave off the bacon! You should also check that the cheese is made with rennet that does not come from animals and is suitable for vegetarians.


Louisa at Eat Your Veg is also hosting the Four Seasons Food challenge along with Anneli at Delicieux, and they are looking for virtuous recipes this month, so I think my vegetable soup - with extra hidden veg - is a good example.

On a similar note, Helen at Fuss Free Flavours and Michelle at Utterly Scrummy are hosting a new challenge, Extra Veg. They want to encourage us to eat an extra portion of vegetables whenever we can - so while this broccoli soup alone would count, I've also added the extra portion of veg with the hidden courgette.

January's Feel Good Food challenge, hosted by A Kick at the Pantry Door, is tasty and inexpensive. You can use vegetables that are a little past their best in this soup, and it's a good way to use up leftover cheese (eg from Christmas) so this is a pretty frugal recipe.


I'm not done yet... January's Cheese Please challenge, hosted by Fromage Homage, is comfort food and winter warmers. Soup is a lovely winter warmer and since I've used stilton I am sending this over.


Simply Food is hosting the event Let's Cook with Green Vegetables, and since it has to be a vegetarian recipe, you'll need to leave out the bacon and check your cheese is vegetarian.


And finally I am sending this to Turquoise Lemons' No Waste Food Challenge as you can use leftover veg and the cheese was hanging around from Christmas.


Saturday, 28 December 2013

Festive Cheese Ball with Nuts and Cranberries


 I recently came across the concept of cheese balls or 'cheese bombs' which are typically served over Christmas in America; they consist of soft cheese and other ingredients shaped into a ball. I thought it would be fun to make one, but it did turn out a lot softer than I expected so I'm not sure if I did something wrong. It was tasty, anyway!

I used this recipe on the Tesco website.

You need:

300g soft cheese
2 cups mature Cheddar, grated
2 tbsp red onion, finely chopped
2 tbsp mango chutney
1 tbsp crushed garlic
1 tsp Worcestershire sauce
1/4 cup dried cranberries
1/2 cup chopped nuts


Mix the soft cheese, Cheddar and red onion in a bowl.


Add the mango chutney, garlic and Worcestershire sauce.


Cover and refrigerate overnight.


In another bowl, mix the chopped nuts and cranberries.


At this point you are supposed to be able to form the cheese mixture into a ball, and roll it in the nuts, but I found it far too wet and sticky. Instead I mixed the nuts and cranberries into the cheese mixture, which made it a little less sticky and a bit easier to form into a ball, but it was still extremely soft.


I wrapped it in two layers of clingfilm.


Finally I wrapped it in greaseproof paper and twisted the top - I got two of these out of this quantity of ingredients. It didn't turn out quite as I expected and isn't really something you could give as a gift but it would make a nice starter or addition to the buffet on either Boxing Day or New Year's Eve. You can spread it on crackers or eat with bread sticks.


I am sending this to Feel Good Food, a monthly blogging challenge hosted by Victoria at A Kick at the Pantry Door and guest hosted this month by JibberJabber.The ingredient she has chosen is cranberries.

I am also sharing this with Cheese Please, hosted by Fromage Homage, as the challenge is to make a festive cheese snack.


Thursday, 26 December 2013

Blue Cheese, Parmesan and Green Olive Bread Sticks


My mum asked me to make a starter for Christmas dinner and I was faced with a problem. Between the six people who would be there, dislikes included: salmon, prawns, pate, salad.... I decided I would be safe with cheese. I also knew it had to be something I could prepare the day before and transport down to my parents, and that my mum wouldn't have a lot of space in her kitchen for preparation or oven for cooking. So the easiest thing, and something I thought we would all enjoy, was baked camembert. You simply buy a whole round camembert (or two, in this case), and put them in the oven for about ten minutes for them to melt. Then you dip bread or veggies into the cheese and enjoy. You could do these if you are having people over on new year's eve, though they are good at any time!

I did want to make something though so I decided to do homemade bread sticks. I'd never made them before, and hardly ever make bread, so I was pleasantly surprised to see how easy these were, and how well they turned out.

I used this recipe from BBC Food but adapted it slightly.

To serve about 8, you need:
one 7g packet dried yeast
1 tsp sugar
500g strong white bread flour,. plus extra for the worktop
2 tbsp olive oil
1 tsp salt
5 tbsp grated parmesan
2 tbsp blue cheese
3 tsp herbes de Provence
2 cloves garlic, crushed
2 tbsp green olives from a jar, chopped
For the rub:
1 egg
2 tsp piri piri seasoning
2 tsp herbes de provence
50g grated parmesan

Add the yeast and sugar to 280ml warm water in a large bowl. Add 75g of the flour, whisk and leave for ten minutes for the yeast to activate.


Add the oil, remaining flour, parmesan and blue cheese, herbes de Provence and garlic and mix well to form a dough.

Chop the olives then add to the mixture and combine


Knead for about 5 minutes then cover the bowl with cling film and leave for half an hour.


Preheat the oven to 190C. Mix the parmesan, herbes de Provence and piri piri seasoning for the rub in a small bowl.


Roll out the dough to a long rectangle and brush with beaten egg yolk, then sprinkle over the rub. You only need to do this on one side.


Use a pizza cutter or a sharp knife to cut strips of the dough. Gently twist each one, and stretch a little as you do so, and place on a lined baking sheet.


Bake for about 12 minutes until golden brown.


I did these in three batches and by the end had a pile of 16 bread sticks. They were quite large - both longer and thicker than the ones you buy in the shops - so I think you would only need 2 per person.


Here are the breadsticks ready to dip into the baked camembert:


I'm sending this to Four Seasons Food, the blogging challenge hosted by Anneli at Delicieux and Louisa at Eat Your Veg as their theme this month is festive party food.


I am also sending this to Cheese Please, hosted by Fromage Homage, as the challenge this month is to make festive nibbles using cheese. These bread sticks contain two types of cheese and are designed to be dunked into cheese, so you can't get more cheesy than that!